
Configure AI Call Transcription with Amazon Service
Cloud Voice can turn a live conversation into text as it happens by handing the call audio to Amazon Transcribe. This page shows you how to link Cloud Voice to your own Amazon Transcribe account, and, if you want, to an OpenAI or Google large language model (LLM) so a written summary is produced once each call ends.
Requirements
Section titled “Requirements”Before you start, confirm your system meets both of these:
| Item | Requirement |
|---|---|
| Firmware | Version 84.23.0.83 or later. |
| Subscription | An active Enterprise Plan or Ultimate Plan, which is what makes the AI Transcription feature available. |
Prerequisites
Section titled “Prerequisites”Network access
Cloud Voice must be able to reach the service domains it depends on:
- Amazon Transcribe:
transcribestreaming.<region>.amazonaws.com- Pick an AWS (Amazon Web Services) Region that supports batch transcription and substitute it for
<region>(for example,transcribe.me-south-1.amazonaws.com). Choosing the Region closest to where your system is deployed keeps latency down and transcription stable; the Amazon Transcribe documentation lists the Regions that are supported. - To confirm the domain answers on TCP port 443, open an SSH session to your server and run
nc -vz <domain> 443.
- Pick an AWS (Amazon Web Services) Region that supports batch transcription and substitute it for
- GPT LLM (OpenAI):
api.openai.com - Gemini LLM (Google):
oauth2.googleapis.comandgenerativelanguage.googleapis.com
Service accounts and credentials
Have the following ready before you begin:
- Amazon Transcribe: an Amazon account that holds enough transcription-minute quota (note its account ID), plus an IAM (Identity and Access Management) user allowed to manage its own access keys (note the username and password).
- GPT/Gemini LLM (optional), an OpenAI account for GPT, or a Google account for Gemini, each with enough token quota, along with the sign-in credentials.
Overview
Section titled “Overview”Setting this up takes three steps:
- Create an access key for Amazon Transcribe.
- (Optional) Create an API (application programming interface) key for a GPT or Gemini LLM.
- Configure AI call transcription in Cloud Voice.
Step 1. Create an access key for Amazon Transcribe
Section titled “Step 1. Create an access key for Amazon Transcribe”So the phone system can authenticate its requests to Amazon Transcribe, generate an access key in the Amazon Management Console first.
-
Sign in to the Amazon Management Console with your Amazon account ID and your IAM username and password.
-
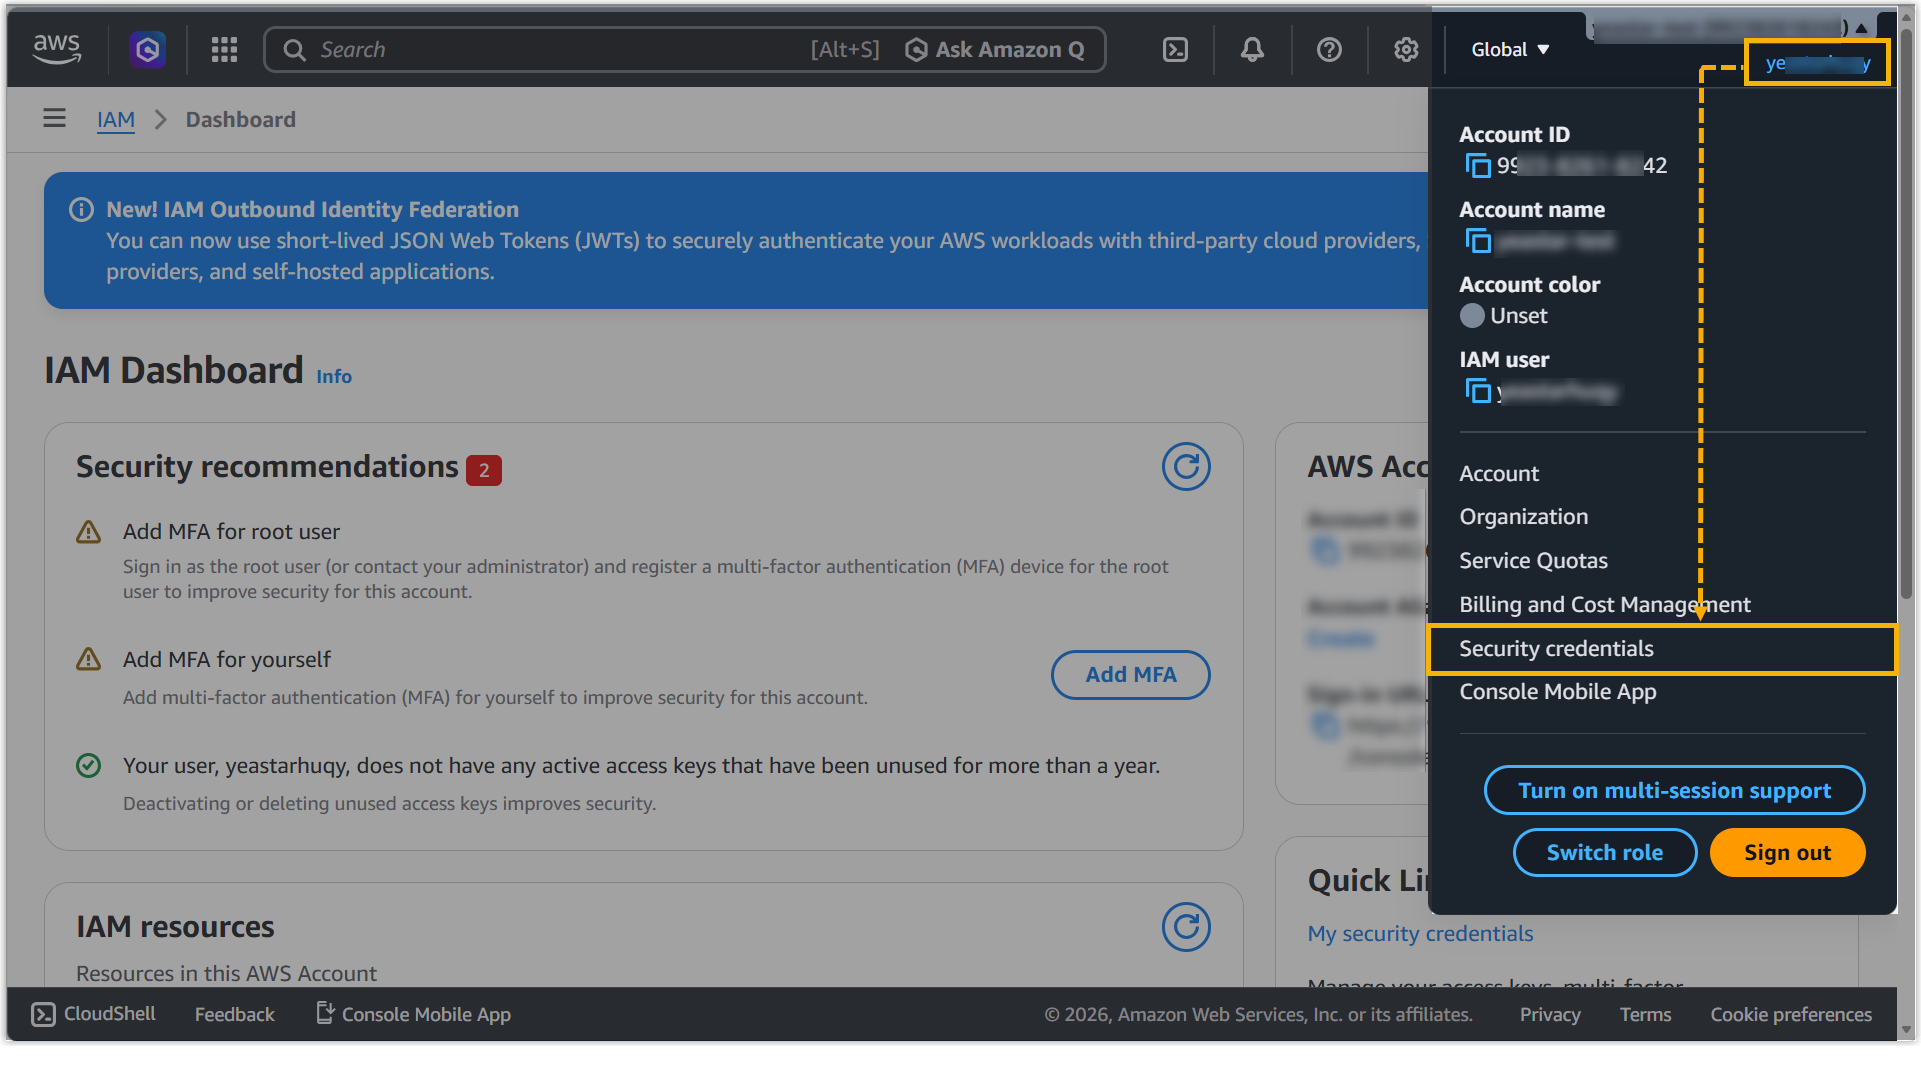
Open the account menu in the top-right corner and choose Security credentials.
-
On the My security credentials page, scroll to the Access keys section and click Create access key.
-
Create the access key:
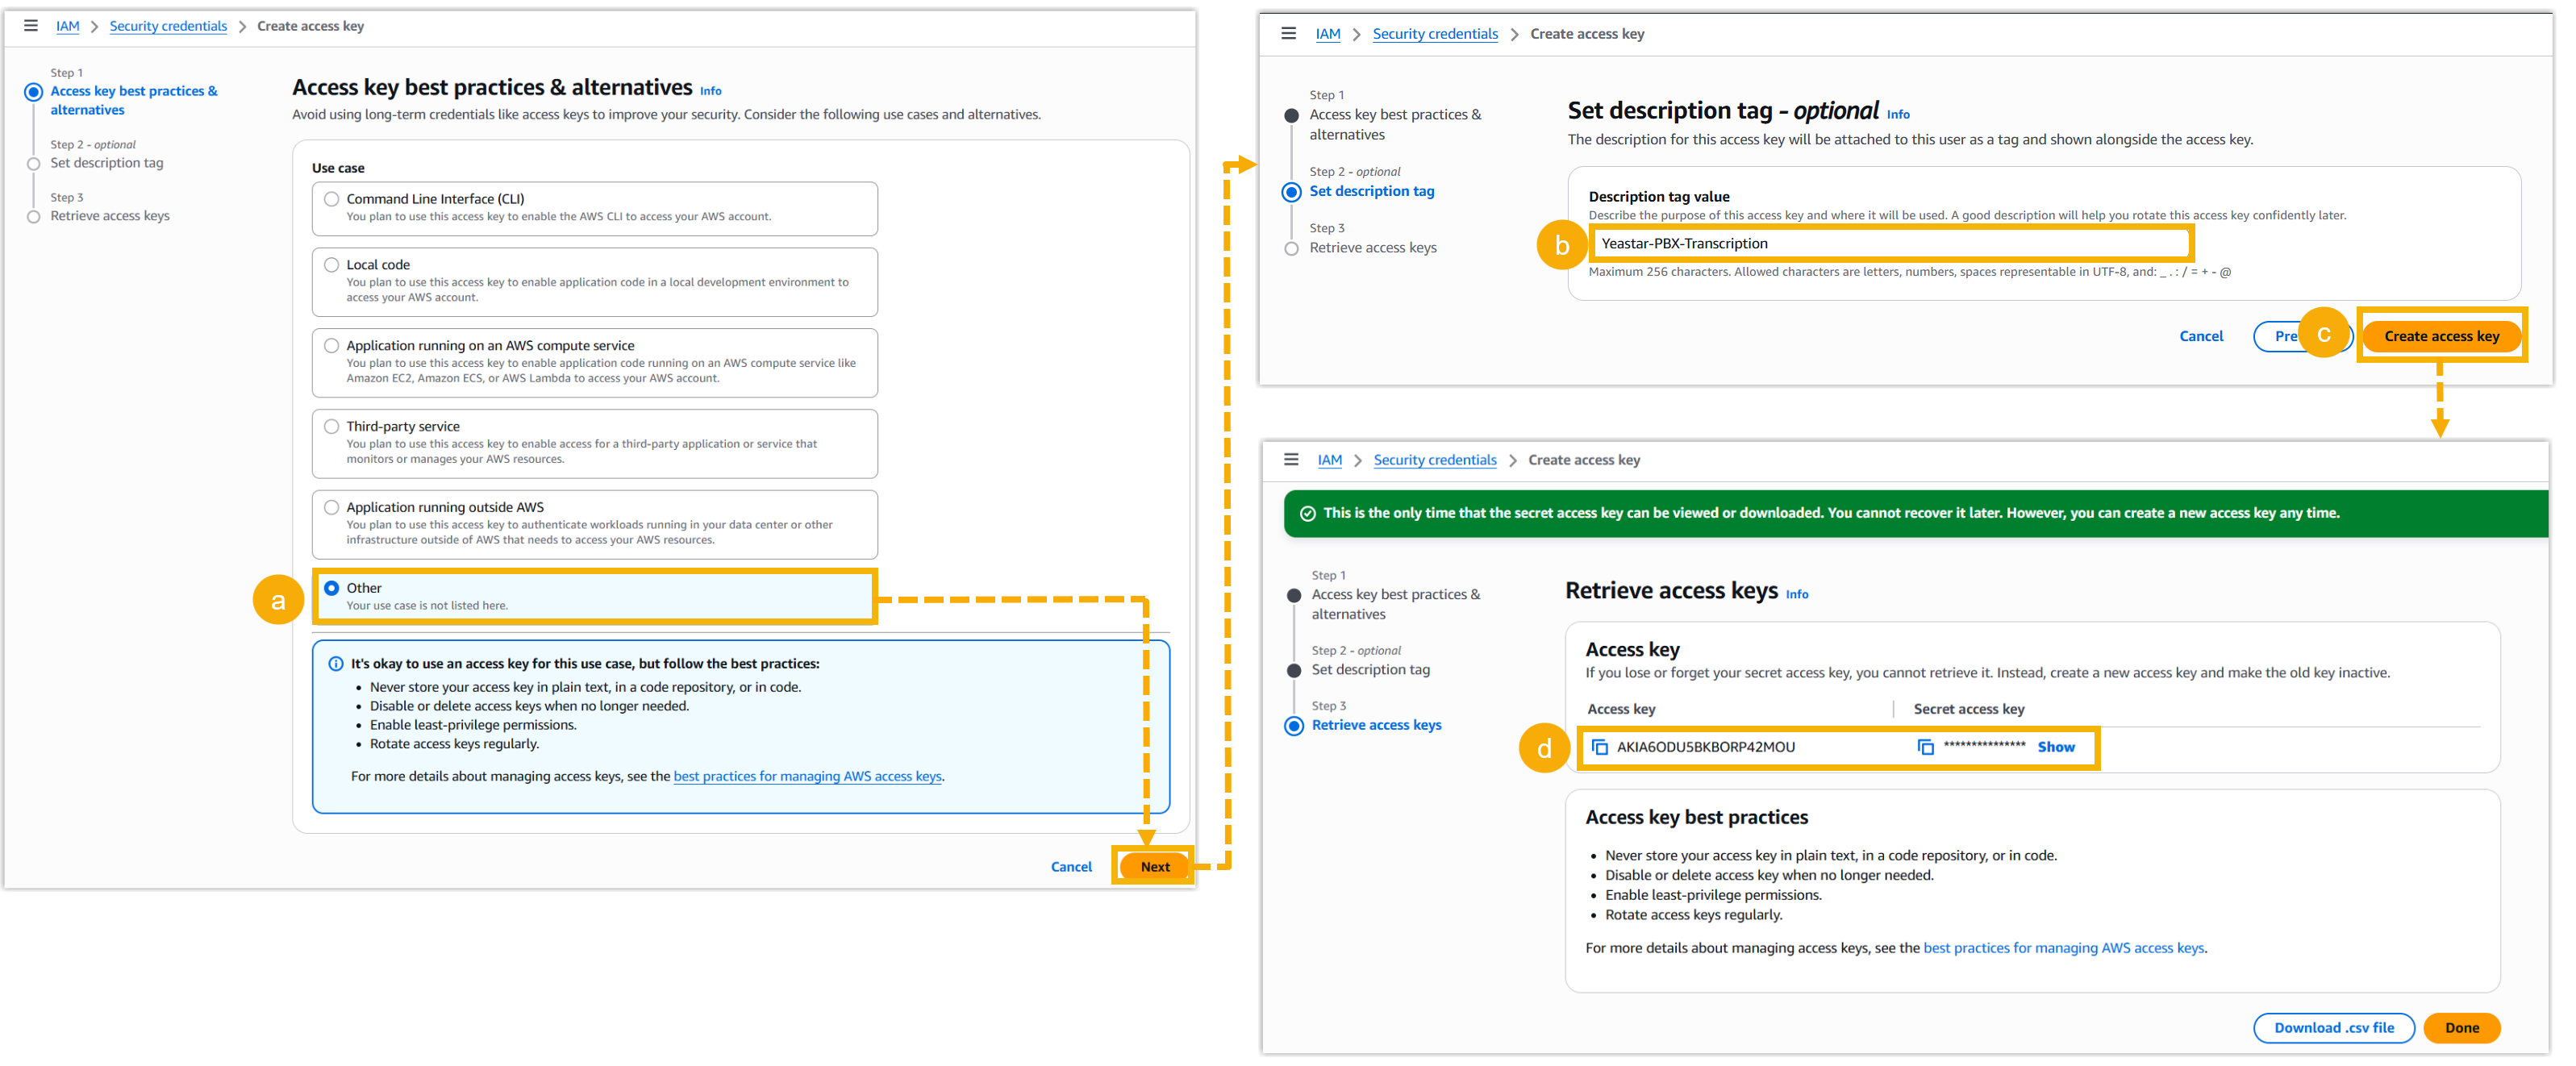
- Under Use case, select Other, then click Next.
- (Optional) In the Description tag value field, add a note that will help you recognize the key later.
- Click Create access key. AWS generates the key.
- In the Access key section, use the copy icon next to Access key and Secret access key to copy both values, and save them somewhere safe for later.
Step 2. (Optional) Create an API key for a GPT or Gemini LLM
Section titled “Step 2. (Optional) Create an API key for a GPT or Gemini LLM”If you want the phone system to summarize calls from their transcripts, it calls a GPT or Gemini LLM, and that call needs its own API key. Follow the section that matches the model you plan to use.
Create an OpenAI API key (OpenAI Platform)
Section titled “Create an OpenAI API key (OpenAI Platform)”-
Sign in to the OpenAI Platform with your OpenAI credentials and open API Keys.
-
Above the key list, click Create new secret key.
-
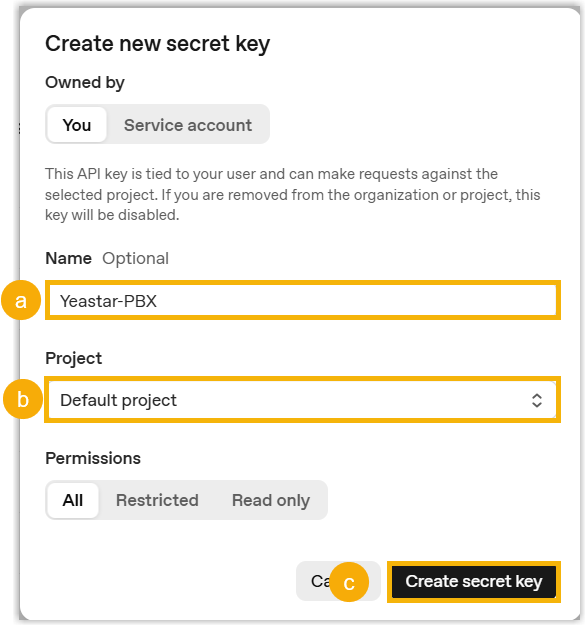
In the dialog, fill in the new key:
-
In Name, enter something that identifies the key.
-
In the Project drop-down, choose the project you want.
-
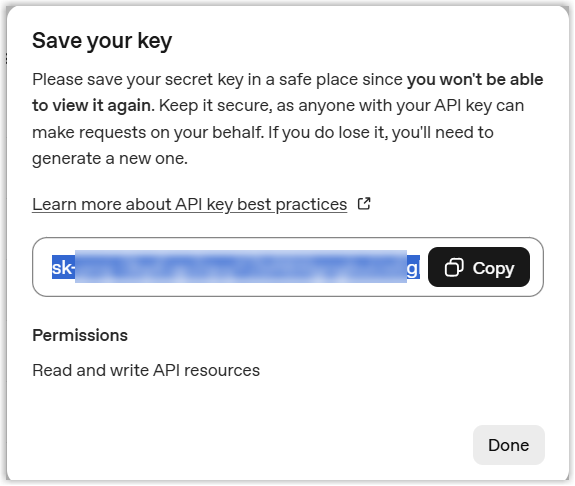
Leave the permission set to the default All, then click Create secret key. The generated key appears.
-
Click Copy and save the key for later.
-
Create a Gemini API key (Google AI Studio)
Section titled “Create a Gemini API key (Google AI Studio)”-
Sign in to Google AI Studio with your Google credentials and open Dashboard > API keys.
-
Above the key list, click Create API key.
-
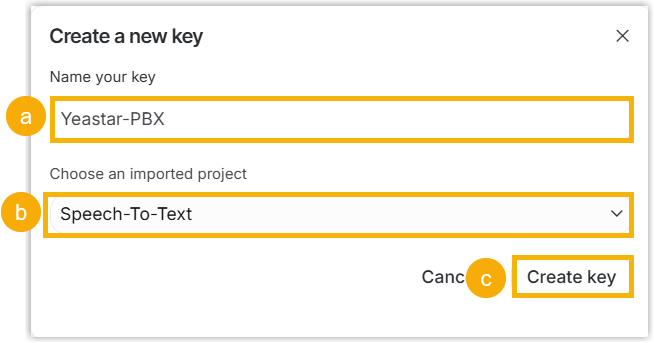
In the dialog, fill in the new key:
-
In Name your key, enter a name that identifies the key.
-
In the Choose an imported project drop-down, pick a project.
-
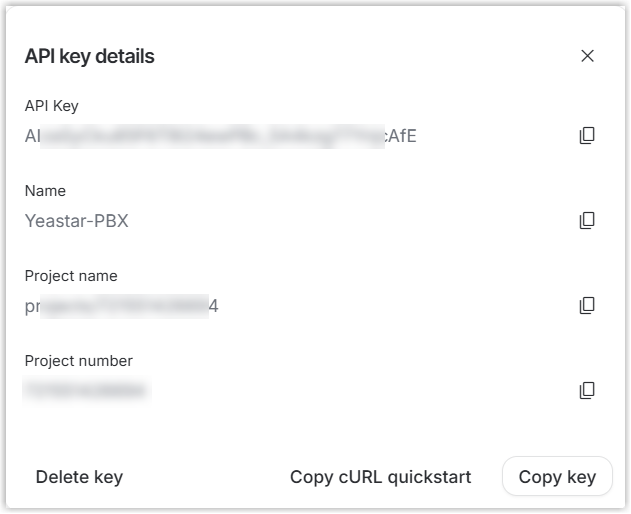
Click Create key. The details of the new key appear.
-
Click Copy key and save the key for later.
-
Step 3. Configure AI call transcription in Cloud Voice
Section titled “Step 3. Configure AI call transcription in Cloud Voice”With the credentials for Amazon Transcribe (and, optionally, your LLM) in hand, enter them in the phone system so it can connect to both services.
-
Sign in to the phone system web portal and open AI > AI Toolbox.
-
Turn on the Call Transcription switch.
-
Set up the transcription service:
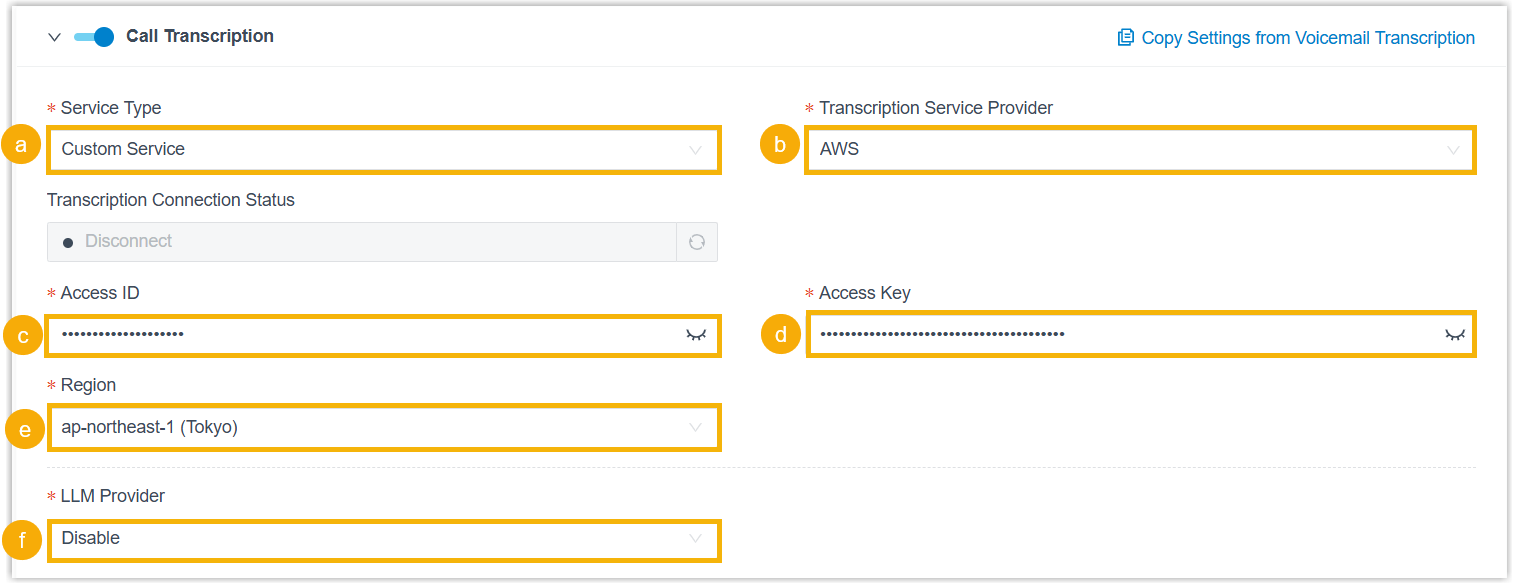
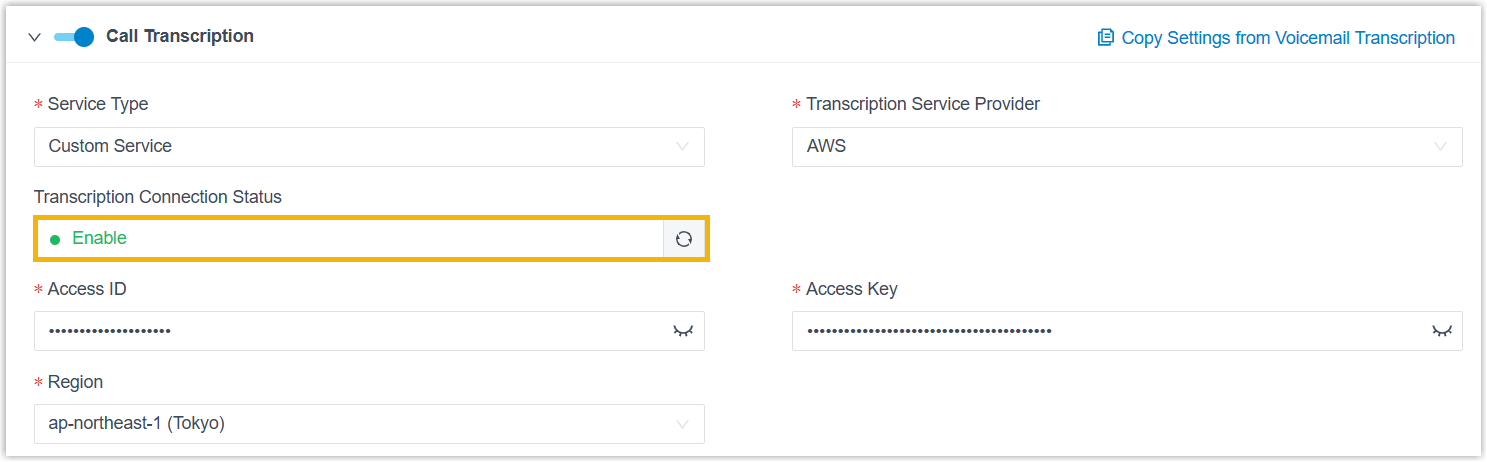
- In the Service Type drop-down, select Custom Service.
- In the Transcription Service Provider drop-down, select AWS.
- In Access ID, paste the access key you copied from the Amazon Management Console.
- In Access Key, paste the secret access key you copied from the Amazon Management Console.
- In the Region drop-down, select the Region you want.
- Set up the LLM service based on whether you want call summaries:
-
No summaries: set the LLM Provider drop-down to Disable.
-
OpenAI (GPT): set the LLM Provider drop-down to OpenAI, paste the API key you created on the OpenAI Platform into API key, and enter your chosen model’s ID in GPT Model. Check the OpenAI model list for the exact ID; for example, to use GPT-5.4, enter
gpt-5.4.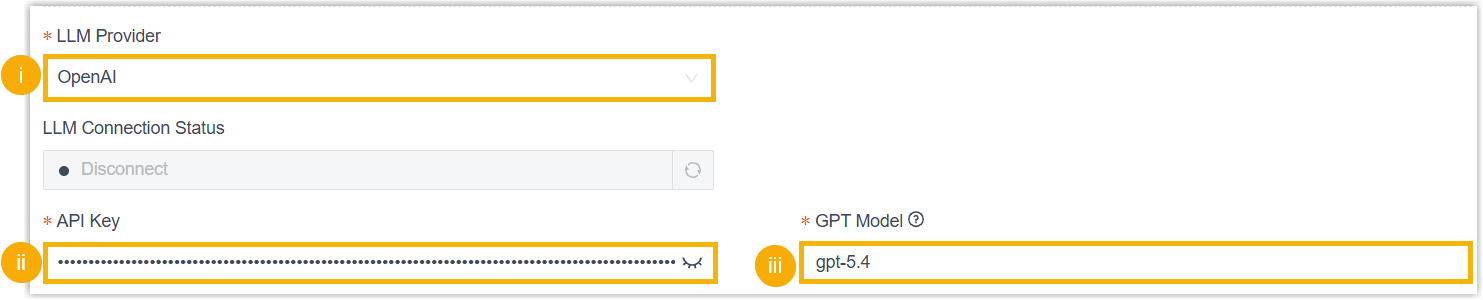
-
Google (Gemini): set the LLM Provider drop-down to Google, paste the API key you created in Google AI Studio into API key, and enter your chosen model’s code in Gemini Model. Check the Gemini model list for the exact code; for example, to use Gemini 3.1 Pro Preview, enter
gemini-3.1-pro-preview.
-
-
In the Language drop-down, choose the language the system should detect and transcribe in the call audio.
-
Under Extension Scope for This Feature, decide who can use call transcription:
- All Extensions: every extension can use the feature.
- Specific Extensions: only the extensions, extension groups, or departments you select can use it.
-
Click Save.
Result
Section titled “Result”-
Transcription Connection Status shows Enable, which means AI call transcription through Amazon Transcribe is live. From here on, two-party call audio is detected and converted to readable text in your chosen language in real time.
-
If you configured an LLM, LLM Connection Status also shows Enable, confirming the phone system reached your model. Cloud Voice will now generate a summary from each transcript once the call ends.

Question about this page?
Ask the AI assistant. It starts from this page, then searches the rest of the docs.
Ask Cloud Voice AI
Answers are AI-generated from the docs and may contain mistakes. Verify with the linked pages.