
Cloud Voice PBX Onboarding Troubleshooting Guide
Setting up a new phone system occasionally hits a snag. This guide walks through the problems customers most often run into while onboarding Cloud Voice, explains what tends to cause each one, and gives you the steps to get back on track. “PBX” (Private Branch Exchange) is the phone system that routes calls for your organization.
Each section follows the same shape: what you see, why it happens, and how to fix it. Work through the section that matches your symptom.
Activation email not received
Section titled “Activation email not received”What you see: After you purchase Cloud Voice, an activation email is sent with everything you need to stand up your PBX. That message never arrives in your inbox.
Why it happens: Your mail provider most likely filtered the message into a spam or junk folder before you saw it.
How to fix it: Open your spam or junk folder and look for the activation message that contains your setup details. If you find it there, mark it as trusted so future notifications land in your inbox.
Activation URL not working
Section titled “Activation URL not working”What you see: You click the activation link, but the activation page fails to load or spins indefinitely.
Why it happens: The browser you opened the link in isn’t fully compatible with the activation page. A URL (Uniform Resource Locator) is simply the web address you were given.
How to fix it: Open the activation URL in Google Chrome.
Auto provisioning over RPS fails
Section titled “Auto provisioning over RPS fails”Auto provisioning pushes the correct configuration to an IP phone (a desk phone that connects over your network) automatically, so you don’t have to program each phone by hand. RPS (Redirection and Provisioning Service) is the cloud redirection step that makes remote provisioning possible: when a supported phone starts up, it checks in with RPS, which points the phone to your Cloud Voice provisioning link so the phone can pull its settings.
What you see: A remote auto provisioning attempt for one or more IP phones over RPS does not complete.
There are a few common reasons this fails. Work through each one below.
The phone is already provisioned by another PBX
Section titled “The phone is already provisioned by another PBX”An IP phone can only be tied to one provisioning list at a time. Remove the phone from the provisioning list on the other PBX first, then run auto provisioning over RPS again from Cloud Voice.
The provisioning server URL doesn’t match
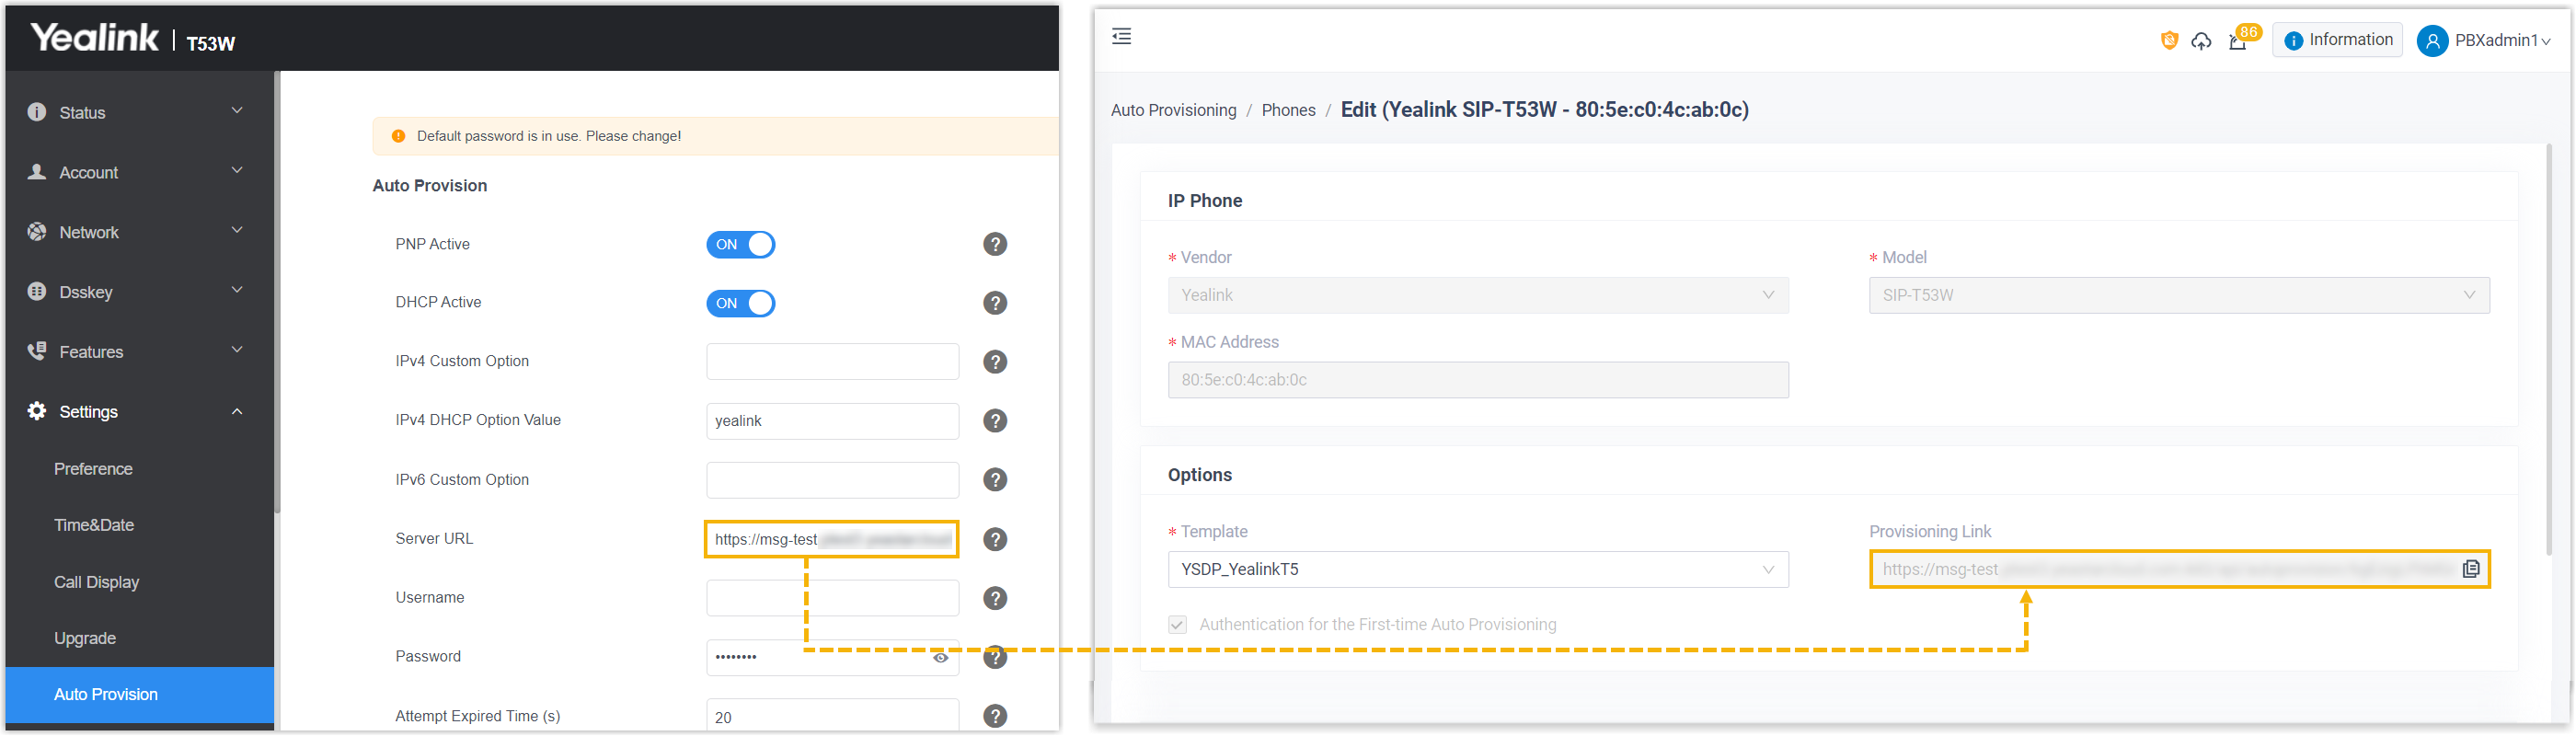
Section titled “The provisioning server URL doesn’t match”The provisioning server URL saved on the phone must be identical to the provisioning link Cloud Voice generated for that phone in the web portal. Compare the two values and correct the phone so they match exactly.
No certificate is uploaded, or the certificate has expired
Section titled “No certificate is uploaded, or the certificate has expired”If the PBX has no certificate, or its certificate has lapsed, the phone can reject the connection. A certificate is the digital identity a server presents to prove it is genuine. Upgrade the phone to its latest firmware, or turn off certificate verification on the phone.
If provisioning still fails after all of the above, contact IZT Cloud Voice support for help.
Trunk registration fails
Section titled “Trunk registration fails”A SIP (Session Initiation Protocol) trunk is the virtual line that connects Cloud Voice to your service provider and carries calls over the internet. SIP is the signaling protocol that sets up and ends voice calls.
What you see: You create a SIP register or SIP peer trunk to connect Cloud Voice to your service provider, and the trunk fails to register.
The cause depends on the trunk type. With a register trunk, your PBX logs in to the provider to stay reachable. With a peer trunk, the two sides trust each other by IP address and no login takes place.
SIP register trunk
Section titled “SIP register trunk”This usually points to a proxy server setting. A proxy server is the provider server that relays your SIP traffic. Some providers spread traffic across multiple proxy servers for load balancing (sharing traffic) or failover (switching to a backup), and publish NAPTR-SRV records for their domain. NAPTR (Naming Authority Pointer) records, combined with SRV records, let a domain advertise several servers and transport options through DNS (Domain Name System, the internet’s address book). When that’s the case, switch the trunk’s transport to DNS-NAPTR so the PBX looks up and resolves the correct server:
-
In the PBX web portal, go to Extension and Trunk > Trunk.
-
Click the edit icon (
 ) next to the SIP register trunk you want to change.
 -
Open the Transport drop-down list and choose DNS-NAPTR. (Transport is how SIP messages travel between the PBX and the provider.)

-
Click Save, then Apply.
SIP peer trunk
Section titled “SIP peer trunk”This also tends to be a proxy server issue. Some providers require a dedicated, fixed public IP address to accept a trunk, but your PBX instance may share a proxy server with other instances. Contact IZT Cloud Voice support to have a dedicated proxy server provisioned for you.
Inbound calls aren’t routed
Section titled “Inbound calls aren’t routed”What you see: Inbound calls arriving on your SIP trunk should follow the inbound route to its destination, but they don’t route the way you expect.
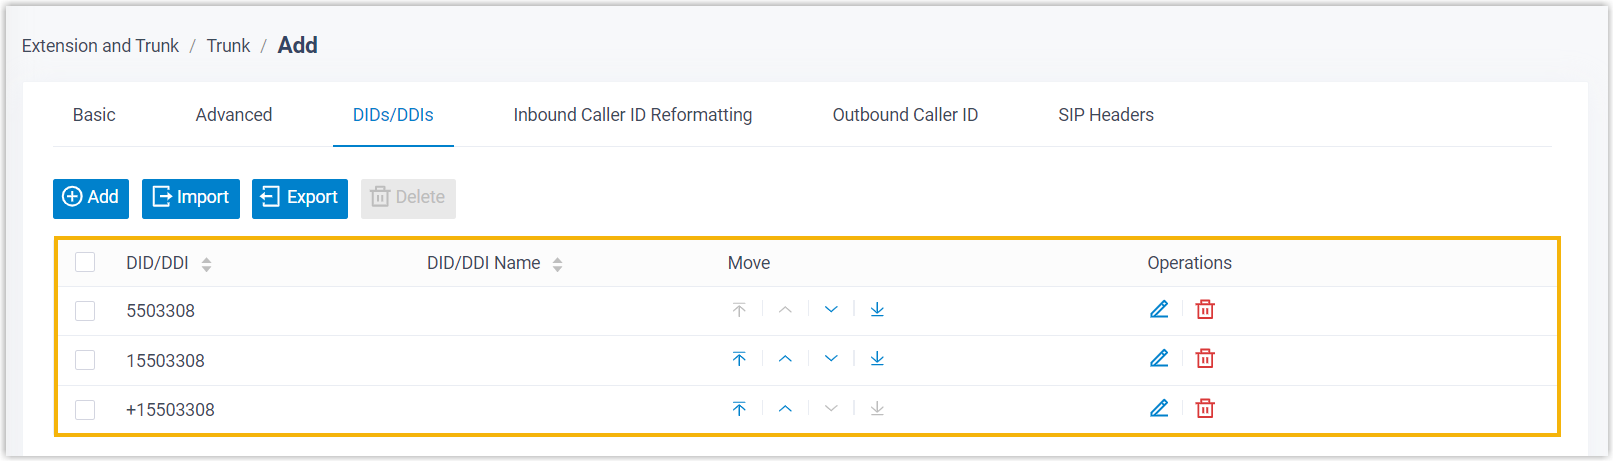
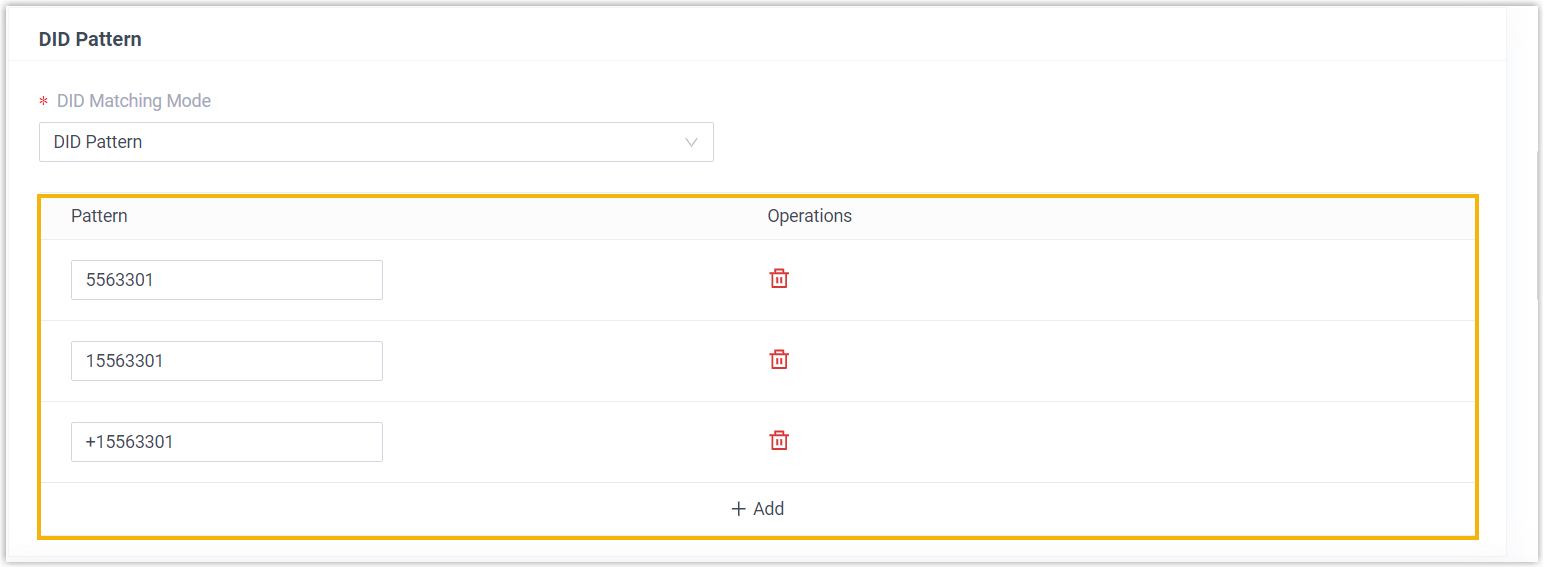
Why it happens: The DID on the SIP trunk or inbound route isn’t configured to cover every number your provider might send. A DID (Direct Inward Dialing, also called DDI or Direct Dial-In in some regions) is the specific phone number the caller dialed to reach you. When you route inbound calls by DID, only calls whose number matches a defined DID pattern reach the destination. Providers differ in what they send: some pass the originally dialed number, others prepend a country code. If your patterns don’t account for every format, some calls slip through.
How to fix it: Add all of the DID patterns your provider might present, on the SIP trunk, the inbound route, or both.
Add DID patterns on the SIP trunk
-
In the PBX web portal, go to Extension and Trunk > Trunk.
-
Click the edit icon (
) next to the trunk you want to change. -
On the DIDs/DDIs tab, click Add and enter every DID your provider may send.
-
Click Save, then Apply.
Add DID patterns on the inbound route
-
In the PBX web portal, go to Call Control > Inbound Route.
-
Click the edit icon next to the inbound route you want to change.
-
Scroll to the DID Pattern section, click Add, and enter every DID your provider may send.
-
Click Save, then Apply.
Question about this page?
Ask the AI assistant. It starts from this page, then searches the rest of the docs.
Ask Cloud Voice AI
Answers are AI-generated from the docs and may contain mistakes. Verify with the linked pages.