
Synchronize Active Directory Groups to Cloud Voice
Once Cloud Voice is connected to your Active Directory (AD), you can control exactly which AD groups become extension groups on the phone system. This page walks through defining that rule so only the groups you want are brought across.
Before you start
Section titled “Before you start”Your Cloud Voice system must already be integrated with Active Directory over LDAP (Lightweight Directory Access Protocol, the standard way to query a directory service).
Define the group synchronization rule
Section titled “Define the group synchronization rule”-
Sign in to the Cloud Voice management portal and open Integrations > Collaboration.
-
Find the Group Synchronization section and enable its switch.

-
Use the Synchronize for field to choose which AD groups are pulled into Cloud Voice.
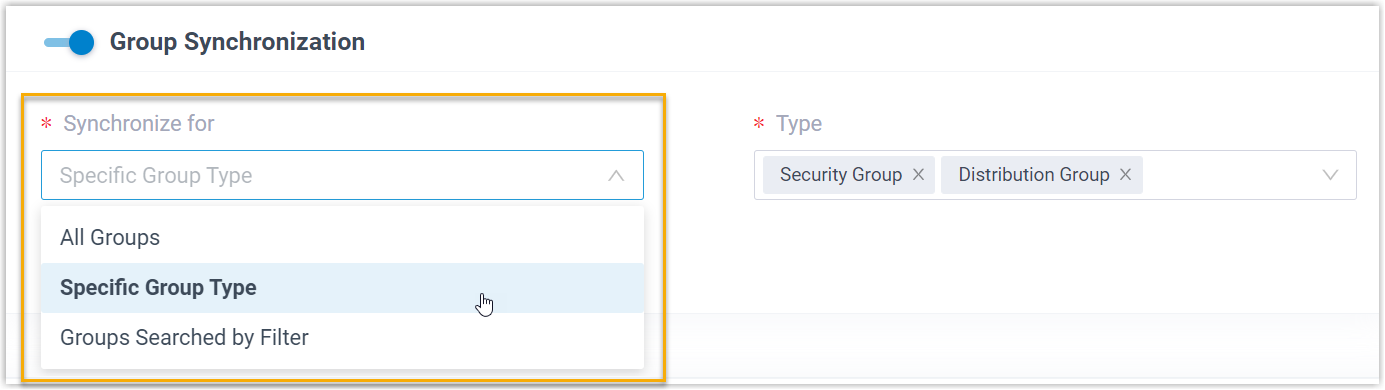
Option What it does All Groups Brings every AD group in the connected directory into Cloud Voice. Specific Group Type Brings only the group type(s) you pick from the Type drop-down list. Choose Security Group to include all AD security groups, Distribution Group to include all AD distribution groups, or both. Groups Searched by Filter Brings only the AD groups that match an LDAP filter. Enter the criteria in the Search Filter for Group field. For example, (&(objectCategory=group)(cn=sales*))matches every group whose name begins with “sales”. -
Click Save.
What happens after synchronization
Section titled “What happens after synchronization”Your custom rule for AD groups is now in place. Each time synchronization runs, Cloud Voice performs LDAP queries against the directory using this rule and imports the matching groups along with any changes made in AD. Once it completes:
-
The outcome is shown in the Group Synchronization section.

-
Extension groups that originate from AD are marked with a
 label and cannot be deleted in Cloud Voice.
 -
You cannot rename these groups or change their membership from Cloud Voice.
Question about this page?
Ask the AI assistant. It starts from this page, then searches the rest of the docs.
Ask Cloud Voice AI
Answers are AI-generated from the docs and may contain mistakes. Verify with the linked pages.