
Connect Two Cloud Voice Systems
You can join two separate Cloud Voice systems so their extensions can reach each other, for example to connect a headquarters site with a branch office. This page walks through the SIP (Session Initiation Protocol) trunk pairing that establishes the link, using each system’s fully qualified domain name (FQDN) to locate the far end. A trunk is simply the signaling path that carries calls between the two systems.
The connection is built from two matched trunks. One system publishes an Account Trunk that acts as the registration host, and the other system points a Register Trunk at that host and signs in. In the example below, the headquarters system hosts the Account Trunk and the branch system registers to it.
| System | What to create |
|---|---|
| Headquarters Cloud Voice | An Account Trunk |
| Branch Cloud Voice | A Register Trunk |
Create the Account Trunk on the headquarters system
Section titled “Create the Account Trunk on the headquarters system”-
Sign in to the PBX (private branch exchange) web portal of the headquarters system and go to Extension and Trunk > Trunk.
-
Click Add to start a new trunk.
-
Under Basic, set the following:

- Name: A label that helps you recognize this trunk.
- Trunk Status: Set to Enabled.
- Select ITSP Template: Choose General.
-
Under Detailed Configuration, define the account the branch system will use to register:

-
Trunk Type: Choose Account Trunk.
-
Transport: Choose UDP (User Datagram Protocol).
-
Username: Set a username for the trunk.
-
Password: Set a password to go with the username.
-
Authentication Name: Set the authentication name the branch system will use when it registers.
-
-
Click Save, then Apply.
Note the username, password, authentication name, and transport you entered here. You will re-enter the same values on the branch system in the next section.
Create the Register Trunk on the branch system
Section titled “Create the Register Trunk on the branch system”-
Sign in to the PBX web portal of the branch system and go to Extension and Trunk > Trunk.
-
Click Add to start a new trunk.
-
Under Basic, set the following:

- Name: A label that helps you recognize this trunk.
- Trunk Status: Set to Enabled.
- Select ITSP Template: Choose General.
-
Under Detailed Configuration, point the trunk at the headquarters system:
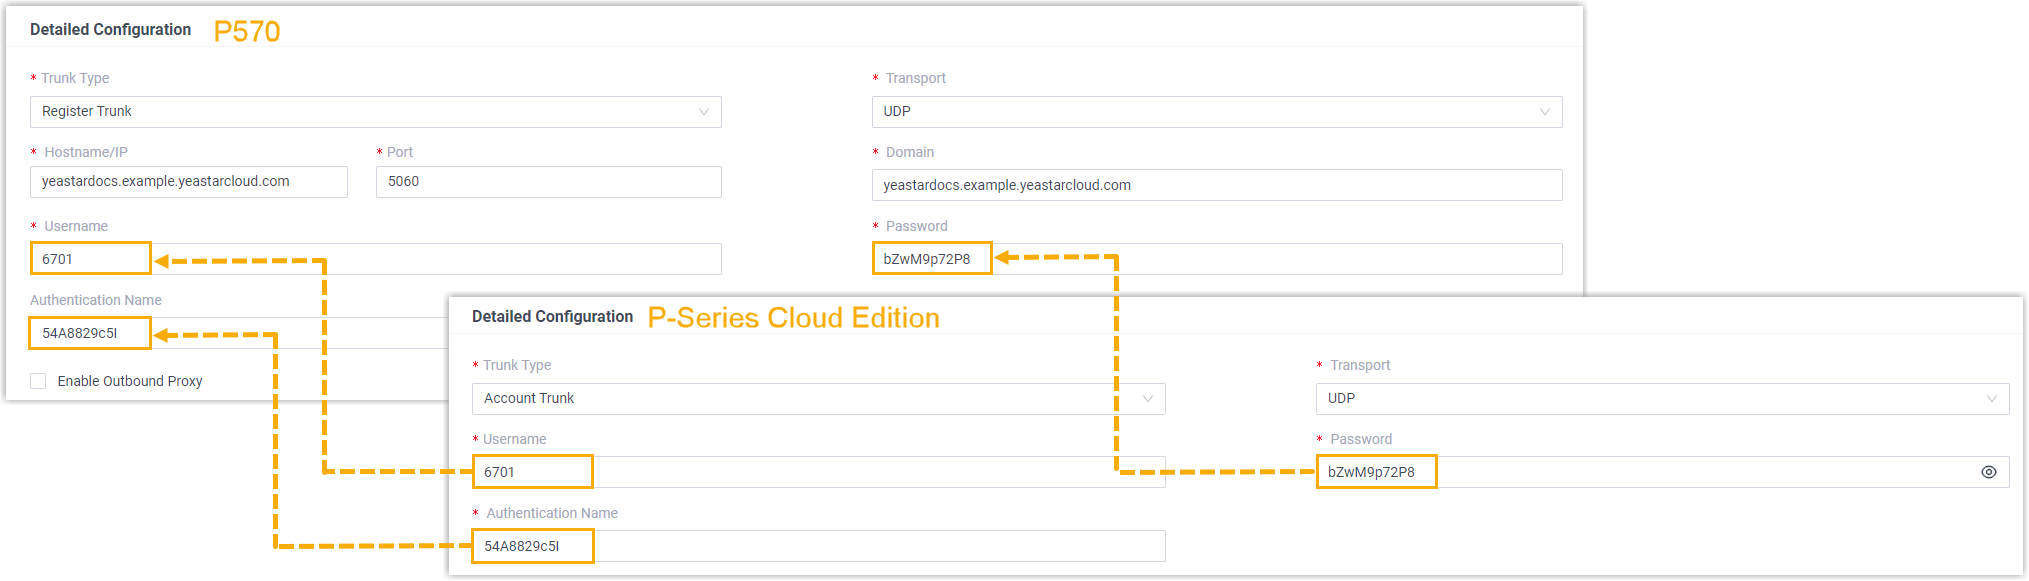
- Trunk Type: Choose Register Trunk.
- Transport: Choose UDP.
- Hostname/IP: The FQDN of the headquarters system, for example
hq.example.com. - Port: The SIP registration port of the headquarters system, typically
5060. - Domain: The FQDN of the headquarters system again, for example
hq.example.com. - Username: The username you set on the headquarters Account Trunk.
- Password: The password you set on the headquarters Account Trunk.
- Authentication Name: The authentication name you set on the headquarters Account Trunk.
-
Click Save, then Apply.
Confirm the connection
Section titled “Confirm the connection”Once both trunks are applied, check that they have come up on each system. A healthy trunk shows a green status indicator ( ).
).
-
On the headquarters portal, go to Extension and Trunk > Trunk and review the Account Trunk’s status.

-
On the branch portal, go to Extension and Trunk > Trunk and review the Register Trunk’s status.

Next steps
Section titled “Next steps”The trunk only carries the link between the systems. To let extensions place calls across it, add routes on each system:
Question about this page?
Ask the AI assistant. It starts from this page, then searches the rest of the docs.
Ask Cloud Voice AI
Answers are AI-generated from the docs and may contain mistakes. Verify with the linked pages.