
Integrate Cloud Voice with Microsoft Dynamics 365 CRM
Cloud Voice connects to Microsoft Dynamics 365 CRM (customer relationship management) through the Channel Integration Framework (CIF). Once the integration is in place, Cloud Voice appears as a plugin inside the Dynamics 365 interface, so your users can manage calls and keep working on their CRM records in the same window instead of moving back and forth between two applications. This page walks an administrator through the full setup.
Before you start
Section titled “Before you start”Make sure the following are in place on each side of the integration.
| Platform | Requirement |
|---|---|
| PBX | Firmware 84.19.0.22 or later. |
| Microsoft 365 | License: an active subscription to one of Microsoft 365 Business Basic, Business Standard, Business Premium, or Microsoft 365 Apps for Business. Service: your organization runs Microsoft Dynamics 365 Sales as its CRM. Account: the Microsoft account you use for setup holds the Global Administrator role and a valid Microsoft 365 commercial license. |
| Browser | For best results, set up and use the integration in Microsoft Edge, Google Chrome, or Opera. |
Add Cloud Voice as a channel provider
Section titled “Add Cloud Voice as a channel provider”You register Cloud Voice in Dynamics 365 by adding it as a channel provider through the Channel Integration Framework. This is what lets the PBX (private branch exchange, the phone system) run as an embedded plugin inside the CRM.
-
Sign in to your Dynamics 365 instance (for example,
https://{{your-organization}}.crm.dynamics.com) using the administrator account. -
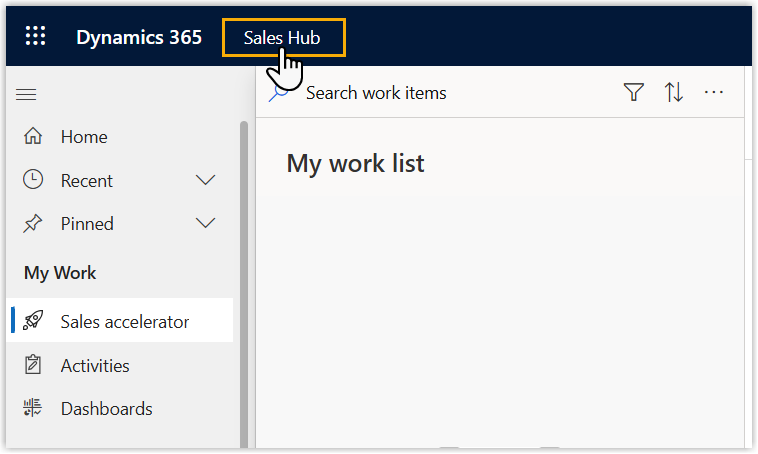
Select the current app name at the top of the page.
-
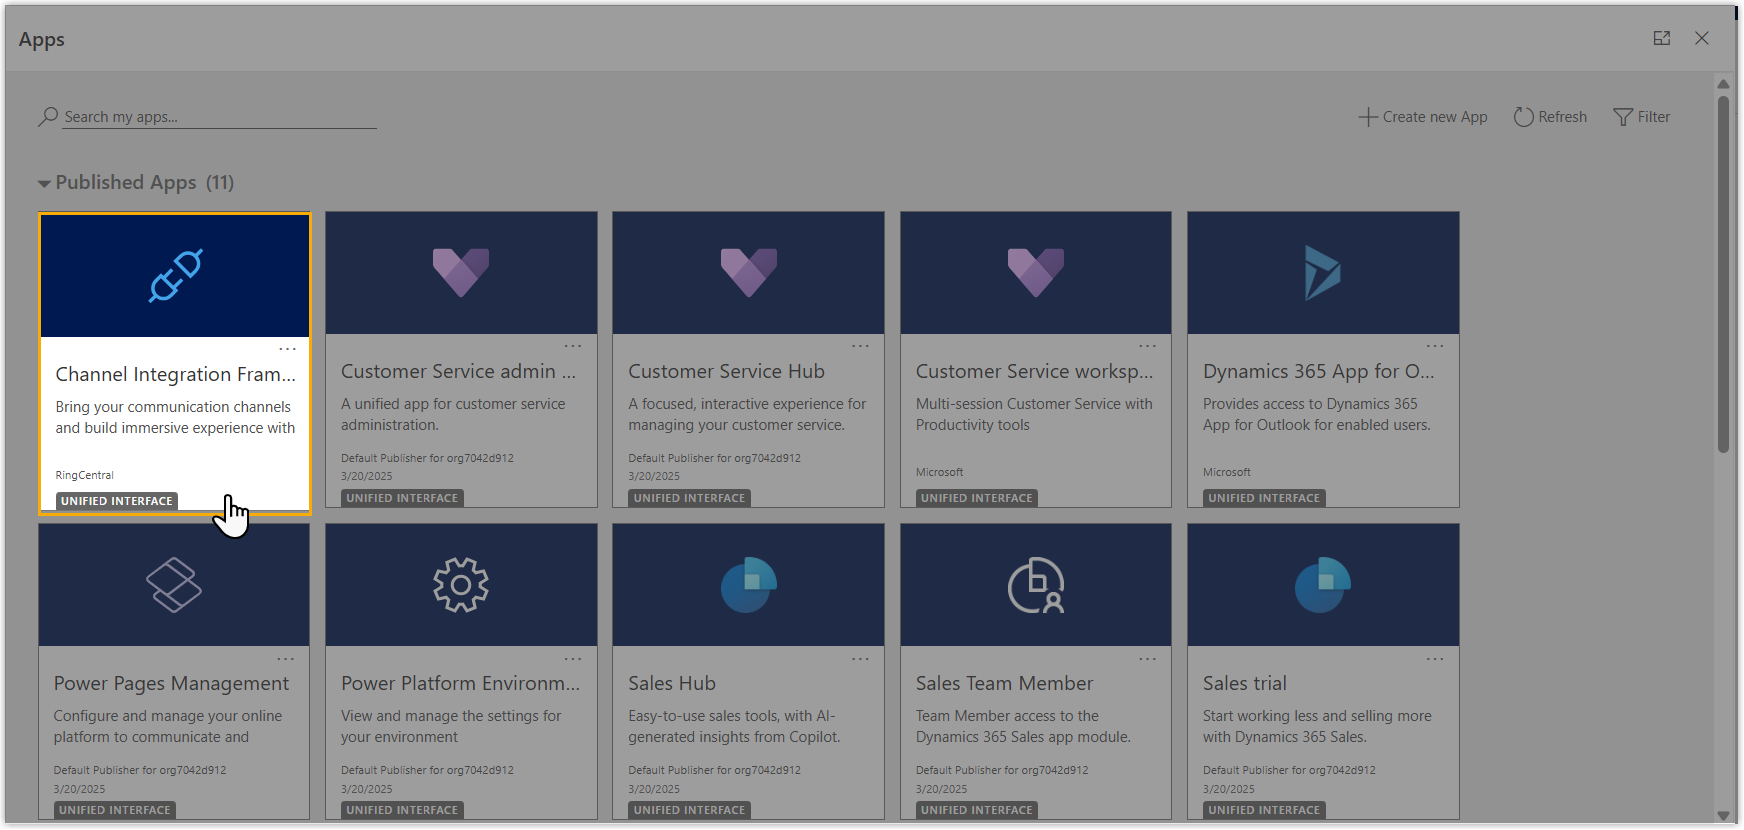
On the Apps page, find and open Channel Integration Framework. Dynamics 365 opens the Channel Integration Framework app.
-
On the toolbar, select New to start a new channel provider.

-
On the Channel Provider Configuration tab, fill in the settings below.
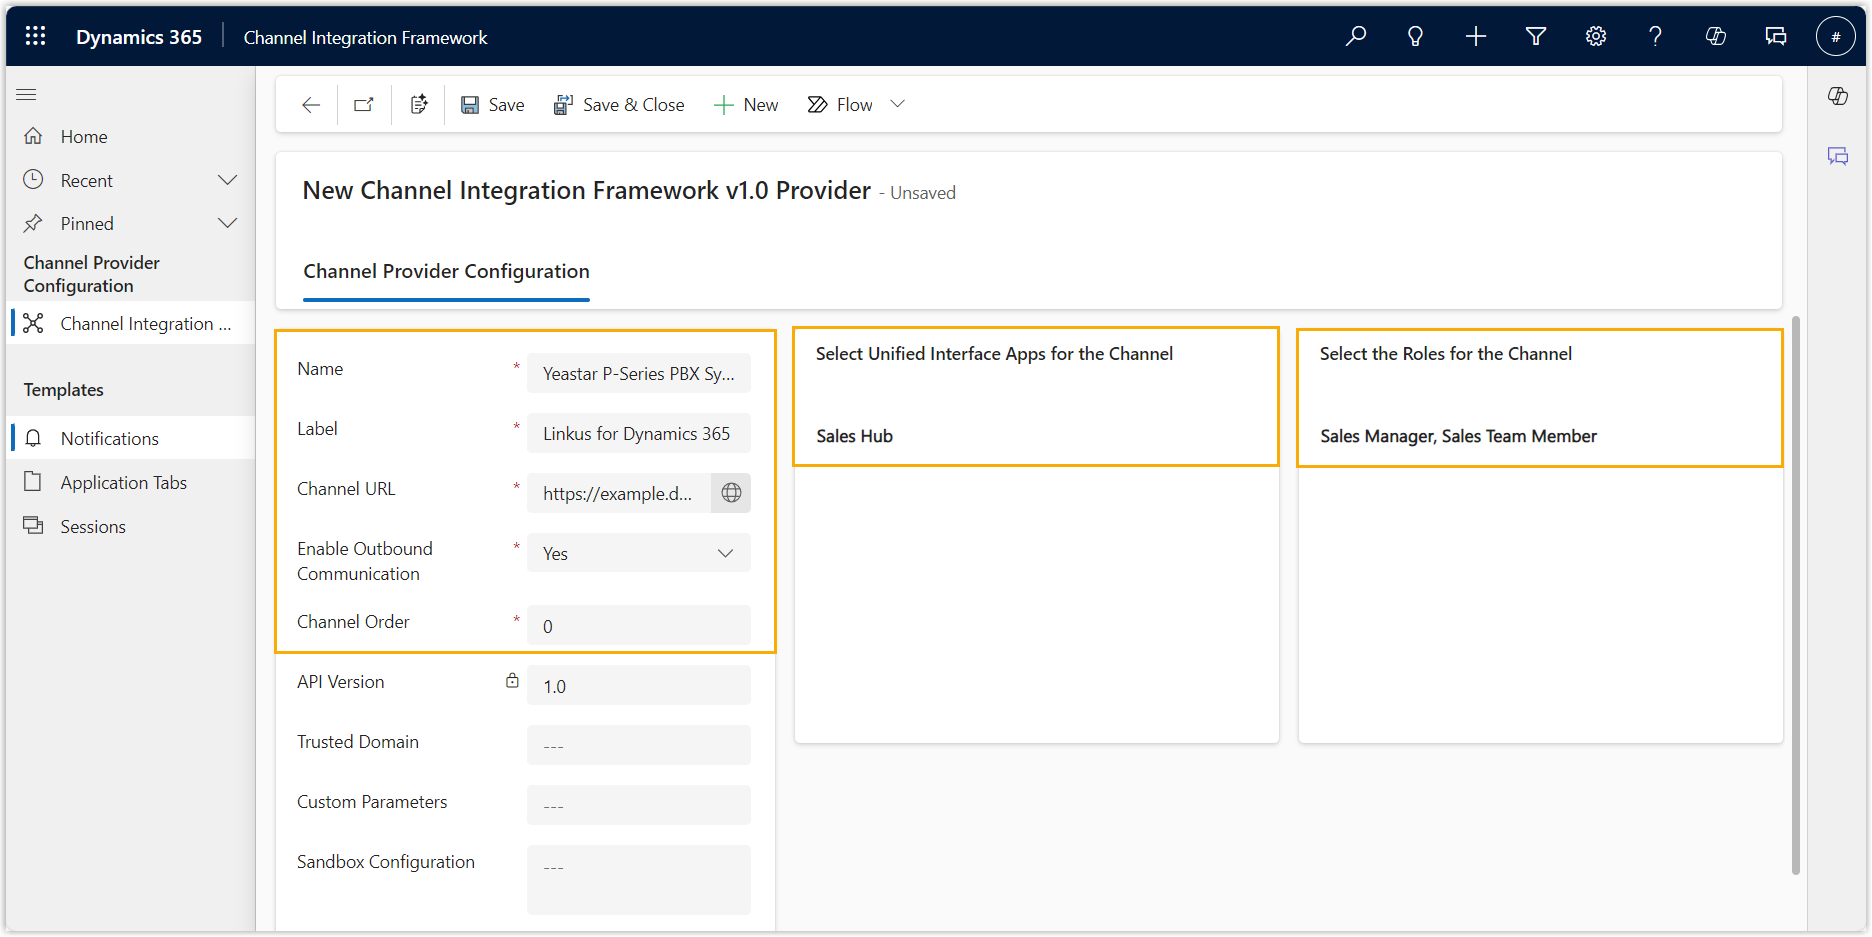
Setting What to enter Name An internal name that helps you recognize the channel, such as Cloud Voice PBX System.Label The name shown to users for the channel, such as Cloud Voice App for Dynamics 365.Channel URL The address that links Cloud Voice to Dynamics 365 (see the format below). Enable Outbound Communication Set to Yes so users can dial out from Dynamics 365 through the channel. Channel Order The position of this channel in the channel list. Select Unified Interface Apps for the Channel Search for and choose Sales Hub to make the channel available in the Dynamics 365 interface. Select the Roles for the Channel The user role(s) permitted to use the channel. Build the Channel URL in this format:
https://{{PBX_domain}}/dyncrm?base={{CRM_base_url}}{{PBX_domain}}: the domain name of your PBX.{{CRM_base_url}}: the URL of your Dynamics 365 instance.
For example, given the PBX domain and Dynamics 365 instance URL shown here:
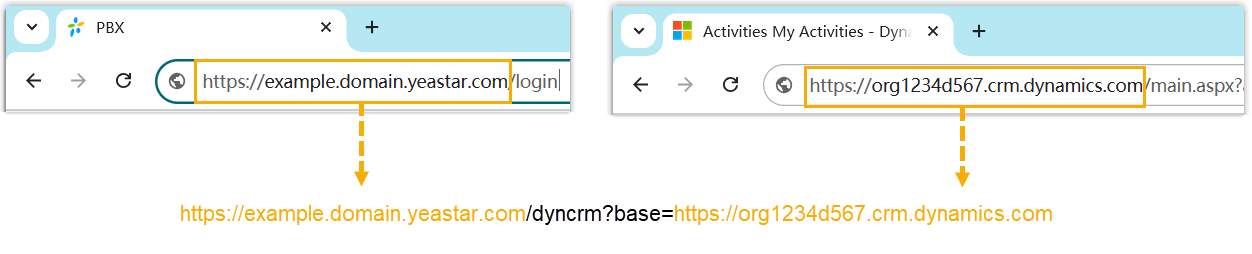
the Channel URL would be:
https://example.cloudvoice-domain.com/dyncrm?base=https://org1234d567.crm.dynamics.com -
At the top of the page, select Save & Close. The new channel appears in the channel providers list.
-
Activate the channel.
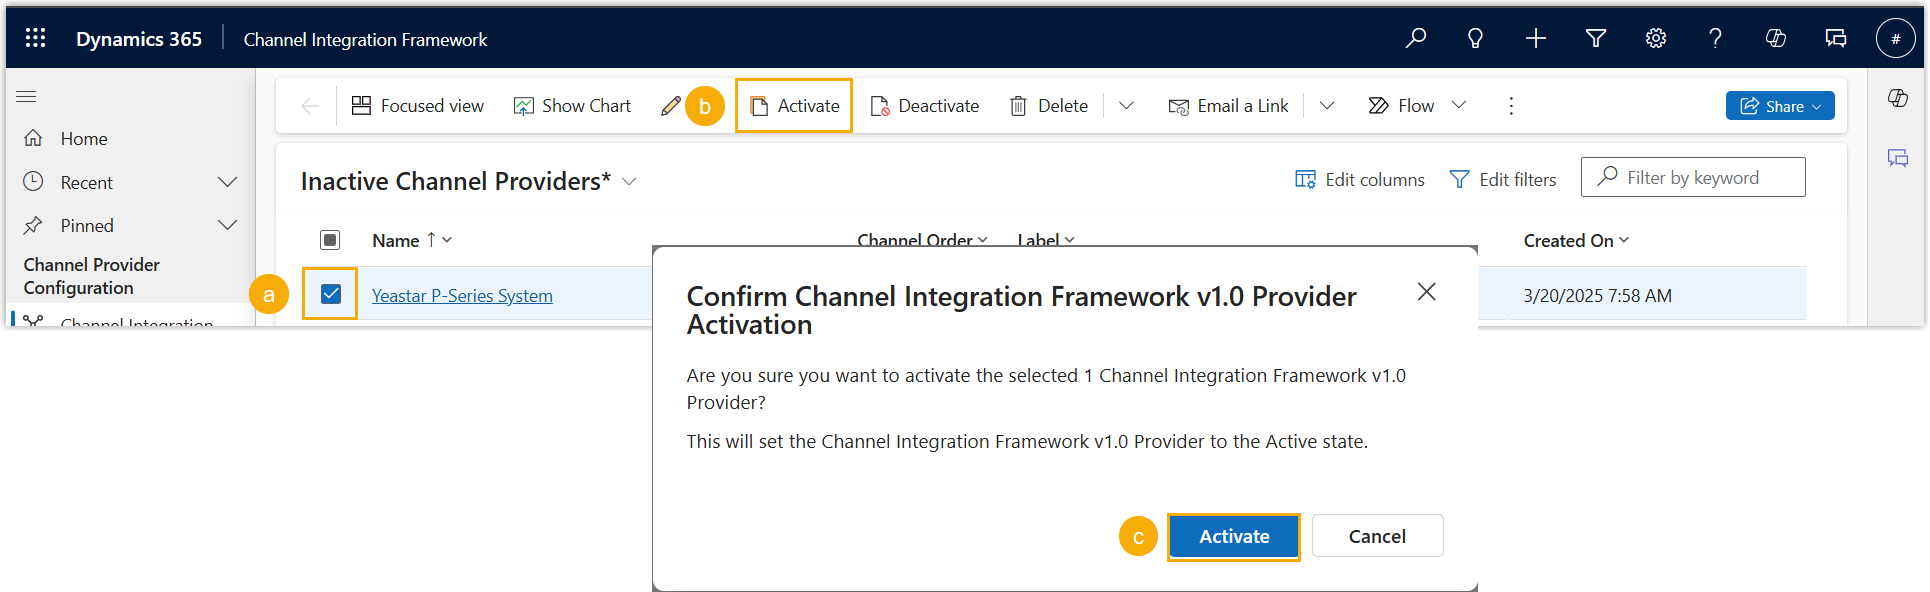
a. In the channel providers list, select the channel.
b. At the top of the page, select Activate.
c. Select Activate again in the confirmation window.
Give users access to the channel
Section titled “Give users access to the channel”Adding the channel is only half of it. You also assign the Channel Access security role to the users who should use it, matching the roles you set in the channel configuration.
-
Sign in to the Microsoft Power Platform Admin Center.
-
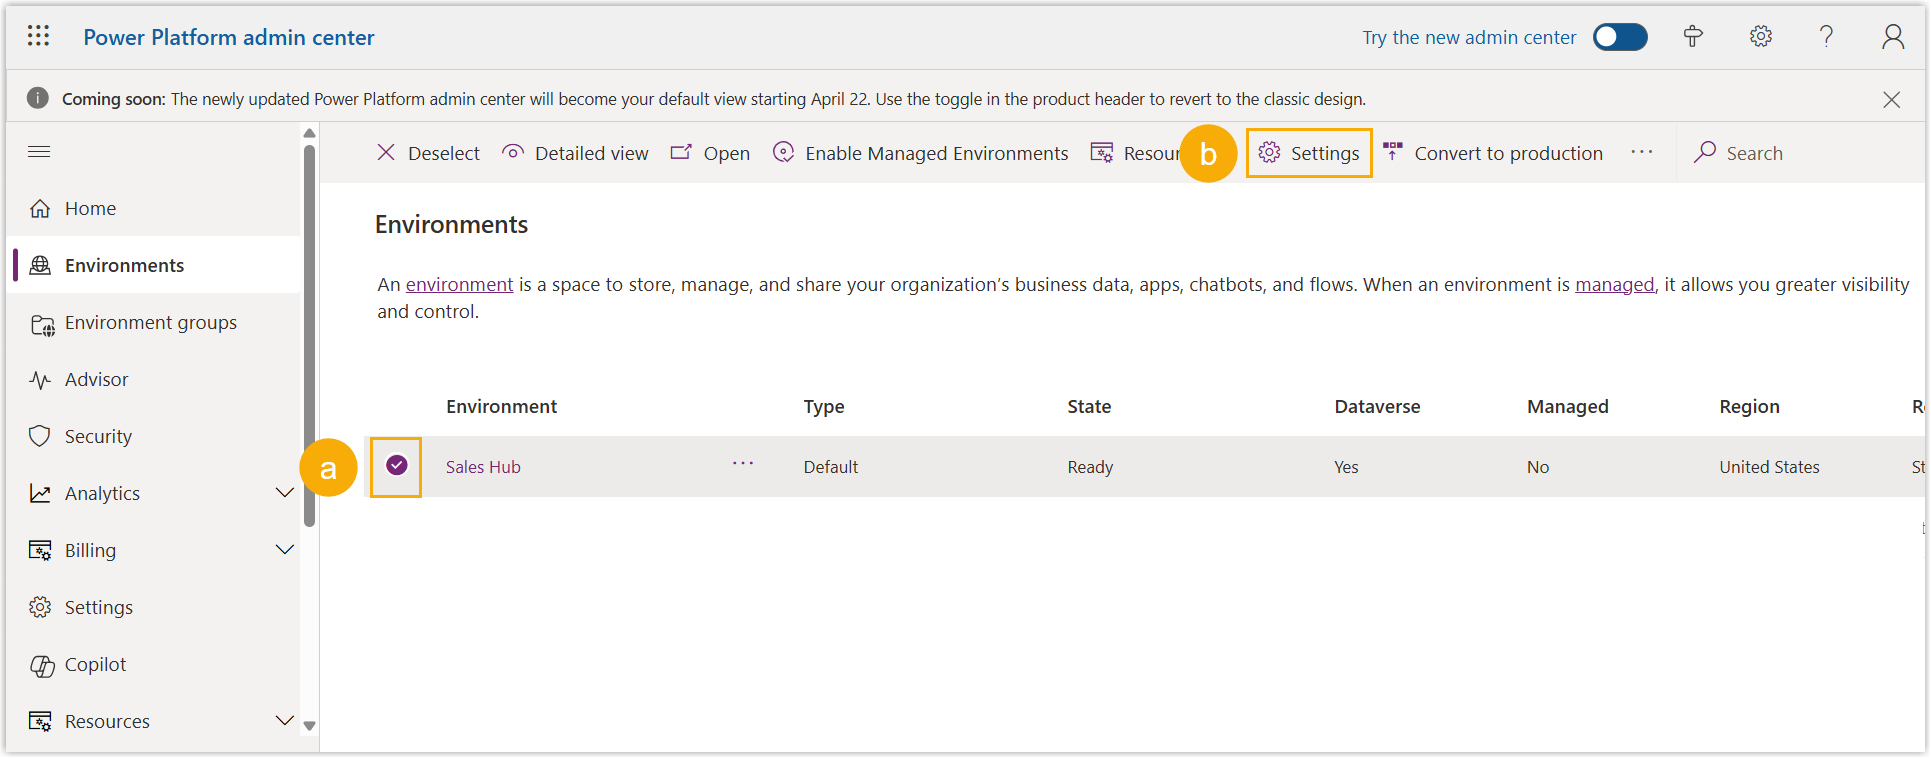
On the Environments page, select your sales hub, then select Settings.
-
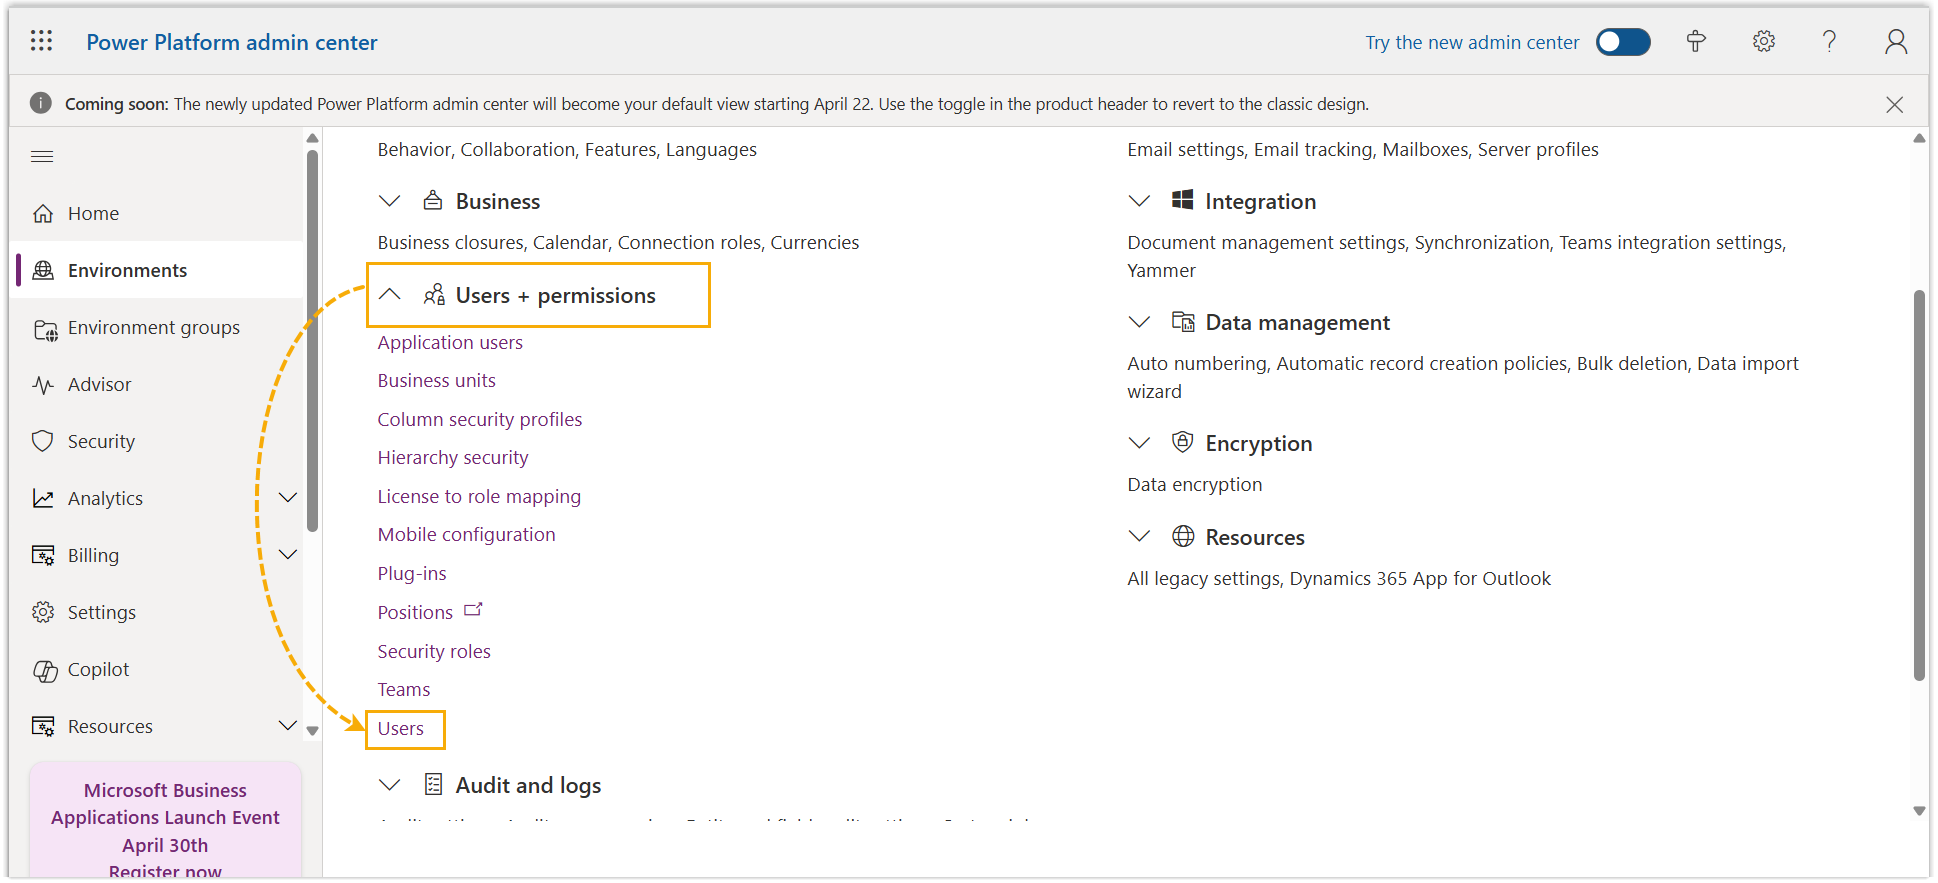
Select Users + permissions, then Users.
-
Select
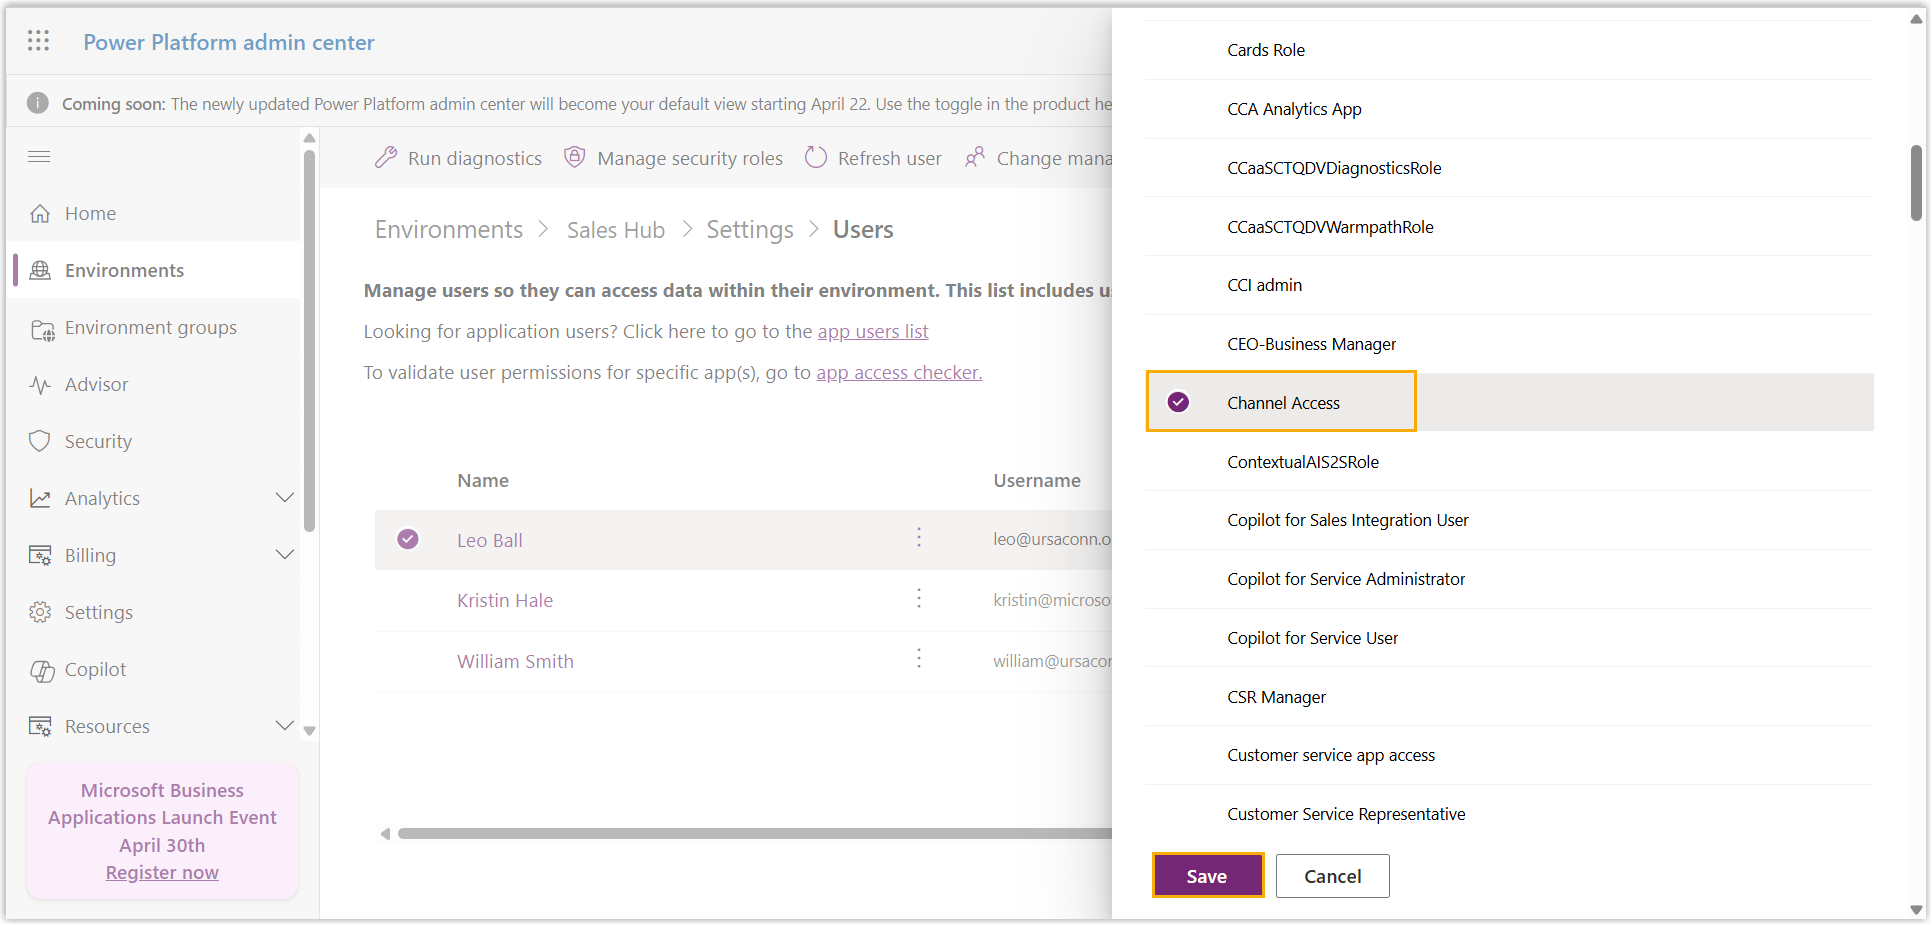
 next to a user, then choose Manage security roles.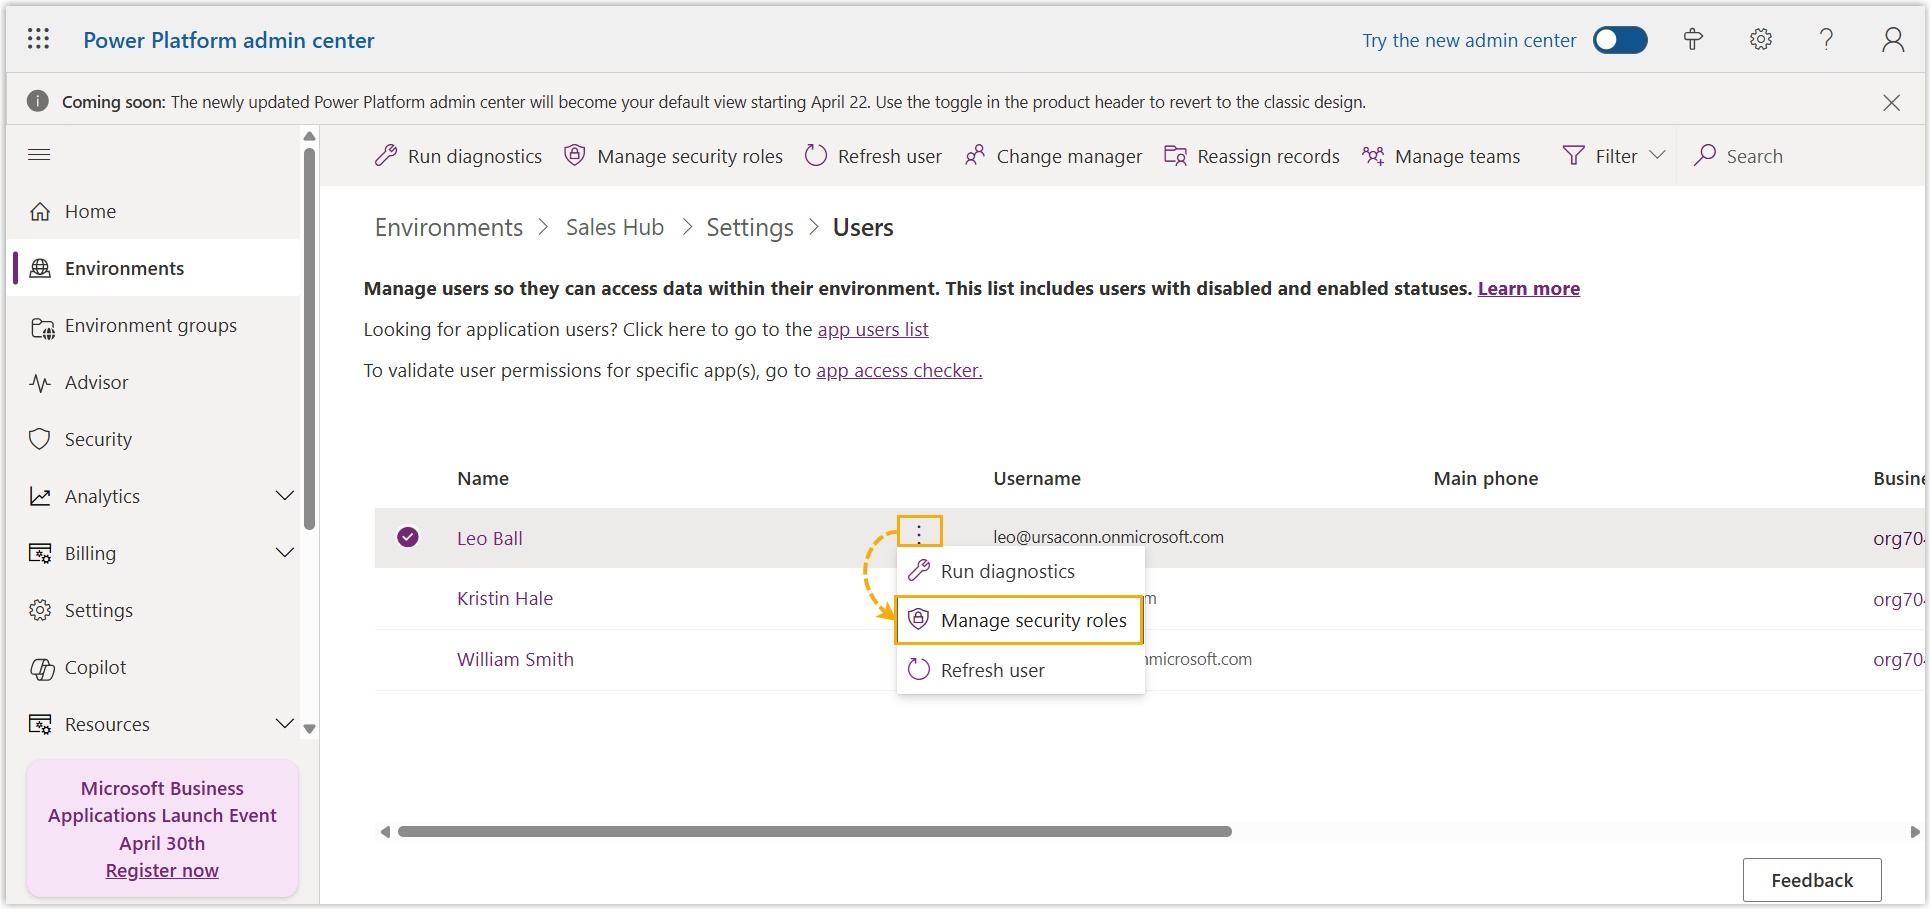
-
In the panel on the right, select Channel Access, then select Save.
Result
Section titled “Result”- The channel is set up and active.
- Users who hold the security roles you specified now see an embedded plugin (the “Cloud Voice App for Dynamics 365” plugin) in their Sales Hub app, and they can handle calls straight from Dynamics 365 CRM.
What to do next
Section titled “What to do next”-
To let users sign in to their extension account with single sign-on inside the embedded plugin, add the SSO redirect URI to your identity provider (for example, Microsoft Entra ID or Google Workspace) in this format:
https://{{PBX_domain}}/dyncrm/loginFor the SSO configuration steps, see your provider’s integration guide for Cloud Voice (Microsoft Entra ID / Azure Active Directory, or Google Workspace).
-
Users can log in to the Cloud Voice App within Dynamics 365 CRM and adjust their Dynamics integration settings to suit how they work.
Question about this page?
Ask the AI assistant. It starts from this page, then searches the rest of the docs.
Ask Cloud Voice AI
Answers are AI-generated from the docs and may contain mistakes. Verify with the linked pages.