
Connect Cloud Voice to the TA810 FXO Gateway
The TA810 is an analog gateway with eight FXO (Foreign Exchange Office) ports. An FXO port terminates a physical phone line coming from the PSTN (Public Switched Telephone Network) or an analog phone service. By pairing the gateway with Cloud Voice over SIP (Session Initiation Protocol, the standard for setting up voice calls), those eight lines become trunks that your PBX (Private Branch Exchange, the phone system) can route calls across. The link is built from two matching pieces: an account trunk on the PBX and a register trunk on the gateway that authenticates against it. This page covers both.
Step 1: Create an account trunk in Cloud Voice
Section titled “Step 1: Create an account trunk in Cloud Voice”-
Sign in to the PBX management portal and go to Extension and Trunk > Trunk, then click Add.
-
Under Basic, fill in these fields:
- Name: A label that makes the trunk easy to spot later, such as
Connect-to-TA810-Gateway. - Trunk Status: Set to Enabled.
- Select ITSP Template: Choose General. ITSP stands for Internet Telephony Service Provider; the General template applies plain SIP settings, which is what this gateway link needs.

- Name: A label that makes the trunk easy to spot later, such as
-
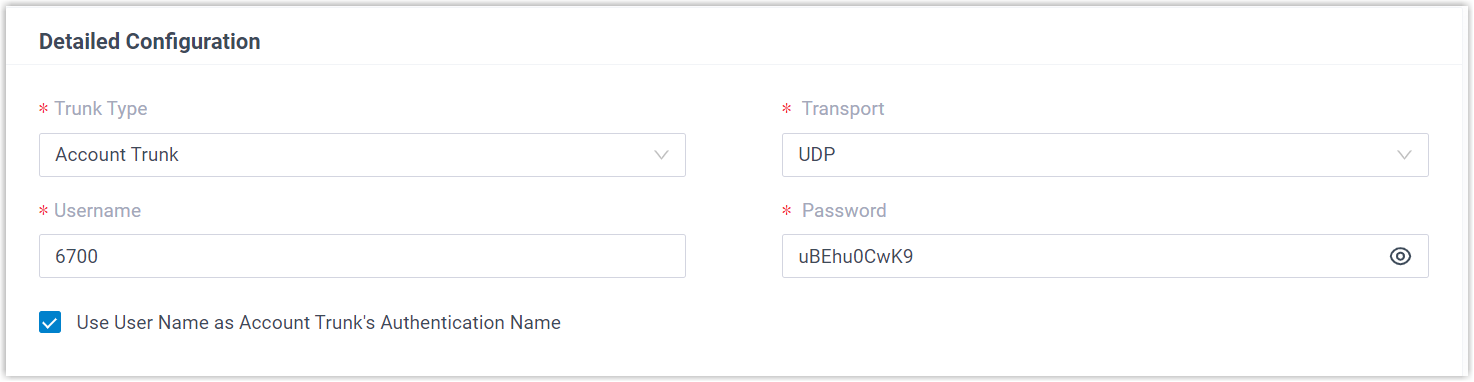
Under Detailed Configuration, set the following:
-
Trunk Type: Choose Account Trunk.
-
Transport: Choose UDP (User Datagram Protocol).
-
Username: Enter a username for the trunk.
-
Password: Enter a password to pair with that username.
-
Use User Name as Account Trunk’s Authentication Name: Turn this on so the trunk authenticates with its username.
-
-
Click Save, then Apply.
Step 2: Create a register trunk on the TA810 gateway
Section titled “Step 2: Create a register trunk on the TA810 gateway”-
Sign in to the gateway’s web interface and go to Gateway > VoIP Settings > VoIP Trunk, then click Add New Trunk.
-
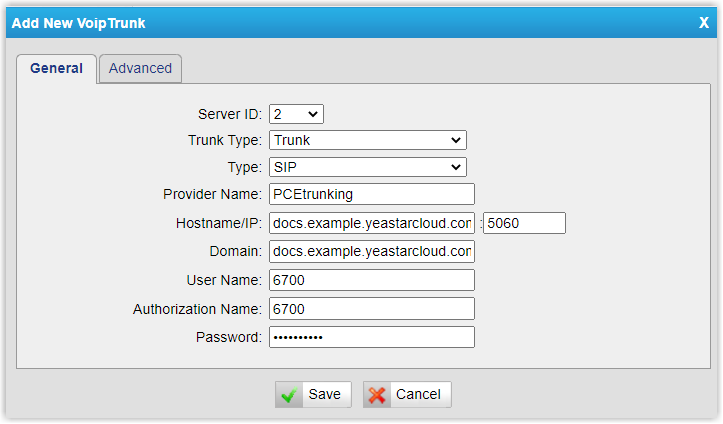
In the dialog that opens, enter the following:
- Trunk Type: Choose Trunk.
- Type: Choose SIP.
- Provider Name: A label to identify the trunk.
- Hostname/IP: The domain name and SIP port of your PBX. In this example,
pbx.example.comwith the default SIP port5060. - Domain: The domain name of your PBX, for example
pbx.example.com. - User Name: The trunk username from the PBX, for example
6700. - Authorization Name: The same username from the PBX, for example
6700. - Password: The trunk password from the PBX.
-
Click Save, then Apply Changes.
Verify the connection
Section titled “Verify the connection”Confirm the trunk registered from both ends:
- In the PBX management portal, open Extension and Trunk > Trunk. A healthy connection shows a green status indicator
 next to the trunk.
 - In the gateway’s web interface, go to Status > System Status > Port/Trunk Status. A healthy connection reports the trunk as Registered.
Once both sides confirm, Cloud Voice is linked to the TA810 gateway and its eight FXO trunks are available on the PBX.
Next steps
Section titled “Next steps”- To place outbound calls over the new FXO trunks, see Make Outbound Calls through the Extended FXO Trunks.
- To receive inbound calls over them, see Receive Inbound Calls through the Extended FXO Trunks.
Question about this page?
Ask the AI assistant. It starts from this page, then searches the rest of the docs.
Ask Cloud Voice AI
Answers are AI-generated from the docs and may contain mistakes. Verify with the linked pages.