
Manage Hikvision Devices on iVMS-4200 Client
Hikvision’s iVMS-4200 Client (iVMS stands for Integrated Video Management Software) is desktop software that lets you configure and manage Hikvision intercom devices from a single console. Use it to bring your door and indoor stations online and set their initial passwords before you register them with Cloud Voice. This page walks through installing the client and preparing your devices.
Step 1. Install the iVMS-4200 Client
Section titled “Step 1. Install the iVMS-4200 Client”Download the iVMS-4200 Client software from Hikvision and install it on a PC on your local network. You will use this PC to discover and configure your intercom hardware.
Step 2. Create an account and sign in
Section titled “Step 2. Create an account and sign in”-
Launch the iVMS-4200 Client.
-
Create a super user account for the software.
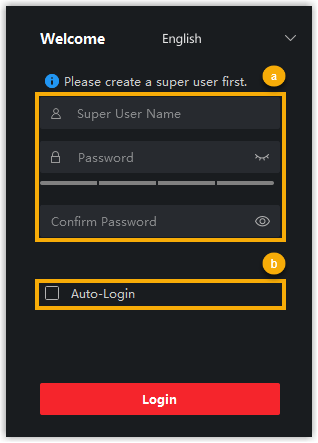
a. Enter a user name and password for the account.
b. Optional: Select Auto-Login if you want the client to sign in automatically.
-
Click Login.
The super user account is created and signed in.
Step 3. Activate the intercom devices
Section titled “Step 3. Activate the intercom devices”Before a Hikvision door station or indoor station can operate, you must activate it by assigning a strong password.
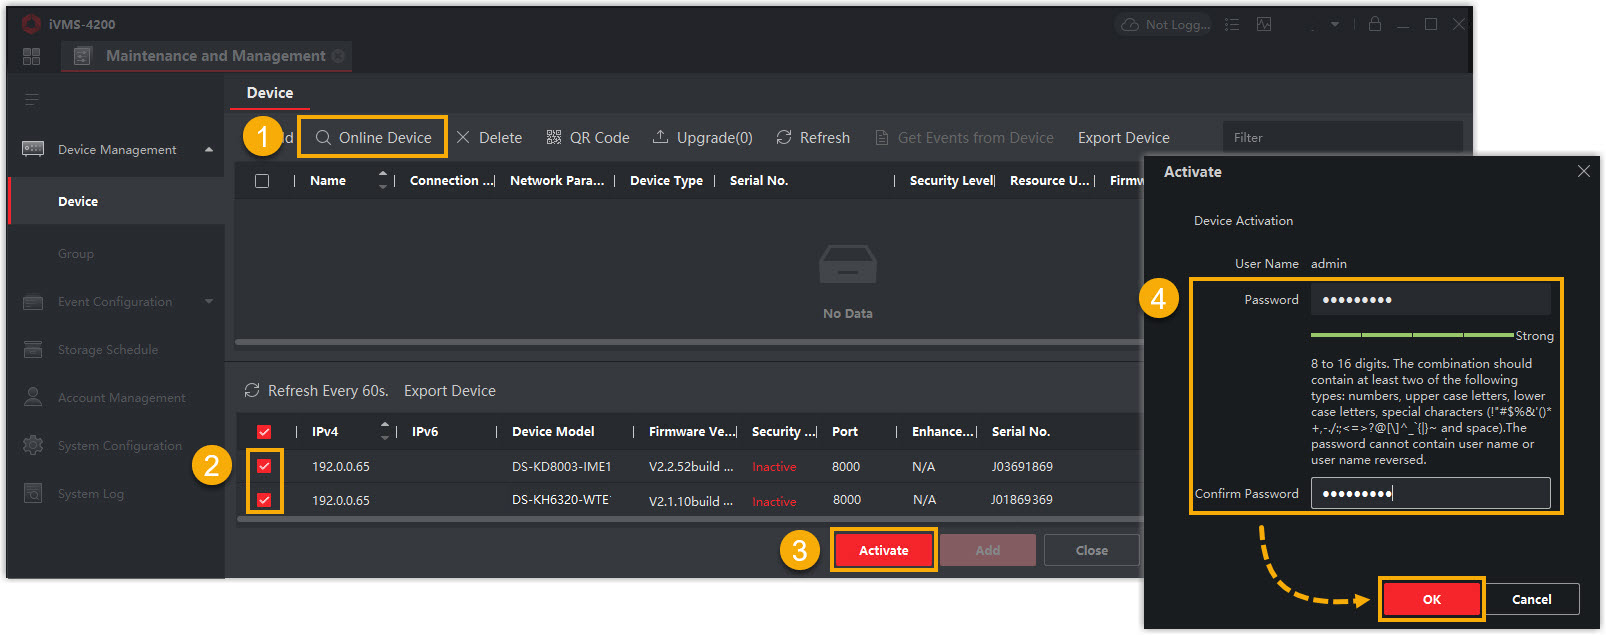
- Go to Device Management > Device and click Online Device. Any devices found on the network appear in the list at the bottom of the page.
- Look at the Security Level column and select the devices marked Inactive.
- Click Activate.
- In the activation window, set a password for the device and click OK.
Step 4. Add the devices to the client
Section titled “Step 4. Add the devices to the client”With the devices activated, assign them IP addresses and add them to the client for management.
-
Set the IP address for each Hikvision device.
a. In the Operation column next to a discovered device, click the network-settings icon
 .
.
b. Set the device’s IP address and gateway so it shares the same network segment as the PC running the client. In this example, the PC’s address is 192.168.66.25, so the devices are assigned as follows:
- Door station:
192.168.66.42 - Indoor station:
192.168.66.43
c. Click OK.
- Door station:
-
Select the activated devices and click Add at the bottom right.

-
In the pop-up window, complete the required fields.
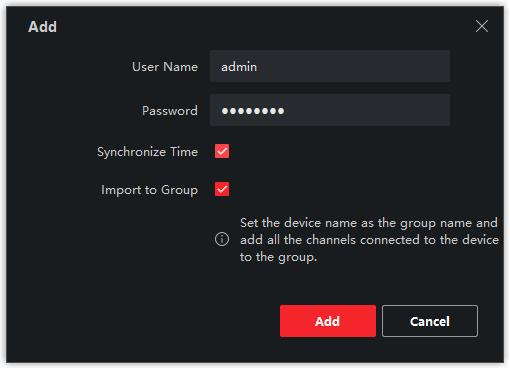
- User Name: Enter your account user name. In this example, enter
admin. - Password: Enter the device password you set during activation.
- Synchronize Time: Select this to sync each device’s clock with the PC running the client.
- Import to Group: Select this to create a group named after the device and import all of the device’s channels into it.
- User Name: Enter your account user name. In this example, enter
-
Click Add.
What to do next
Section titled “What to do next”Register your Hikvision devices with Cloud Voice:
Question about this page?
Ask the AI assistant. It starts from this page, then searches the rest of the docs.
Ask Cloud Voice AI
Answers are AI-generated from the docs and may contain mistakes. Verify with the linked pages.