
Connect Cloud Voice to a TE100 Gateway
Pairing Cloud Voice with a TE100 digital gateway lets you bring an E1/T1/PRI circuit into your hosted phone system. E1/T1/PRI (Primary Rate Interface) lines are digital trunk lines that carry many concurrent voice channels over a single physical circuit, and the TE100 gateway is the box that converts that circuit into VoIP.
You build the link from two matching SIP trunks. SIP (Session Initiation Protocol) is the signalling that sets up and tears down VoIP calls. On Cloud Voice you create an account trunk that accepts a registration, and on the gateway you create a register trunk that signs in to it. Once both sides agree, the single E1/T1/PRI line on the gateway behaves as an extended trunk on Cloud Voice.
Requirements
Section titled “Requirements”Your Cloud Voice system must run firmware version 84.10.0.30 or later.
Step 1. Create a SIP account trunk on Cloud Voice
Section titled “Step 1. Create a SIP account trunk on Cloud Voice”Start on the phone system by defining the account trunk that the gateway will register against.
-
Sign in to the Cloud Voice management portal and go to Extension and Trunk > Trunk, then click Add.
-
Fill in the trunk settings.
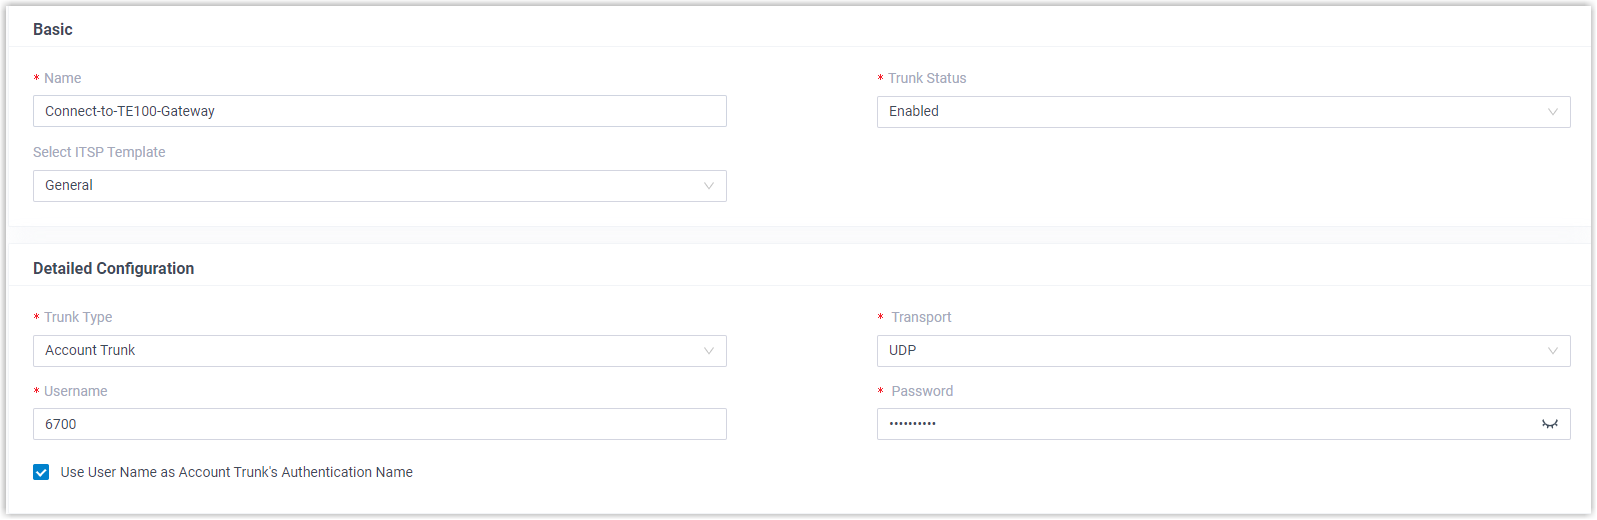
- Name: A label that is easy to recognize, such as
Connect-to-TE100-Gateway. - Trunk Status: Select Enabled.
- Select ITSP Template: Select General. ITSP (Internet Telephony Service Provider) templates preload provider-specific settings; General applies no provider-specific tweaks, which is what you want for a direct gateway link.
- Trunk Type: Select Account Trunk.
- Transport: Select UDP. UDP (User Datagram Protocol) is the network transport SIP will use; you must select the same transport on the gateway in Step 2.
- Username: Set a username for the trunk, for example
6700. - Password: Set the password that goes with the username.
- Use User Name as Account Trunk’s Authentication Name: Turn this on so the trunk’s username is also used as its authentication name.
- Name: A label that is easy to recognize, such as
-
Click Save, then Apply.
Step 2. Create a SIP register trunk on the TE100 gateway
Section titled “Step 2. Create a SIP register trunk on the TE100 gateway”On the gateway, add a register trunk that signs in to the account trunk you just created.
-
Sign in to the gateway’s web interface and go to Gateway > VoIP Settings > VoIP Trunk, then click Add VoIP Trunk.
-
Configure the trunk in the window that opens.
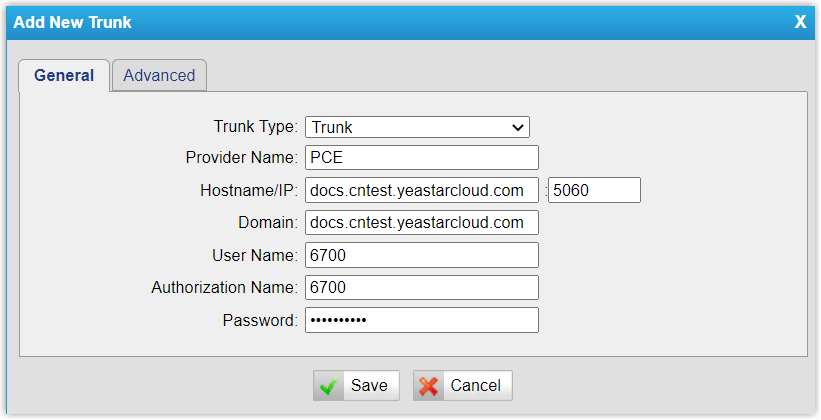
- Trunk Type: Select Trunk.
- Provider Name: A label that is easy to recognize.
- Hostname/IP: Enter your Cloud Voice domain name followed by the SIP port. This example uses
pbx.example.comand the default SIP port5060. - Domain: Enter your Cloud Voice domain name,
pbx.example.comin this example. - User Name: Enter the username from the account trunk in Step 1,
6700in this example. - Authorization Name: Enter the same username,
6700in this example. - Password: Enter the password from the account trunk in Step 1.
-
Click Save, then Apply Changes.
Result
Section titled “Result”With both trunks in place, confirm the registration on each device.
-
In the Cloud Voice portal (Extension and Trunk > Trunk), the trunk shows a connected status icon
 .
.
-
On the gateway (Status > System Status > IP Trunk Status), the trunk status reads Registered.

Cloud Voice is now connected to the TE100 gateway, and the gateway’s single E1/T1/PRI line is available as an extended trunk on your phone system.
What to do next
Section titled “What to do next”- To place outbound calls over the extended E1/T1/PRI trunk, see Make Outbound Calls through the Extended E1/T1/PRI Trunk.
- To take inbound calls over the extended E1/T1/PRI trunk, see Receive Inbound Calls through the Extended E1/T1/PRI Trunk.
Question about this page?
Ask the AI assistant. It starts from this page, then searches the rest of the docs.
Ask Cloud Voice AI
Answers are AI-generated from the docs and may contain mistakes. Verify with the linked pages.