
Connect Cloud Voice and a TG400 Gateway
A TG400 gateway is a four-channel 4G (fourth-generation mobile) VoIP (Voice over Internet Protocol) gateway. Pairing it with your Cloud Voice PBX (Private Branch Exchange, your phone system) lets you route calls over mobile carrier networks, giving the PBX up to four cellular (4G) trunks. A trunk is a line that carries calls between your PBX and an outside network. You build the link in two halves: an account trunk on the PBX and a matching register trunk on the gateway. The two sides talk over SIP (Session Initiation Protocol, the signaling used to set up calls). The gateway registers to the PBX using the account trunk’s credentials.
Requirements
Section titled “Requirements”Your Cloud Voice PBX must be running version 84.10.0.30 or later.
Step 1. Create an account trunk on the PBX
Section titled “Step 1. Create an account trunk on the PBX”-
Sign in to the Cloud Voice PBX portal and go to Extension and Trunk > Trunk, then click Add.
-
Fill in the trunk settings:
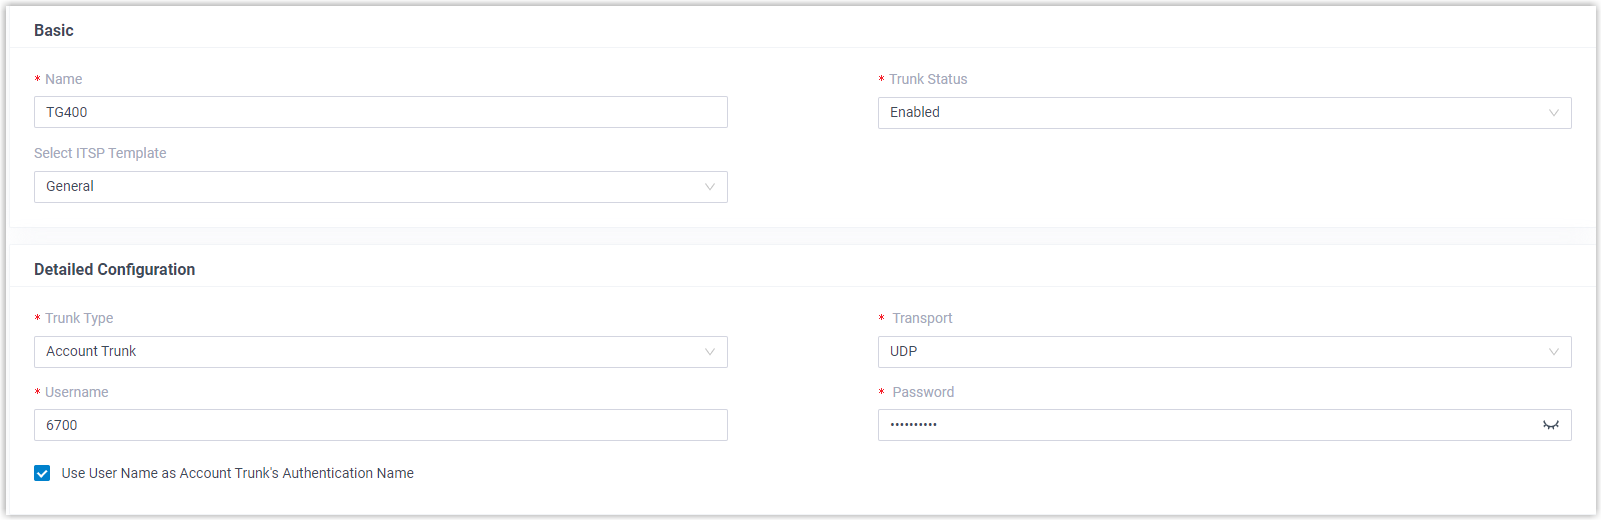
- Name: A label that helps you recognize the trunk, such as
TG400. - Trunk Status: Choose Enabled.
- Select ITSP Template: Choose General. (ITSP means Internet Telephony Service Provider; the template applies a set of provider defaults, and General works for this gateway.)
- Trunk Type: Choose Account Trunk.
- Transport: Choose UDP (User Datagram Protocol, the transport SIP uses here).
- Username: Set a username for the trunk.
- Password: Set a password to go with that username.
- Use User Name as Account Trunk’s Authentication Name: Turn this on so the username also serves as the authentication name.
- Name: A label that helps you recognize the trunk, such as
-
Click Save, then Apply.
Step 2. Create a register trunk on the gateway
Section titled “Step 2. Create a register trunk on the gateway”-
Sign in to the gateway’s web interface and go to Gateway > VoIP Settings > VoIP Trunk, then click Add VoIP Trunk.
-
In the dialog that opens, enter the trunk settings:
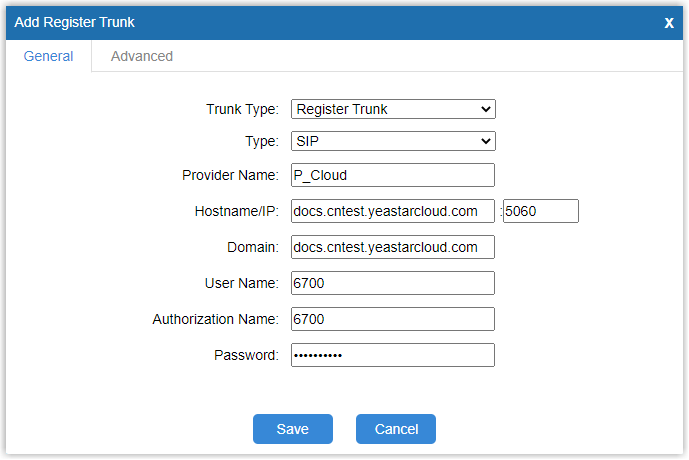
- Trunk Type: Choose Register Trunk.
- Type: Choose SIP.
- Provider Name: A label that helps you recognize the trunk.
- Hostname/IP: Your Cloud Voice PBX domain followed by its SIP port, for example
pbx.example.izt.companyand the default SIP port5060. - Domain: Your Cloud Voice PBX domain, for example
pbx.example.izt.company. - User Name: The username you set on the account trunk in Step 1, for example
6700. - Authorization Name: The same username from the account trunk, for example
6700. - Password: The password you set on the account trunk in Step 1.
-
Click Save, then Apply Changes.
Confirm the connection
Section titled “Confirm the connection”Once both sides are saved, check that the trunk has come up:
-
On the PBX portal, open Extension and Trunk > Trunk. The trunk’s status shows a connected icon
 .
..png)
-
On the gateway, open Status > System Status > Trunk Status. The trunk reads Registered.

When both statuses look right, the PBX and gateway are linked, and four 4G trunks are now available on your Cloud Voice PBX.
What to do next
Section titled “What to do next”- To place outbound calls over a specific 4G trunk, see Make Outbound Calls through a Designated 4G Trunk.
- To send inbound calls from each carrier to its own destination, see Route Calls from Different Carriers to Different Destinations.
Question about this page?
Ask the AI assistant. It starts from this page, then searches the rest of the docs.
Ask Cloud Voice AI
Answers are AI-generated from the docs and may contain mistakes. Verify with the linked pages.