
Register a Hikvision Door Station to Cloud Voice
A SIP-capable Hikvision door station can register to Cloud Voice as an ordinary extension. SIP (Session Initiation Protocol) is the standard signaling protocol that phones and intercoms use to set up calls. Once registered, the door station behaves like any other endpoint on your phone system and can ring extensions, ring groups, or the Cloud Voice App. This page uses the Hikvision DS-KD8003 as a working example; the same approach applies to other Hikvision door stations that speak SIP.
The setup has two halves: first you create an extension on Cloud Voice, then you point the door station at that extension so it registers.
Before you begin
Section titled “Before you begin”- Confirm that your door station supports the SIP protocol. A door station that only speaks Hikvision’s proprietary protocol cannot register to Cloud Voice.
- Activate the door station and add it to the iVMS-4200 client first. See Activate intercom video devices and Add devices to the iVMS-4200 client.
Step 1. Create an extension for the door station
Section titled “Step 1. Create an extension for the door station”Give the door station its own extension on Cloud Voice. The door station will use these credentials to register, exactly the way a desk phone would.
-
Sign in to the PBX (Private Branch Exchange) web portal and go to Extension and Trunk > Extension, then click Add > Add.
-
Enter the user and extension details, or keep the defaults. In this example, create a SIP extension numbered 1666 for the DS-KD8003.
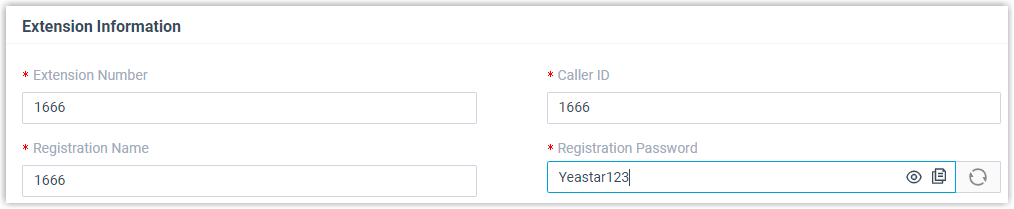
-
Click Save, then Apply.
Step 2. Register the door station to Cloud Voice
Section titled “Step 2. Register the door station to Cloud Voice”Configure the door station in the iVMS-4200 client so it registers to the extension you just created.
-
Sign in to the iVMS-4200 client and go to Device Management > Device.
-
Next to the DS-KD8003, click the remote configuration icon to open its Configuration page.


-
Set up the DNS (Domain Name System) server:
-
Go to Network > Basic Settings > TCP/IP.
-
In the DNS Server section, enter the IP address of your DNS server, then click Save.
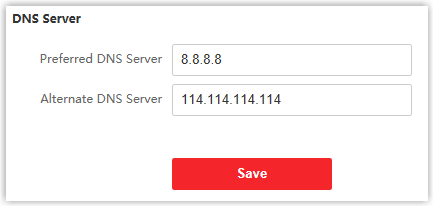
-
-
Register the door station to extension 1666:
-
Go to Network > Basic Settings > SIP.
-
Select the Enable VOIP Gateway checkbox. (VoIP means Voice over IP: carrying calls over the network.)
-
Enter the extension’s credentials:
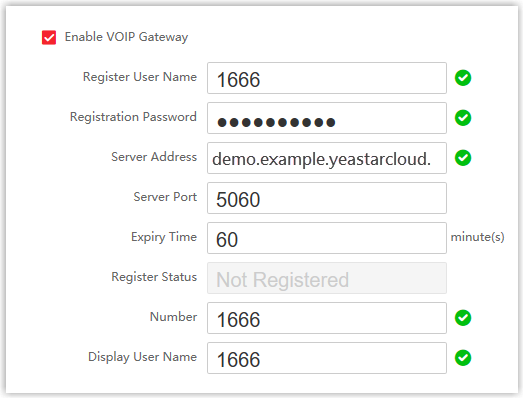
- Register User Name: The extension’s registration name. In this example, enter
1666. - Registration Password: The extension’s registration password. In this example, enter the password generated for extension 1666.
- Server Address: The domain name of your Cloud Voice system. In this example, enter
demo.example.com. - Server Port: The SIP registration port of your Cloud Voice system. In this example, enter
5060. - Expiry Time: Keep the default value. This controls how often the door station re-registers to stay online.
- Number: The extension number. In this example, enter
1666. - Display User Name: The name shown on outgoing calls. In this example, enter
1666.
- Register User Name: The extension’s registration name. In this example, enter
-
Click Save.
-
When the Register Status shows Registered, the door station is connected to Cloud Voice.
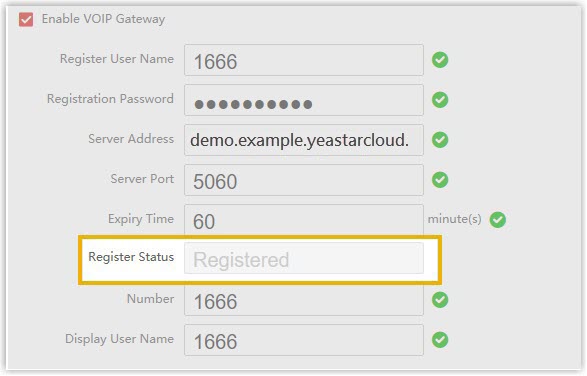
Question about this page?
Ask the AI assistant. It starts from this page, then searches the rest of the docs.
Ask Cloud Voice AI
Answers are AI-generated from the docs and may contain mistakes. Verify with the linked pages.