
Add a Helpdesk Integration Template
When your helpdesk isn’t one of the pre-built integrations, you can describe the connection yourself with a custom template. The template tells Cloud Voice how to authenticate against the helpdesk’s REST API and which endpoints to call for each feature, so the two systems can share and sync data. This page walks through creating a template and filling in the settings you need.
Requirements and restrictions
Section titled “Requirements and restrictions”Requirements
- PBX server (the Private Branch Exchange that runs your phone system)
- Firmware: version 84.23.0.123 or later.
- Plan: Enterprise Plan (EP) or Ultimate Plan (UP).
- Helpdesk system: must expose a REST API.
Restrictions
- You can add up to 10 custom helpdesk integration templates.
Before you begin
Section titled “Before you begin”Building a template means mapping your helpdesk’s API onto Cloud Voice’s fields and requests, so plan for the following:
- You are comfortable with basic coding and reading API documentation.
- You have your helpdesk’s REST API reference on hand and have collected the details below.
Authentication method
Identify how the helpdesk authenticates requests. Cloud Voice supports None, Basic, OAuth2, and Bearer token. If the helpdesk uses OAuth2 or Bearer token, gather these endpoints and their data specifications:
| Function | Purpose |
|---|---|
| Authorization | The URL that redirects users to the helpdesk’s authorization and consent page. |
| Get access token | The API request URL that issues an access token. |
| Refresh access token | Optional. The API request URL that issues a refresh token. |
API request information
Depending on which features you want and what the helpdesk offers, collect the request URLs and data specifications for the following:
| API request | Purpose |
|---|---|
| Search contacts | URLs that look up helpdesk contacts by specific criteria. |
| Get users | Optional. The URL that returns helpdesk user information. |
| Create contacts | Optional. The URL that adds new contacts to the helpdesk. |
| Call journaling | Optional. The URL that creates and/or updates call records in the helpdesk. |
| Chat journaling | Optional. The URL that creates an object (such as a task) to hold synced chat data. |
| Create tickets | Optional. The URL that opens new tickets in the helpdesk. |
Create a template
Section titled “Create a template”-
Sign in to the PBX web portal and go to Integrations > Helpdesk.
-
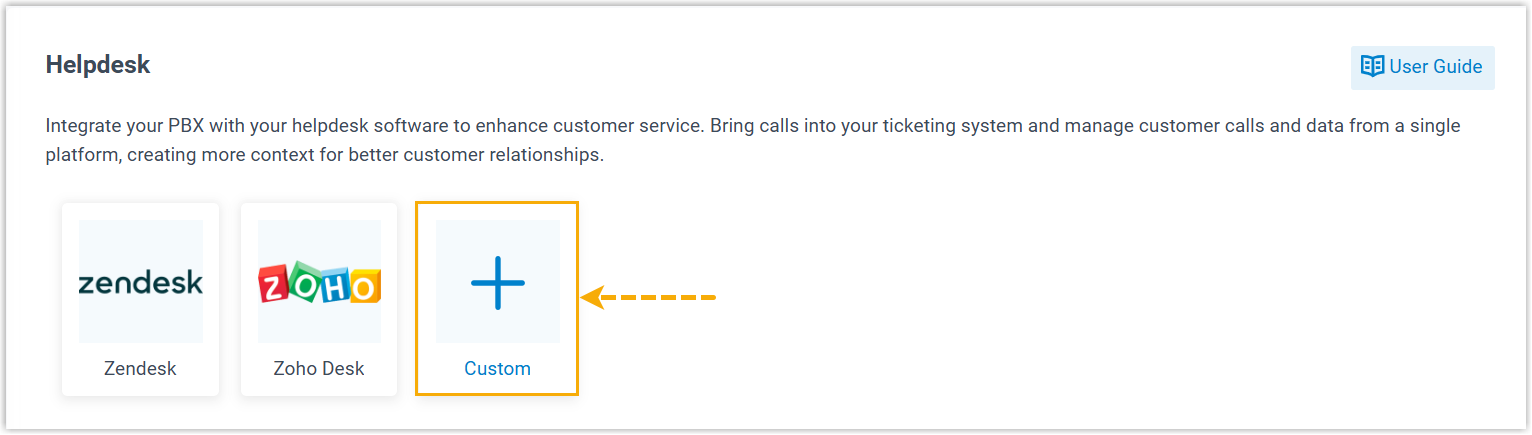
In the helpdesk list, click Custom. You are taken to the Template Management page.
-
Click Add to start a new template.
-
In the dialog, complete the settings that apply to your helpdesk and your goals:
- General settings
- User association (optional)
- Authentication method
- Request headers (optional)
- Follow-up requests (optional)
- Connection keepalive (optional)
- Contact search and call popup
- New contact creation (optional)
- Call journaling (optional)
- Chat journaling (optional)
- Automatic ticket creation (optional)
-
Click Save to generate the custom helpdesk integration template.
General settings
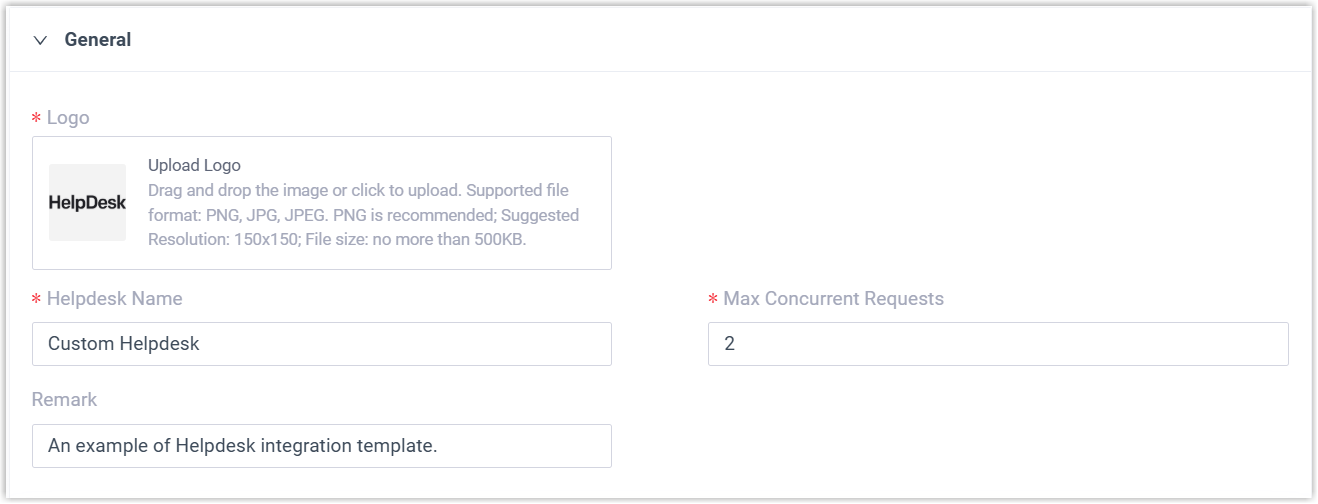
Section titled “General settings”In the General section, set the template’s basic details.
-
Logo: Upload an icon for the helpdesk. It appears next to the helpdesk in the list on the Integration page.
-
Helpdesk Name: The display name of the helpdesk.
-
Max Concurrent Request: The maximum number of simultaneous HTTP requests Cloud Voice may send to the helpdesk.
-
Remark: Optional. A description shown on the Template Management page.
User association (optional)
Section titled “User association (optional)”Turn on the User Association section to link helpdesk users to Cloud Voice extensions.
-
Switch on User Association.

-
In the Get User field, enter the helpdesk API request URL that returns the list of helpdesk users.

For example:
https://www.api.example.com/v1/users?type=ActiveUsers -
In the Pagination Type list, choose the mode that matches the helpdesk API.
Mode Behavior Disabled Cloud Voice sends one request with no pagination parameters. Use this when the API returns every record in a single response. Page Number Pagination Cloud Voice sends repeated requests keyed on page number and page size, incrementing the page each time until all data is retrieved. Offset Pagination Cloud Voice sends repeated requests keyed on a starting offset and record limit, raising the offset by the limit each time until all data is retrieved. Link Pagination Cloud Voice follows the “next page” URL returned in each response until no more pages remain. For Page Number Pagination, set these parameters:
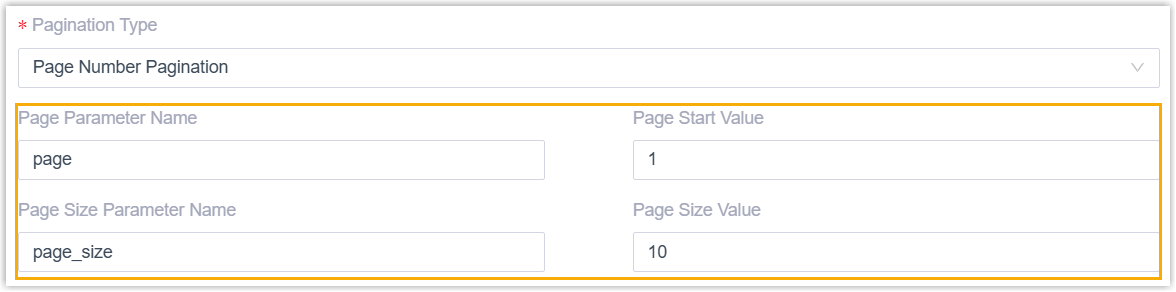
- Page Parameter Name: The parameter that carries the page number in the request.
- Page Start Value: The page number to begin querying from.
- Page Size Parameter Name: The parameter that sets how many records each page returns.
- Page Size Value: The maximum records per page.
For Offset Pagination, set these parameters:
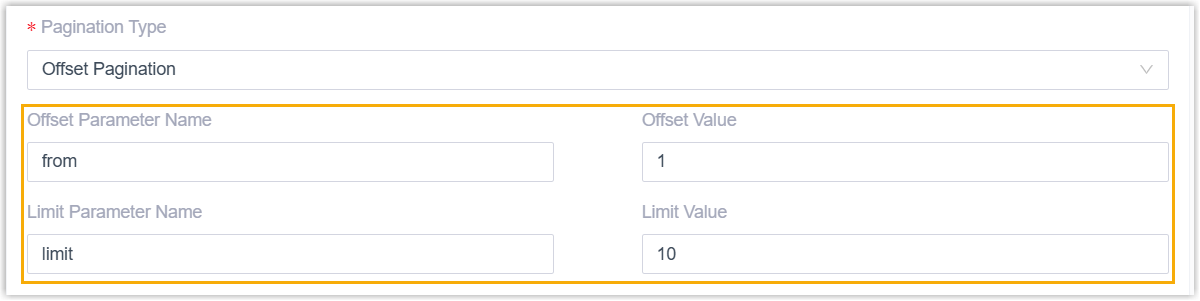
- Offset Parameter Name: The parameter that carries the starting offset.
- Offset Value: How many records to skip before retrieval begins. For example,
1starts at the first record and100starts at the 100th. - Limit Parameter Name: The parameter that sets how many records each page returns.
- Limit Value: The maximum records per page.
For Link Pagination, enter the JSON path (for example
links.next) that holds the next-page link in the Next Page Link Path field.
-
In the User Field Mapping section, map helpdesk response fields to the Cloud Voice fields below by giving the JSON path (for example
data.#(key=="value").field) of each field in the helpdesk response.Cloud Voice field Description User Unique ID The user’s unique identifier. For example, users.#.id.First Name The user’s first name, shown in the helpdesk user list. For example, users.#.First_Name.Last Name The user’s last name, shown in the helpdesk user list. For example, users.#.Last_Name.Email The user’s email, shown in the user list and usable for automatically pairing helpdesk users with Cloud Voice extensions. For example, users.#.Email.
Authentication method
Section titled “Authentication method”In the Configure Authentication Method section, pick the method the helpdesk expects.
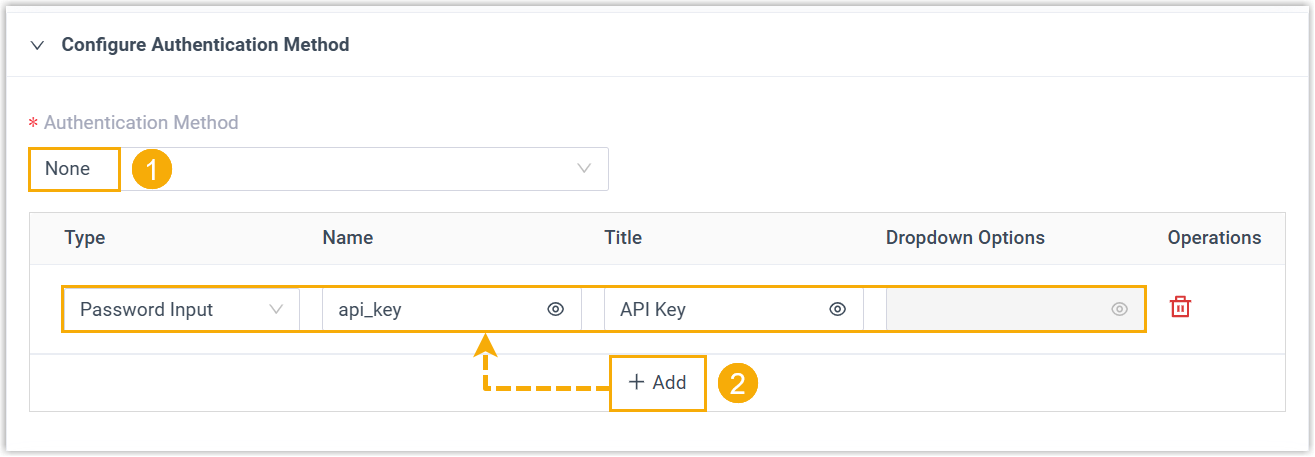
Use this when the helpdesk needs no authentication, or when it only needs a few values for the integration (such as an API key for requests, or a webhook URL for real-time delivery).
-
In the Authentication Method list, select None.
-
Optional. Click Add to create custom fields. Each field appears as an input on the integration page, prompting whoever sets up the integration to supply the value.
Setting Description Type The field type: Text Input (plain text), Password Input (masked for sensitive values), or Dropdown List (a preset list of choices). Name The variable name for the field, referenced within the template. Title The label shown above the input. Dropdown Options For a Dropdown List type, the choices to offer. Separate multiple options with commas, for example option1,option2.
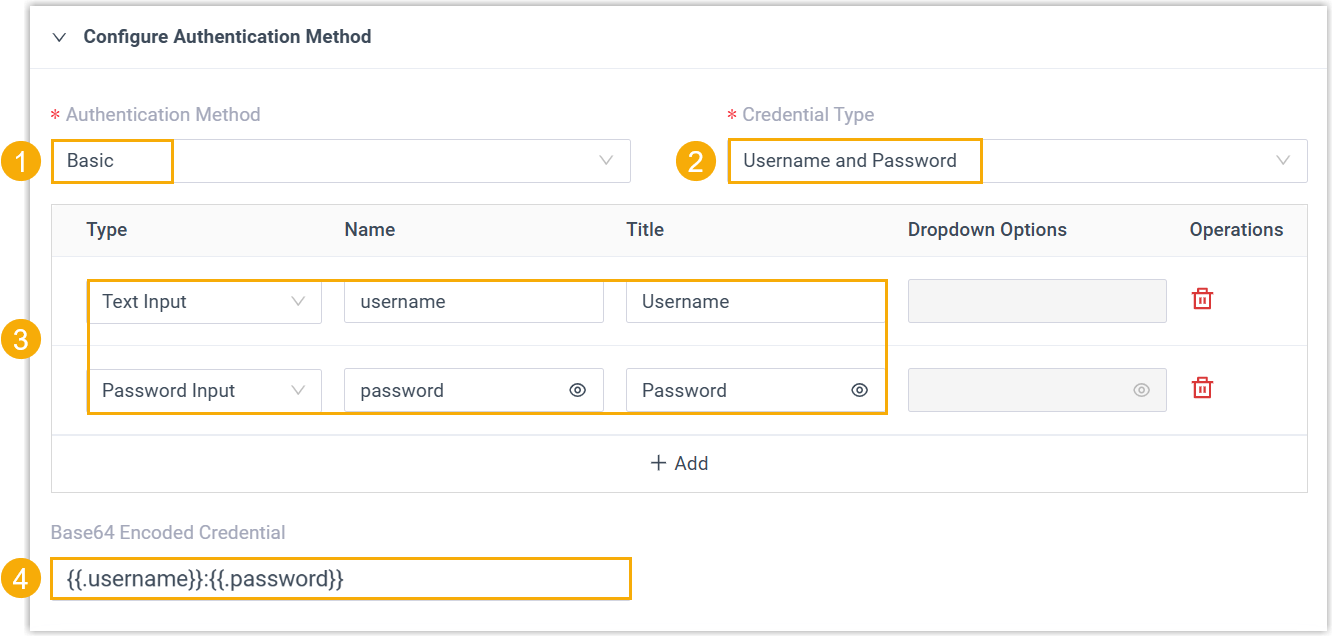
Requests are authenticated with credentials, such as a username and password or an API key. Every request to the helpdesk carries a header of the form Authorization: Basic {{.basic_string}}, where {{.basic_string}} is the Base64-encoded credential supplied during integration.
-
In the Authentication Method list, select Basic.
-
In the Credential Type list, select Username and Password or API Key, depending on the helpdesk.
-
Configure the fields users fill in for their credentials, adding custom fields if needed.
Setting Description Type The field type: Text Input, Password Input, or Dropdown List. Name The variable name for the field. Title The label shown above the input. Dropdown Options For a Dropdown List type, comma-separated choices, for example option1,option2. -
In the Base64 Encoded Credential field, define how the credential variables combine to form the Basic string (
basic_string). For example,{{.username}}:{{.password}}or{{.api_key}}.
OAuth2
Section titled “OAuth2”Requests are granted access with tokens instead of shared credentials, which the integration obtains through specific API calls to the helpdesk. OAuth2 supports both the Standard Authorization Code flow and the Authorization Code with PKCE (Proof Key for Code Exchange) flow.
-
Set the method and authorization mode.
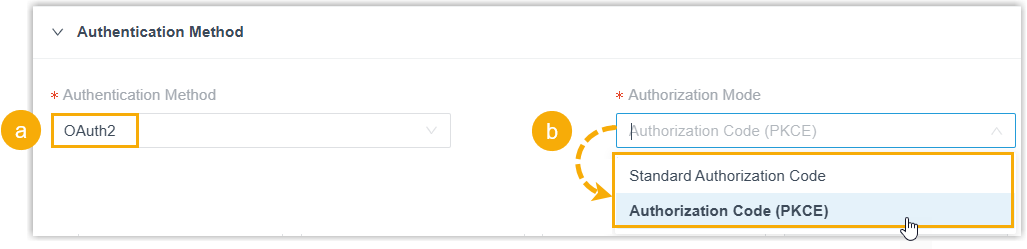
a. In the Authentication Method list, select OAuth2.
b. In the Authorization Mode list, choose the mode:
Mode When to use it Standard Authorization Code Requires a client_secret. Use it when the helpdesk expects aclient_secret.Authorization Code (PKCE) Makes client_secretoptional and adds a layer of security. Cloud Voice generates acode_verifier, derives acode_challengefrom it (SHA256 hash, Base64URL encoded), and sends the challenge up front while keeping the verifier locally. At token exchange, it presents the verifier; the authorization server hashes it the same way and compares it to the stored challenge. A match proves the client holds the original verifier, so only that client can exchange the code for a token, which blocks interception attacks. -
Configure the fields users fill in for their credentials.
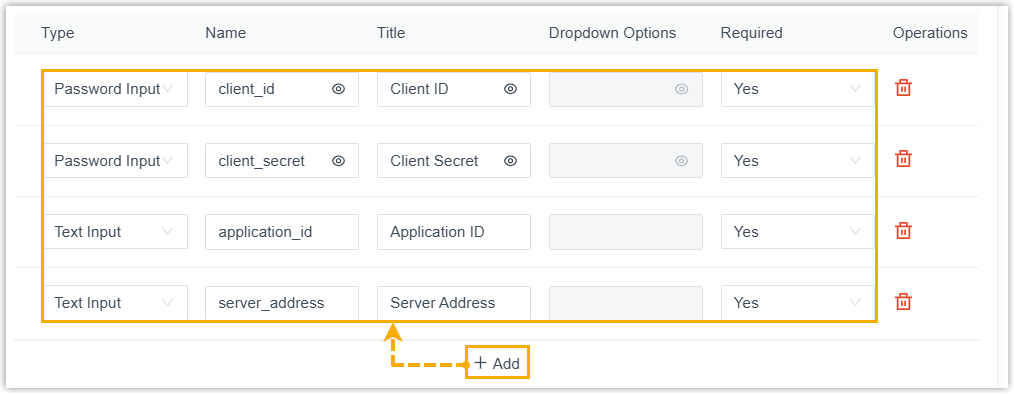
Setting Description Type The field type: Text Input, Password Input, or Dropdown List. Name The variable name for the field. Title The label shown above the input. Dropdown Options For a Dropdown List type, comma-separated choices, for example option1,option2.Required Whether the field is mandatory: Yes (required) or No (may be left blank). -
Configure the OAuth2 authorization settings.
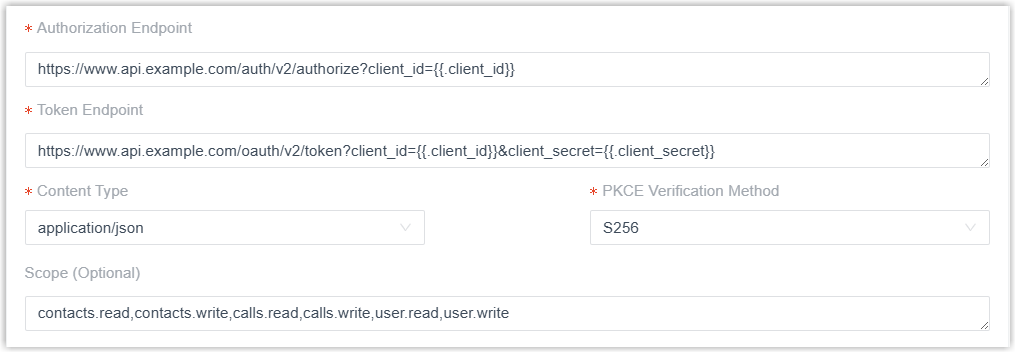
Setting Description Authorization Endpoint The helpdesk authorization URL users are redirected to during integration. For example, https://www.api.example.com/auth/v2/authorize?client_id={{.client_id}}.Token Endpoint The helpdesk API URL that issues the access token and refresh token. For example, https://www.api.example.com/oauth/v2/token?client_id={{.client_id}}&client_secret={{.client_secret}}.Content Type The content type of the token request. PKCE Verification Method How to turn the code_verifierinto thecode_challenge. Available only when Authorization Mode is Authorization Code (PKCE). Choose S256 (SHA256 hash, Base64URL encoded, recommended) or Plain (use the verifier directly, for systems without SHA256 support).Scope Optional. The scope that limits what data Cloud Voice may access. Separate multiple values with commas, for example contacts.read,contacts.write,calls.read,calls.write,user.read,user.write.Additional Query String Optional. If the helpdesk authenticates with query parameters rather than a scope, add them here, for example client_id={{.client_id}}&redirect_uri={{.redirect_uri}}. -
Optional. Configure token refresh.
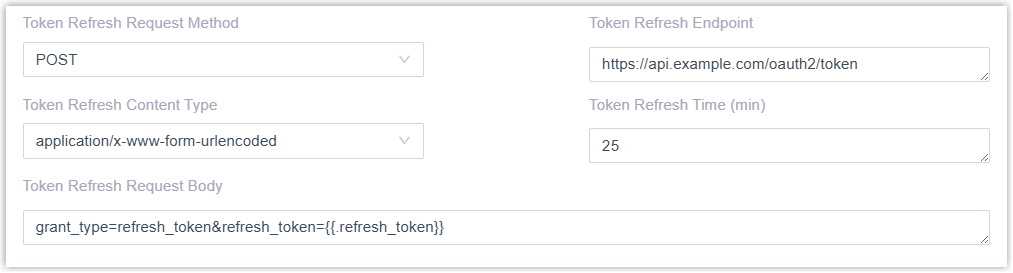
Setting Description Token Refresh Request Method The HTTP method for the token refresh API. Token Refresh Endpoint The API URL that refreshes the access token. Token Refresh Content Type The content type of the refresh request. Token Refresh Time (min) How often, in minutes, to refresh the access token automatically. Set to 0to disable automatic refresh; leave blank to refresh every 25 minutes by default.Token Refresh Request Body The request body for the refresh API.
Bearer Token
Section titled “Bearer Token”Requests are authenticated with a bearer token, usually obtained through an authorization process such as OAuth2. Every request to the helpdesk carries a header of the form Authorization: Bearer {{.AccessToken}}, where {{.AccessToken}} is the token the helpdesk grants.
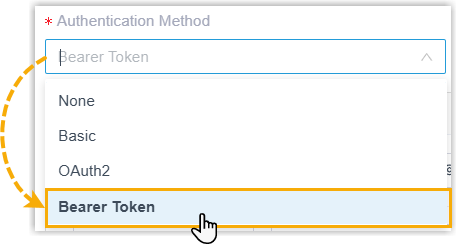
-
In the Authentication Method list, select Bearer Token.
-
Configure the fields users fill in for their credentials, adding custom fields if needed.
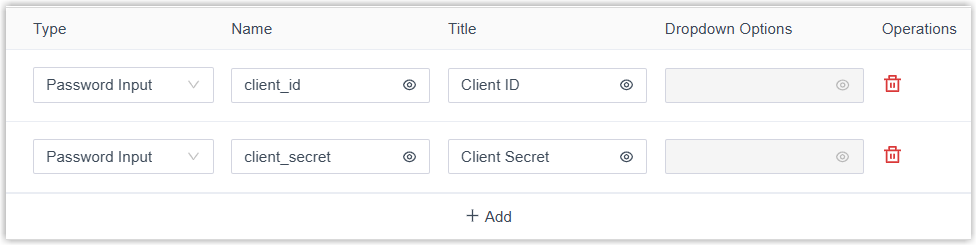
Setting Description Type The field type: Text Input, Password Input, or Dropdown List. Name The variable name for the field. Title The label shown above the input. Dropdown Options For a Dropdown List type, comma-separated choices, for example option1,option2. -
Configure token retrieval to match the API specification.

Setting Description Token Endpoint The helpdesk API URL that requests the access token, for example https://www.api.example.com/oauth/v2/token?client_id={{.client_id}}&client_secret={{.client_secret}}&grant_type=client_credentials. The returned token is stored in the{{.AccessToken}}variable.Content Type The content type of the token request. -
Optional. Configure token refresh.
Setting Description Token Refresh Request Method The HTTP method for the token refresh API. Token Refresh Endpoint The API URL that refreshes the access token. Token Refresh Content Type The content type of the refresh request. Token Refresh Time (min) How often, in minutes, to refresh the access token automatically. Set to 0to disable automatic refresh; leave blank to refresh every 25 minutes by default.Token Refresh Request Body The request body for the refresh API.
Request headers (optional)
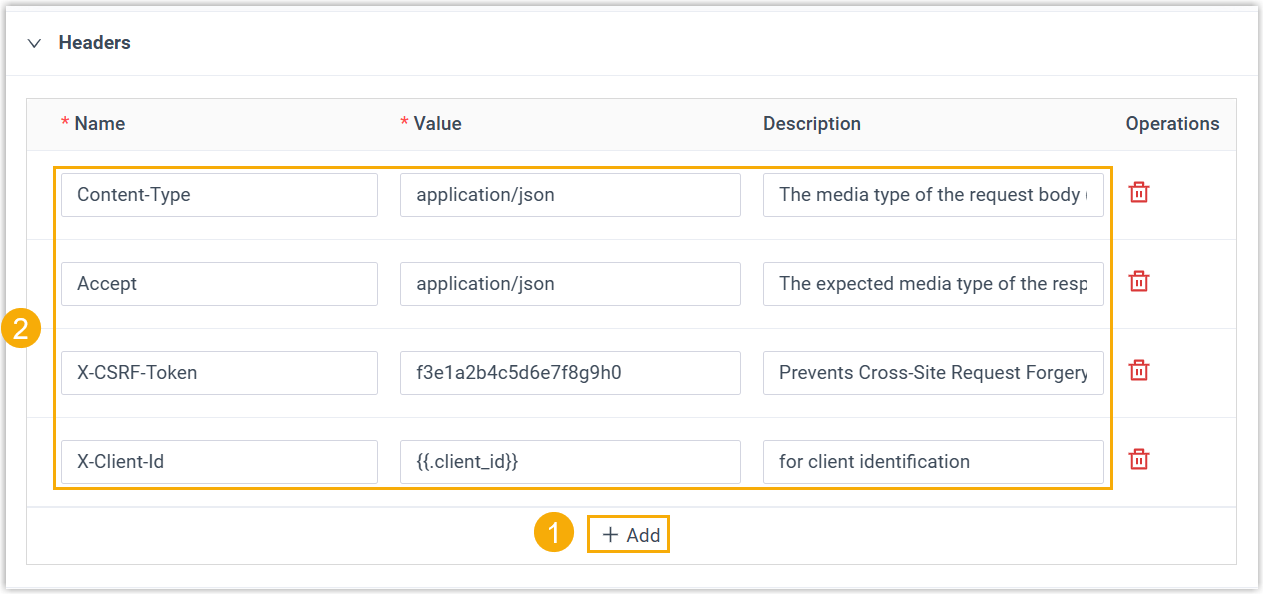
Section titled “Request headers (optional)”Add custom HTTP headers that ride along with the built-in synchronization requests (user association, contact sync, and so on).
-
In the Headers section, click Add.
-
Configure the header:
Setting Description Name The header name, such as Content-TypeorAccept.Value The header value, a fixed value or a variable. Variables from the authentication method work here too; for example, reference a client_idvariable as{{.client_id}}.Description A short note on what the header is for.
Follow-up requests (optional)
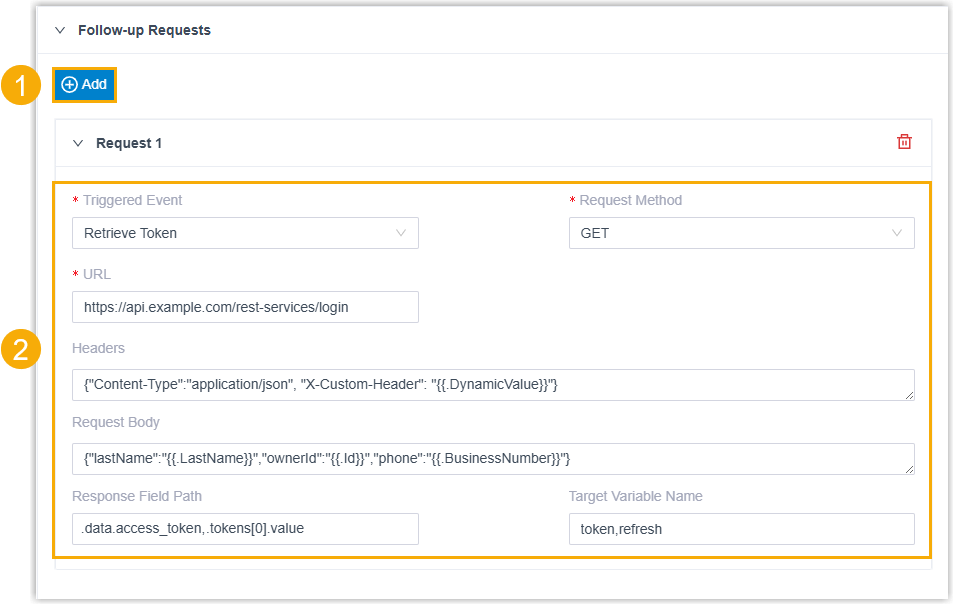
Section titled “Follow-up requests (optional)”If your integration needs extra operations after certain built-in requests finish, define follow-up requests. Each one fires automatically when its trigger operation succeeds, and you can extract data from its response into global variables for reuse elsewhere.
-
In Request Configuration > Follow-up Requests, click Add.
-
Configure the request:
Setting Description Triggered Event The built-in system event that fires this request. Request Method The HTTP method for the request. URL The endpoint for the follow-up operation, for example https://api.example.com/rest-services/login.Headers The request headers as a JSON object. Insert dynamic values with {{.varname}}, for example{"Content-Type":"application/json", "X-Custom-Header": "{{.DynamicValue}}"}.Request Body The payload as a JSON object, again using {{.varname}}for dynamic values, for example{"lastName":"{{.LastName}}","ownerId":"{{.Id}}","phone":"{{.BusinessNumber}}"}.Response Field Path The JSON path(s) that extract data from the response. Separate multiple paths with commas, for example .data.access_token, .tokens[0].value.Target Variable Name The variable(s) that store the extracted values, existing or new. Separate multiple names with commas, for example token,refresh. Values are assigned in the same order as the paths in Response Field Path. The stored values become global variables reusable across the integration.
Connection keepalive (optional)
Section titled “Connection keepalive (optional)”Keep the connection alive so it isn’t dropped after a network timeout or a period of inactivity. When enabled, Cloud Voice sends keep-alive requests to the helpdesk at a set interval to check connection status and authentication validity.

- Switch on Connection Keepalive.
- In the Keepalive Interval (minutes) field, set how often to send the keep-alive request.
Contact search and call popup
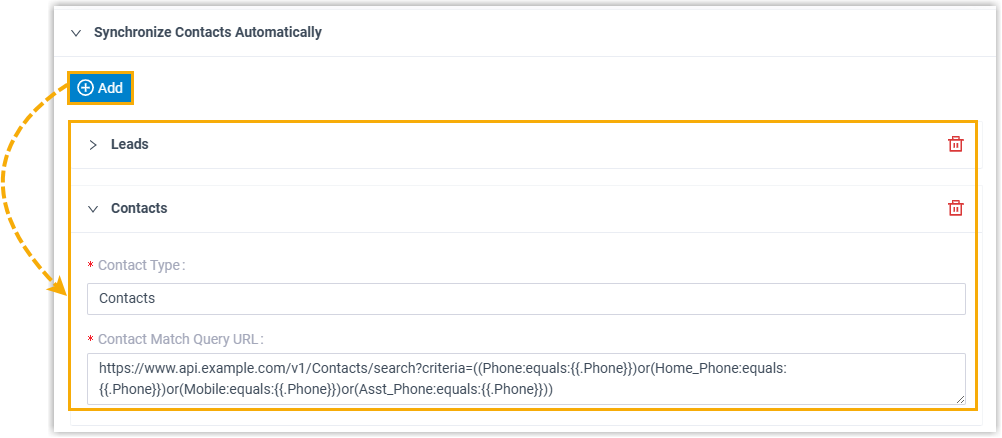
Section titled “Contact search and call popup”In the Synchronize Contacts Automatically section, define the contact types users can choose from and the requests that search for them. These settings power contact lookup, automatic contact synchronization, and call popup.
-
Add a contact type and its search request.
-
Contact Type: A name for the type, for example
Contacts. This name appears as an automatic-sync option when users set up the integration. -
Contact Match Query URL: The helpdesk API URL that searches contacts by criteria. You can use these variables in the criteria:
- Variables from user input during authentication.
- Target variables extracted from follow-up responses.
{{.Phone}}: the number tied to the inbound or outbound call, or the number a user types when searching.
For example:
https://www.api.example.com/v1/Contacts/search?criteria=((Phone:equals:{{.Phone}})or(Home_Phone:equals:{{.Phone}})or(Mobile:equals:{{.Phone}})or(Asst_Phone:equals:{{.Phone}}))
-
-
Set the call popup URL using one of these methods.
Specify URL Format
Build the popup URL from a format string, using variables to fill it in dynamically.

a. In the Contact Popup URL list, select Specify URL Format.
b. In the URL Format field, enter the URL expression. You can use these variables, whose values come from the contact search results:
-
Variables from user input during authentication.
-
Target variables extracted from follow-up responses.
-
{{.ContactSyncType}}: the contact type. -
{{.ContactId}}: the contact ID. -
{{.CustomValue}}: a custom field mapped in the Contact Field Mapping section.For example:
{{.doman_url}}{{.CustomValue}}/tab/{{Capitalize .ContactSyncType}}/{{.ContactId}}
Retrieve from Contact Fields
Pull the popup URL straight from a field in the contact search response.

a. In the Contact Popup URL list, select Retrieve from Contact Fields.
b. In the Contact Field for URL field, enter the JSON path of the field in the response, for example
data.#.contactUrl. -
-
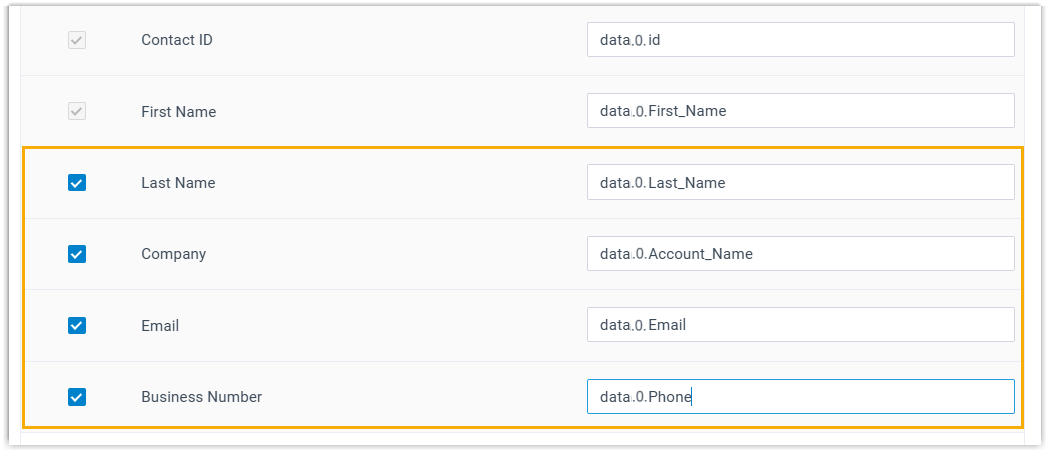
In the Contact Field Mapping section, map helpdesk response fields to Cloud Voice fields by giving each field’s JSON path (for example
data.#(key=="value").field).a. Map the required fields:

- Contact ID: The ID of the matched contact, for example
data.0.id. - First Name: The first name of the matched contact, for example
data.0.First_Name.
b. Enable and map any optional Cloud Voice fields you need.
c. If the built-in Cloud Voice fields don’t cover a value you need, enable and map the response field to Custom Value, then reference it as
{{.CustomValue}}.
- Contact ID: The ID of the matched contact, for example
New contact creation (optional)
Section titled “New contact creation (optional)”To add a new contact to the helpdesk when a caller’s number matches no existing contact, enable Create New Contact.
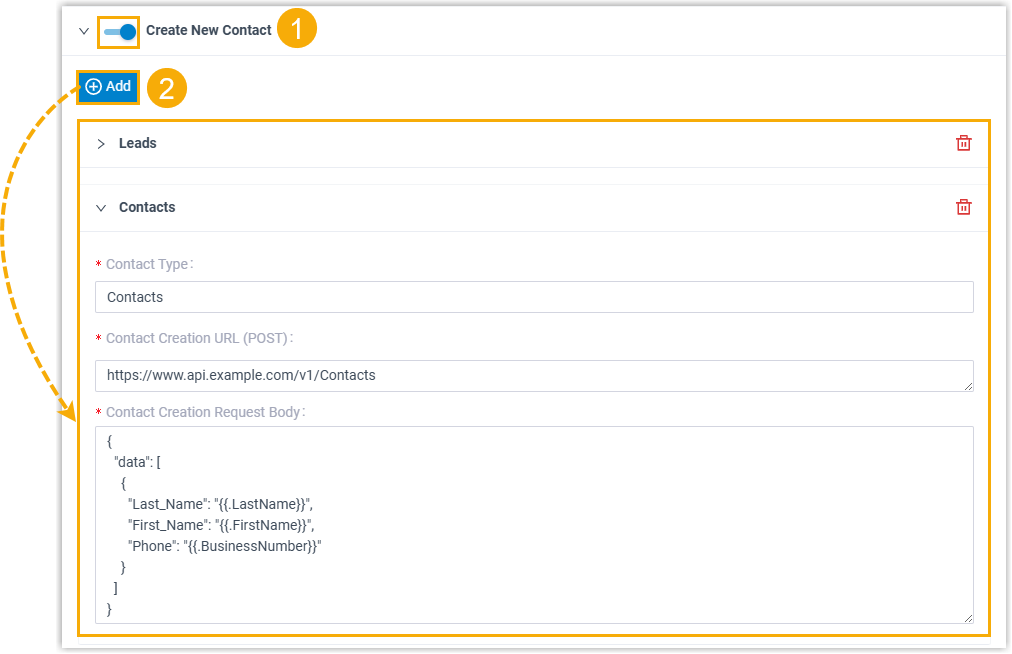
- Switch on Create New Contact.
- Add the contact types users can choose when configuring the integration:
-
Contact Type: The type of contact, for example
Contacts. -
Contact Creation URL (POST): The helpdesk API URL that creates a contact, for example
https://www.api.example.com/v1/Contacts. -
Contact Creation Request Body: The JSON body carrying the contact details. You can use:
- Variables from user input during authentication.
- Target variables extracted from follow-up responses.
{{.LastName}}: required. The contact’s last name.{{.FirstName}}: required. The contact’s first name.{{.BusinessNumber}}: required. The contact’s phone number.
For example:
{"data": [{"Last_Name": "{{.LastName}}","First_Name": "{{.FirstName}}","Phone": "{{.BusinessNumber}}"}]}
-
Call journaling (optional)
Section titled “Call journaling (optional)”To log call activity and details in the helpdesk automatically, enable Call Journal.
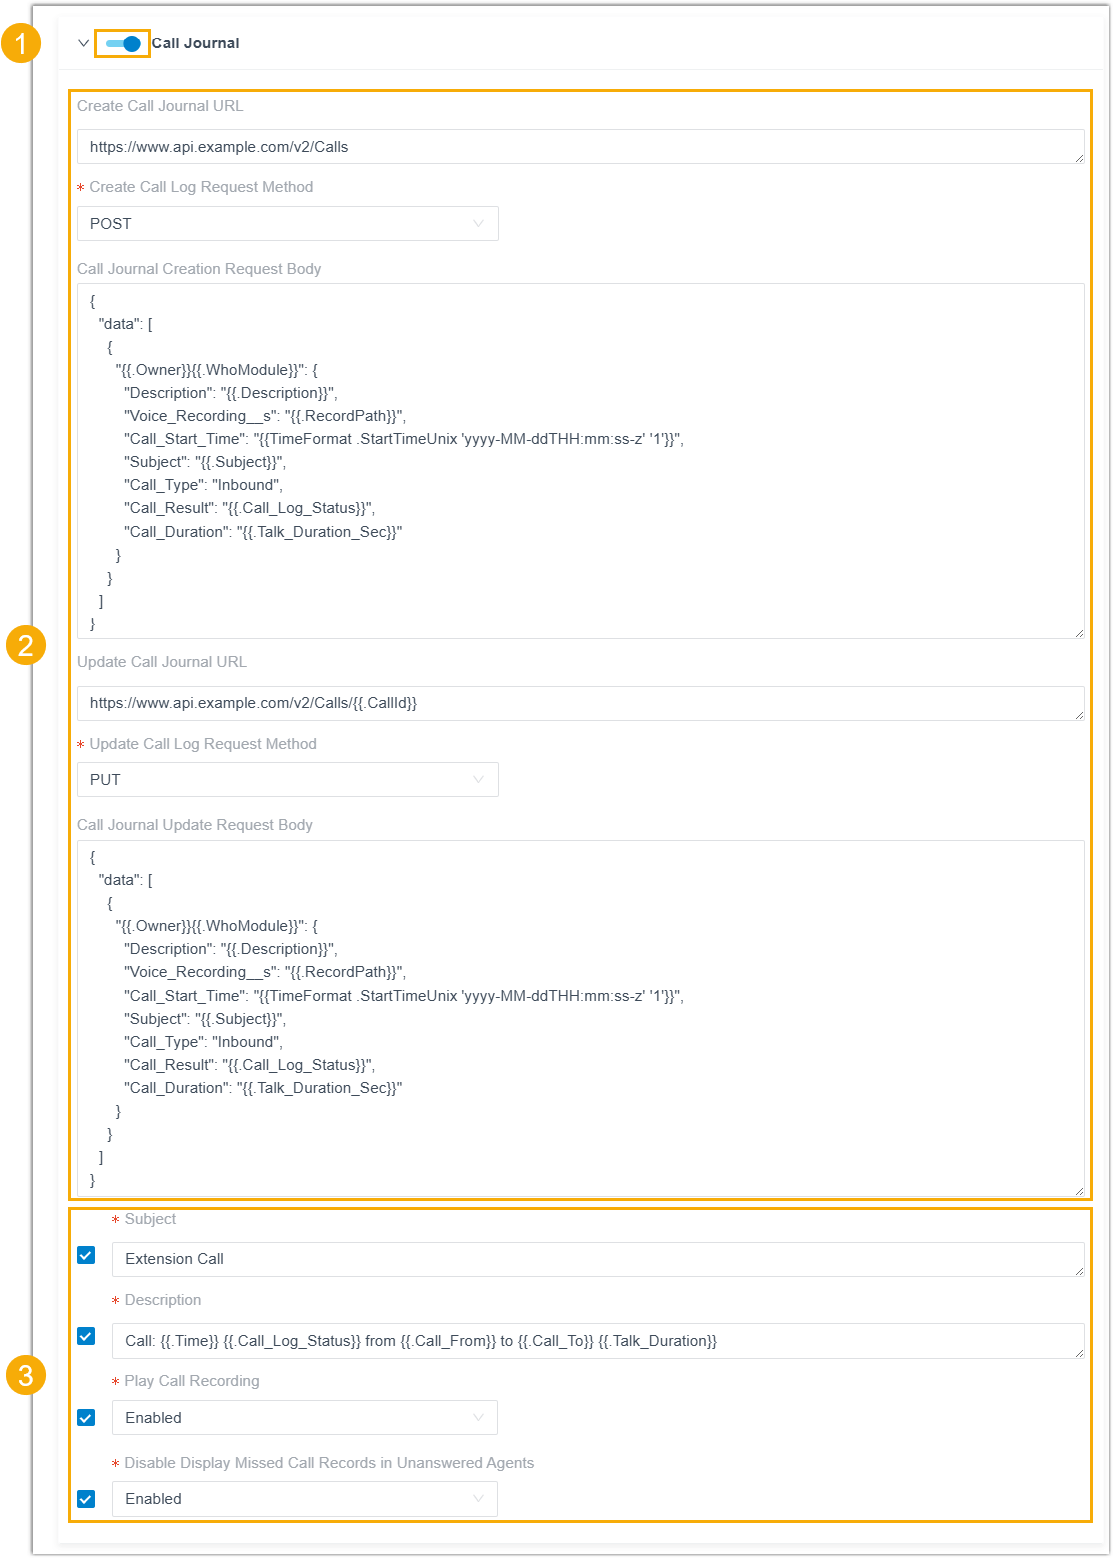
-
Switch on Call Journal.
-
Configure the request and body for journaling.
a. Configure the request that creates a new call log:
-
Create Call Journal URL: The helpdesk API URL that creates a call log, for example
https://www.api.example.com/v2/Calls. -
Create Call Log Request Method: POST or PUT.
-
Call Journal Creation Request Body: The JSON body carrying the call details.
For example:
{"data": [{"{{.Owner}}{{.WhoModule}}": {"Description": "{{.Description}}","Voice_Recording__s": "{{.RecordPath}}","Call_Start_Time": "{{TimeFormat .StartTimeUnix 'yyyy-MM-ddTHH:mm:ss-z' '1'}}","Subject": "{{.Subject}}","Call_Type": "Inbound","Call_Result": "{{.Call_Log_Status}}","Call_Duration": "{{.Talk_Duration_Sec}}"}}]}
b. Optional. Configure the request that updates an existing call log with extra information:
-
Update Call Journal URL: The helpdesk API URL that updates a call log, for example
https://www.api.example.com/v2/Calls/{{.CallId}}. -
Update Call Log Request Method: POST or PUT.
-
Call Journal Update Request Body: The JSON body carrying the call details.
For example:
{"data": [{"{{.Owner}}{{.WhoModule}}": {"Description": "{{.Description}}","Voice_Recording__s": "{{.RecordPath}}","Call_Start_Time": "{{TimeFormat .StartTimeUnix 'yyyy-MM-ddTHH:mm:ss-z' '1'}}","Subject": "{{.Subject}}","Call_Type": "Inbound","Call_Result": "{{.Call_Log_Status}}","Call_Duration": "{{.Talk_Duration_Sec}}","AI_Transcription": "{{.AI_Transcription}}","AI_Summary": "{{.AI_Summary}}","Call_Note": "{{.Call_Note}}"}}]}
-
-
Optional. Choose which call journaling settings are available in the integration by selecting their checkboxes, and set default values.
Option Description Subject Makes a subject setting available in the integration, used to set a default subject for all synced call logs. Description Makes a description setting available, used to detail synced call logs, for example Call: {{.Time}} {{.Call_Log_Status}} from {{.Call_From}} to {{.Call_To}} {{.Talk_Duration}}.Play Call Recording Makes a setting available that controls whether call recordings can be played back inside the helpdesk. Disable Display Missed Call Records in Unanswered Agents Makes a setting available that controls whether queue and ring group call logs sync only to the helpdesk of the agent who answered, while missed-call logs for the same call are not synced to agents who didn’t answer.
Chat journaling (optional)
Section titled “Chat journaling (optional)”To sync chat conversations with helpdesk contacts into the helpdesk automatically, enable Chat Journal.
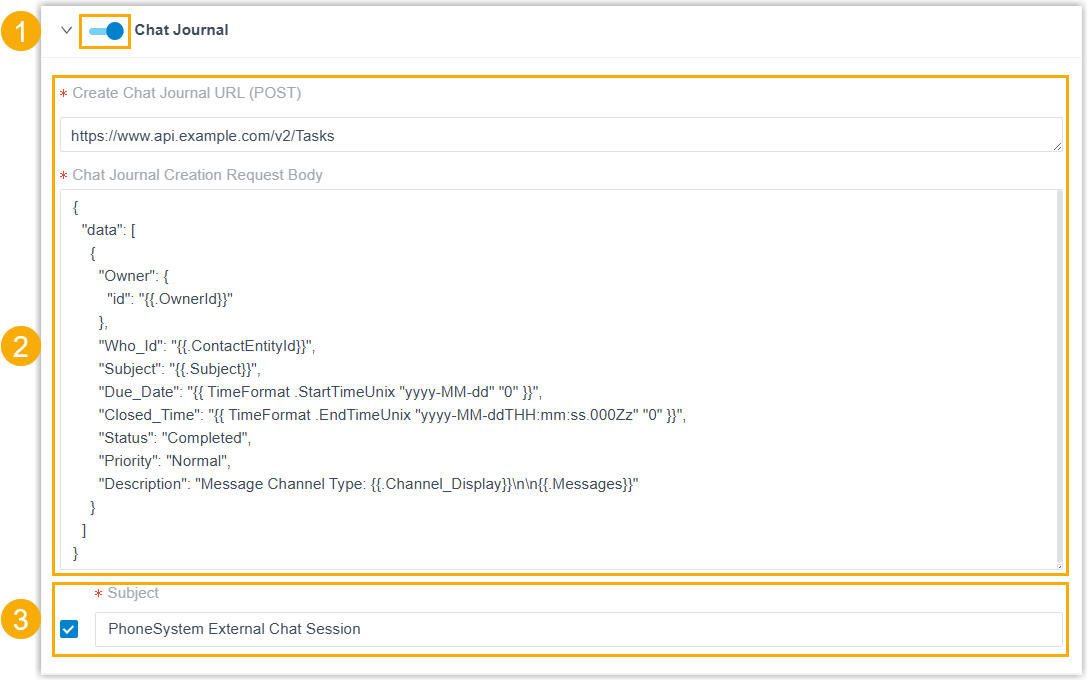
-
Switch on Chat Journal.
-
Configure the request and body for journaling.
-
Create Chat Journal URL (POST): The helpdesk API URL that creates an object to store chat messages, for example
https://www.api.example.com/v2/Tasks. -
Chat Journal Creation Request Body: The JSON body carrying the chat details.
For example:
{"data": [{"Owner": {"id": "{{.OwnerId}}"},"Who_Id": "{{.ContactEntityId}}","Subject": "{{.Subject}}","Due_Date": "{{ TimeFormat .StartTimeUnix "yyyy-MM-dd" "0" }}","Closed_Time": "{{ TimeFormat .EndTimeUnix "yyyy-MM-ddTHH:mm:ss.000Zz" "0" }}","Status": "Completed","Priority": "Normal","Description": "Message Channel Type: {{.Channel_Display}}\n\n{{.Messages}}"}]}
-
-
Optional. In the Subject section, decide whether users may customize the subject of the synced record.
a. Select the checkbox to make the Subject field available in the integration, used to set a default subject for all synced records.
b. Set the default value for the Subject field.
Automatic ticket creation (optional)
Section titled “Automatic ticket creation (optional)”To open a new helpdesk ticket automatically from a call, enable Create New Ticket Automatically.
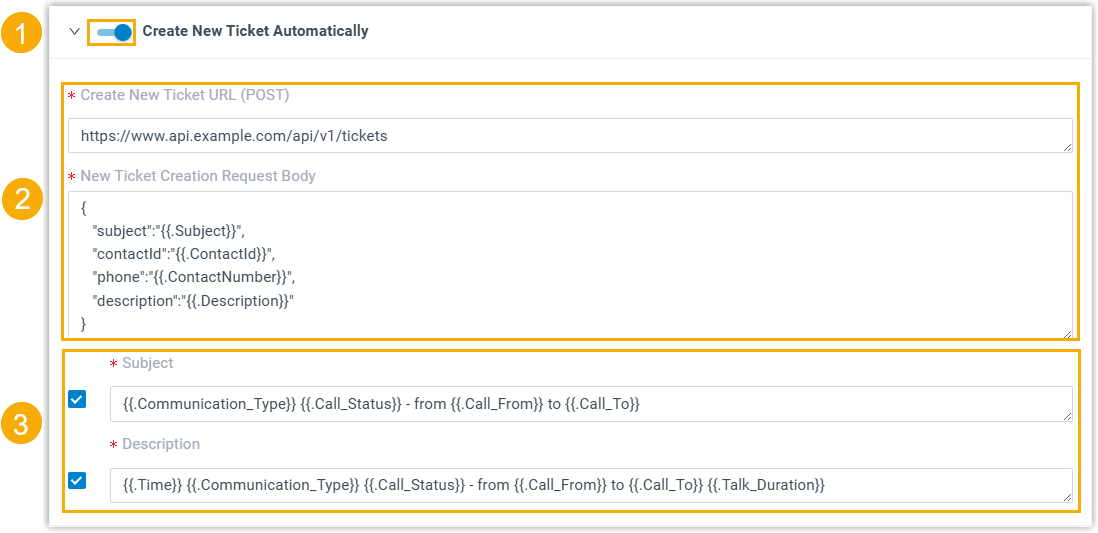
-
Switch on Create New Ticket Automatically.
-
Configure the request and body for ticket creation.
-
Create New Ticket URL (POST): The helpdesk API URL that creates a ticket, for example
https://www.api.example.com/api/v1/tickets. -
New Ticket Creation Request Body: The JSON body carrying the ticket details.
For example:
{"subject":"{{.Subject}}","contactId":"{{.ContactId}}","phone":"{{.ContactNumber}}","description":"{{.Description}}"}
-
-
To let users customize the subject and description of the new ticket, enable the options below and set their defaults.
- Subject: If enabled, enter a default subject, for example
{{.Communication_Type}} {{.Call_Status}} - from {{.Call_From}} to {{.Call_To}}. - Description: If enabled, enter default details, for example
{{.Time}} {{.Communication_Type}} {{.Call_Status}} - from {{.Call_From}} to {{.Call_To}} {{.Talk_Duration}}.
- Subject: If enabled, enter a default subject, for example
Question about this page?
Ask the AI assistant. It starts from this page, then searches the rest of the docs.
Ask Cloud Voice AI
Answers are AI-generated from the docs and may contain mistakes. Verify with the linked pages.