
Add a Company Contact
Company contacts are shared address-book entries. Any contact you add is synced across your own Cloud Voice App clients and the server, and made available to the colleagues who are authorized to see it. This page covers the ways to add one from the desktop client.
You can add a company contact in several ways:
- Enter the details by hand.
- Save an unknown number straight from a call log, voicemail, or recording.
- Promote one of your personal contacts to a shared company contact.
Add a contact manually
Section titled “Add a contact manually”-
In the Cloud Voice App desktop client, open Contacts.
-
Click the phonebook selector
 in the top-left corner, then choose Company Contacts or the phonebook you want the contact to live in.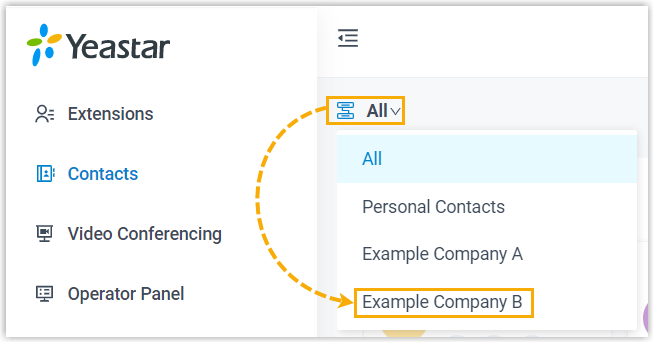
-
Click Add.
-
Fill in the contact’s details on the page that opens.
-
Click Save.
Add a contact from a call log, voicemail, or recording
Section titled “Add a contact from a call log, voicemail, or recording”When an unknown number shows up in one of your activity lists, you can turn it into a company contact without retyping it.
- In the Cloud Voice App desktop client, open the list that holds the number: Call Logs, Voicemails, or Recordings.
- Right-click the entry you want to save.
- Do one of the following, depending on whether the number belongs to a new or an existing contact.
Save the number as a new contact
Section titled “Save the number as a new contact”-
Click Add New Contact. A contact details page opens with the number already filled into the number list.
-
Open the Add to drop-down, select Company Contacts, and then pick the phonebook or phonebooks to store the contact in from the Phonebook List.

-
Set the number’s type and enter any other details you want to record.
-
Click Save.
Add the number to an existing contact
Section titled “Add the number to an existing contact”-
Click Add to Existing Contact.
-
In the window that opens, click the phonebook selector
in the top-left corner, then choose Company Contacts or the phonebook where the contact is stored.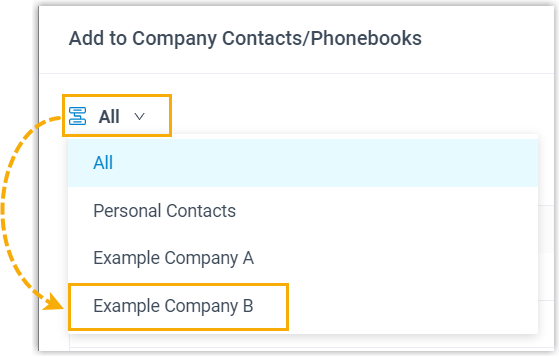
-
Search for and select the contact, then click Confirm. The contact details page opens with the number added to the number list.
-
Set the number’s type and update any other details as needed.
-
Click Save.
Add a contact from your personal contacts
Section titled “Add a contact from your personal contacts”You can share one of your own personal contacts with the team by copying it into Company Contacts.
-
In the Cloud Voice App desktop client, open Contacts.
-
Click the phonebook selector
in the top-left corner and choose Personal Contacts.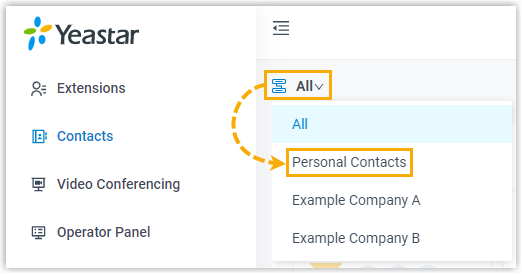
-
On the contact card, click the more options icon
 , then click Add to Company Contacts or Add to Phonebooks.
 -
If you chose Add to Phonebooks, select the phonebook to store the contact in from the pop-up window and click Confirm. An “Added successfully” message confirms the personal contact is now a company contact.
Question about this page?
Ask the AI assistant. It starts from this page, then searches the rest of the docs.
Ask Cloud Voice AI
Answers are AI-generated from the docs and may contain mistakes. Verify with the linked pages.