
Set Up Auto Answer for Cloud Voice App UC Clients
Auto answer lets the Cloud Voice App accept an incoming call on its own, so the caller is connected without the user having to tap or click Answer. This cuts the caller’s wait time to zero (or to a short delay you choose). You can enable it separately for a user’s mobile, desktop, and web unified communications (UC) apps, and each change you make is pushed to their apps right away. This page covers both flavors of the feature: auto answer for ordinary (non-paging/intercom) calls and auto answer for paging and intercom calls.
Requirements
Section titled “Requirements”Confirm the PBX and the user’s apps meet these minimum versions before you begin. If any component is older, the auto answer options may not appear or may not sync.
| Server / Client | Version requirement |
|---|---|
| PBX server | 84.17.0.16 or later |
| Cloud Voice App (mobile) | iOS: 5.8.2 or later; Android: 5.8.3 or later |
| Cloud Voice App (desktop) | Windows: 1.8.3 or later; Mac: 1.8.3 or later |
Auto answer for non-paging/intercom calls
Section titled “Auto answer for non-paging/intercom calls”Use this setting for regular inbound calls. You can also hold the caller for a short delay before the app connects.
-
Sign in to the PBX (Private Branch Exchange, your organization’s phone system) web portal and open Extension and Trunk > Extension.
-
Next to the extension you want to change, select the edit icon
 , then open the Cloud Voice App tab.
 -
Set up auto answer for the client you want to configure.
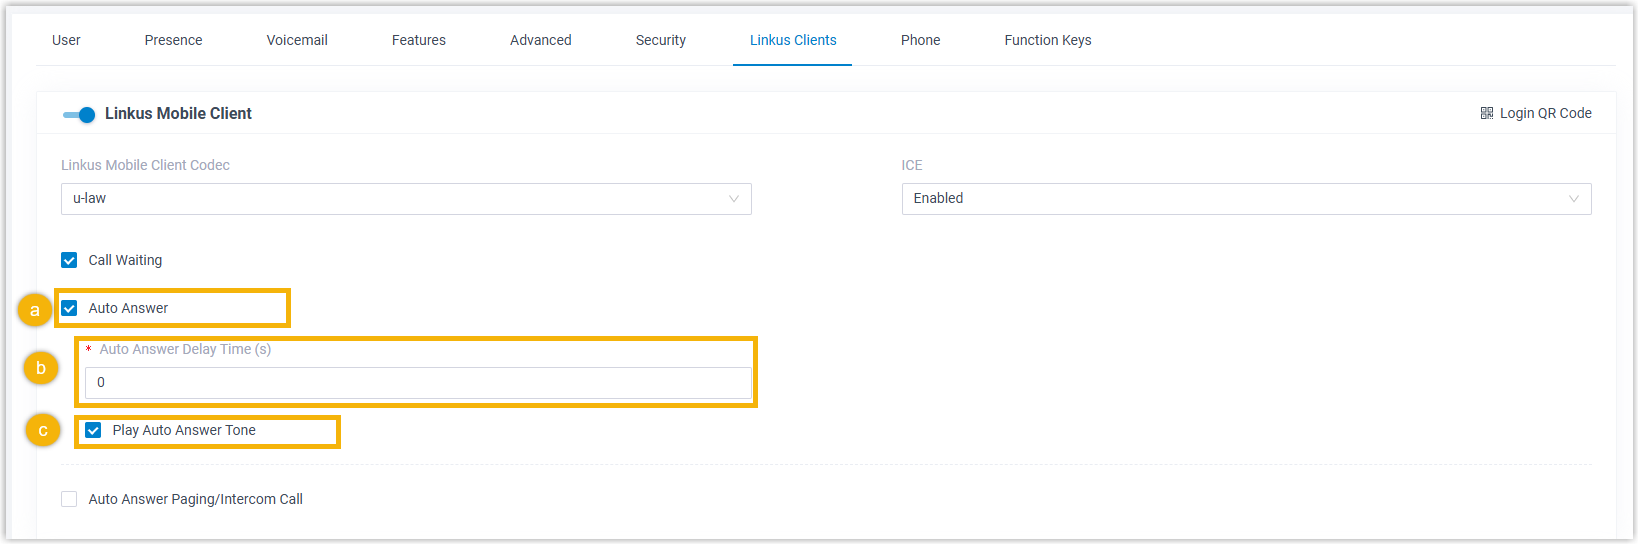
- Select the Auto Answer checkbox.
- In Auto Answer Delay Time(s), enter how many seconds the caller waits before the app picks up. Enter a value from 0 to 60; set it to 0 to answer immediately.
- Optional: Select Play Auto Answer Tone to play a short beep on the user’s end whenever a call is answered automatically.
-
Select Save.
The setting applies to the user’s Cloud Voice App. From then on, incoming non-paging/intercom calls are answered automatically once the delay you set has elapsed.
Auto answer for paging and intercom calls
Section titled “Auto answer for paging and intercom calls”Paging (a one-way announcement pushed out to devices) and intercom (a direct two-way call that opens the far end automatically) calls are meant to reach the user instantly, so this setting connects them right away rather than after a delay.
-
Sign in to the PBX web portal and open Extension and Trunk > Extension.
-
Next to the extension you want to change, select the edit icon
, then open the Cloud Voice App tab. -
Set up paging/intercom auto answer for the client you want to configure.
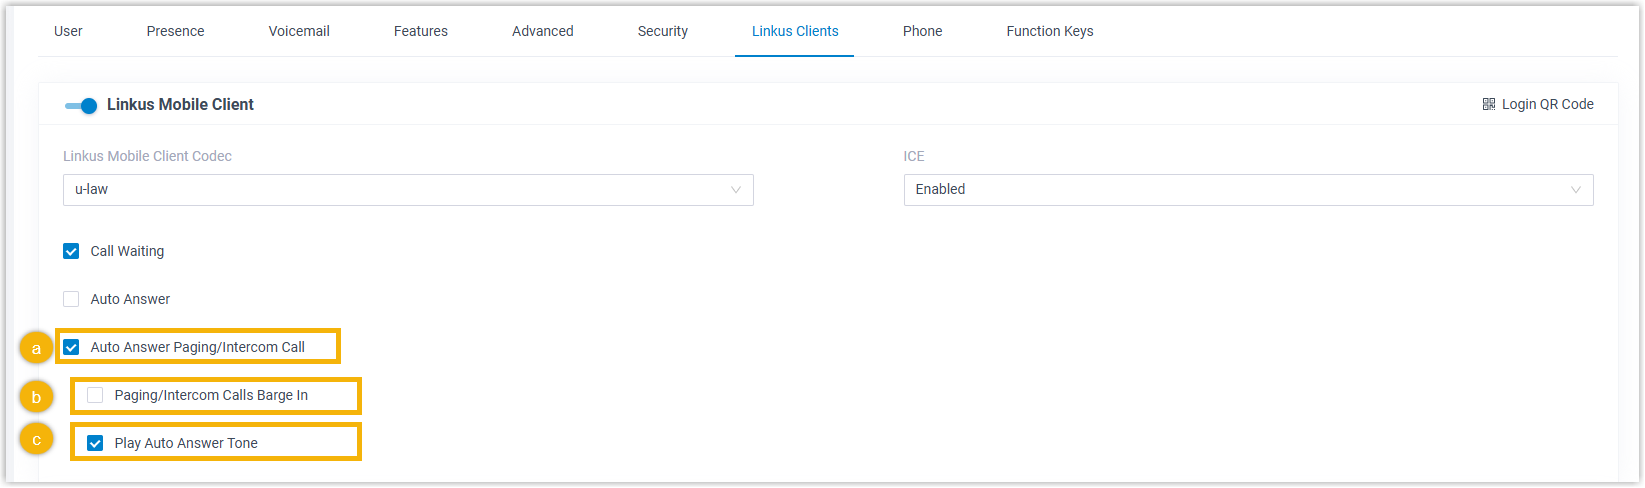
- Select the Auto Answer Paging/Intercom Call checkbox.
- Optional: Select Paging/Intercom Calls Barge In to answer an incoming paging or intercom call even when the user is already on another call.
- Optional: Select Play Auto Answer Tone to play a short beep on the user’s end whenever a paging or intercom call is answered automatically.
-
Select Save.
The setting applies to the user’s Cloud Voice App, and incoming paging or intercom calls are answered automatically.
Question about this page?
Ask the AI assistant. It starts from this page, then searches the rest of the docs.
Ask Cloud Voice AI
Answers are AI-generated from the docs and may contain mistakes. Verify with the linked pages.