
Allow Callers to Dial by Name via IVR
Dial by Name lets a caller who doesn’t have someone’s extension number find them from within an IVR (Interactive Voice Response: the automated menu that answers a call and offers keypad options such as “Press 1 for Sales”). Instead of transferring blind, the caller enters the first three letters of an employee’s first or last name on the phone keypad, and the system matches it against your extension directory and connects the call. This page walks through the setup, from naming your extensions to wiring the feature to an IVR key.
How the setup breaks down
Section titled “How the setup breaks down”Getting Dial by Name working takes four steps, each covered below:
- Give each extension a caller ID name.
- Choose whether callers search by first name or last name.
- Record or upload a prompt that tells callers how to use the feature.
- Point an IVR key press at Dial by Name.
Step 1: Give each extension a caller ID name
Section titled “Step 1: Give each extension a caller ID name”Dial by Name searches an extension’s caller ID name, which the system builds from the user’s first and last name. If those fields are empty, the extension can’t be found, so start by making sure every extension you want reachable has a name set.
-
In the PBX web portal, go to Extension and Trunk > Extension and open the extension you want to edit.
-
Under User Information, fill in the First Name and Last Name fields.

-
Click Save, then Apply.

Step 2: Choose search by first name or last name
Section titled “Step 2: Choose search by first name or last name”The IVR always matches from the start of the caller ID name, so the display format you pick decides which name callers spell out. Set it once for the whole system.
-
In the PBX web portal, go to PBX Settings > Preferences.
-
Open the Name Display Format drop-down and choose a format.

- To let callers search by first name, choose First Name Last Name with Space Inbetween.
- To let callers search by last name, choose Last Name First Name with Space Inbetween or Last Name First Name without Space Inbetween.
-
Click Save, then Apply.
Step 3: Prepare a custom prompt
Section titled “Step 3: Prepare a custom prompt”Callers won’t know Dial by Name exists unless the IVR tells them. Create a prompt that instructs them to press the key you’ll assign to the feature.
-
In the PBX web portal, go to PBX Settings > Voice Prompt > Custom Prompt.
Step 4: Configure the IVR
Section titled “Step 4: Configure the IVR”With the prompt ready, attach it to an IVR and assign a key to Dial by Name.
-
In the PBX web portal, go to Call Features > IVR and open the IVR you want to edit.
-
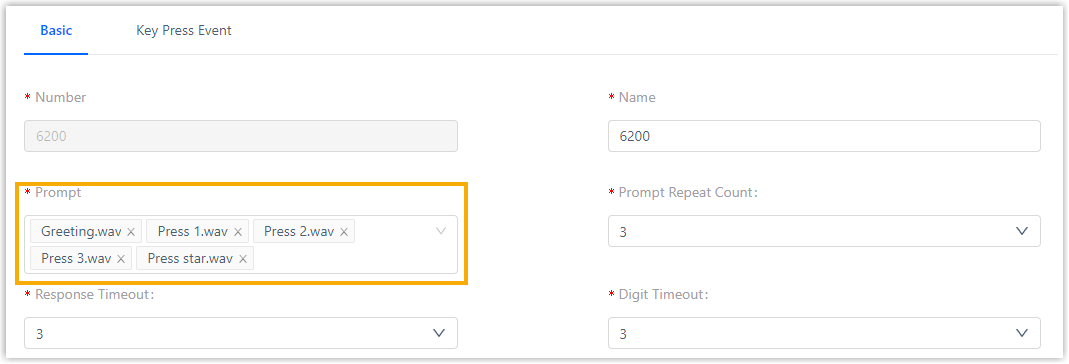
Set the prompt callers hear: a. Open the Basic tab. b. From the Prompt drop-down, select your custom prompt. You can add up to five audio files, and the system plays them in the order listed.
-
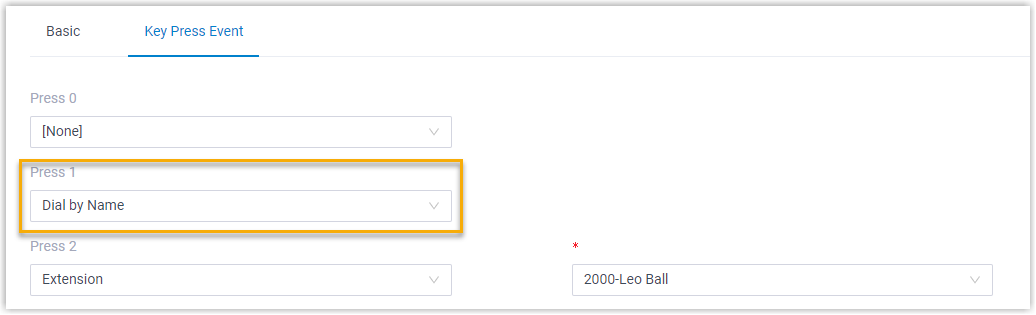
Assign a key to the feature: a. Open the Key Press Event tab. b. In the drop-down for the key you want to use, select Dial by Name.
-
Click Save, then Apply.
Result
Section titled “Result”Callers who reach the IVR can now find any named extension by entering the first three letters of the person’s name on their keypad.
Example
Section titled “Example”The following walkthrough uses a system where the name display format is First Name Last Name with Space Inbetween and key 1 is assigned to Dial by Name.
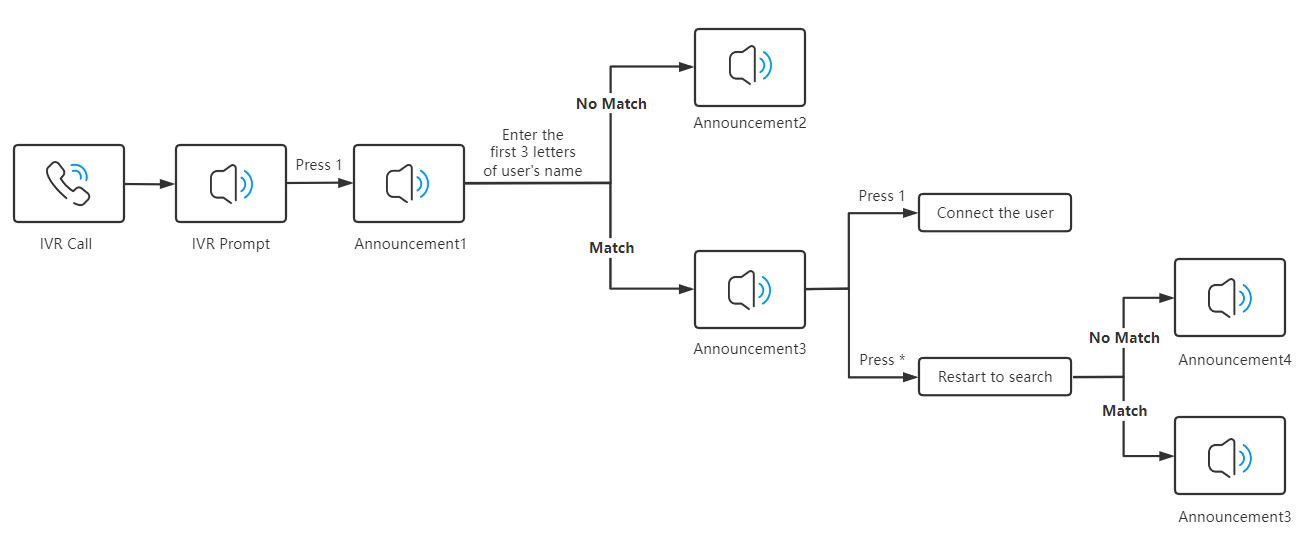
- A caller reaches the IVR and hears the greeting.
- The caller presses 1 to start Dial by Name.
- After the directory prompt, the caller enters the first three letters of an extension user’s first name. To find “Phillips Huff”, for example, the caller presses 7-4-4, the keys that carry the letters
P,H, andI. - The IVR looks for the closest match and responds:
- If nothing matches, it plays the “no entries” announcement.
- If it finds a match, it announces the user’s name and extension number, then offers two options:
- 1: Connect me: press 1 to have the IVR put the call through to that extension.
- *, Not who I want: press star to search again. The IVR offers the next matching user. When no more matches remain, it plays the “no more entries” announcement.
Default Dial by Name announcements
Section titled “Default Dial by Name announcements”Cloud Voice ships with the default announcements below. Each one plays at a specific point in the search.
| Announcement | When it plays |
|---|---|
| Welcome to the directory. Please enter the first three letters of your party’s first name, using your touch tone keypad, use the 7 key for Q, and the 9 key for Z. | When the caller presses the key that starts Dial by Name. |
| No directory entries match your search. | When no directory entry matches the three letters the caller entered. |
| [Name] extension [Number] If this is the person you are looking for, press 1 now, otherwise please press star now. | When a directory entry matches the three letters the caller entered. |
| There are no more compatible entries in the directory. | When the caller presses star to keep searching but no further matches remain. |
Question about this page?
Ask the AI assistant. It starts from this page, then searches the rest of the docs.
Ask Cloud Voice AI
Answers are AI-generated from the docs and may contain mistakes. Verify with the linked pages.