
Auto Provision IP Phones Remotely with Proxy
An Onsite Proxy lets you provision several IP phones at a remote site without exposing them to the public internet. Instead of each phone reaching Cloud Voice directly, the proxy sits in the phones’ local subnet and carries provisioning and registration traffic through an encrypted tunnel. This page walks through auto provisioning for both PnP (Plug and Play) and Non-PnP phones, and shows how to assign a user extension to each device.
Requirement
Section titled “Requirement”Your Cloud Voice system must be running firmware version 84.23.0.24 or later.
Auto provision PnP IP phones
Section titled “Auto provision PnP IP phones”When a phone supports PnP provisioning, an Onsite Proxy in the same subnet finds it automatically. The proxy detects the phone, reports its details back to the PBX (Private Branch Exchange, your hosted Cloud Voice phone system), and passes the SIP (Session Initiation Protocol) NOTIFY message, which carries the provisioning link, from the PBX down to the phone.
The phone then pulls its configuration file from the server named in that link and sends its extension registration request back through the Onsite Proxy, which relays it to the PBX to finish registration.
The example below uses a Yealink SIP-T53W running firmware 96.86.0.81 to illustrate PnP provisioning through an Onsite Proxy.
Prerequisites
Section titled “Prerequisites”- An Onsite Proxy is deployed in the same subnet as the phone and is connected to the PBX. See Onsite Proxy Overview.
- The phone is on the list of models supported for auto provisioning. See Auto Provisioning - Supported Devices.
- The phone supports PnP provisioning.
- You have downloaded the provisioning template for the phone model, at Auto Provisioning > Resource Repository > Default Templates. See Update a Default Auto Provisioning Template.
Procedure
Section titled “Procedure”-
If the phone has been used before, reset it to factory defaults.
-
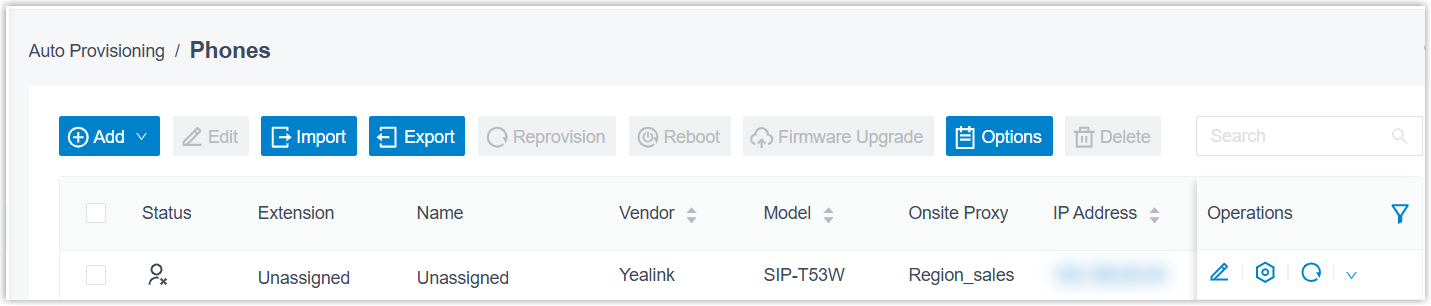
Sign in to your Cloud Voice management portal and open Auto Provisioning > Phones.
Every phone the Onsite Proxy has discovered appears in the list, along with its MAC (Media Access Control) address, IP address, vendor, and model.
-
Click the edit icon
 next to the phone you want to provision.
 -
Under Options, pick a template from the Template drop-down list.
-
Under Assign Extension, choose the extension to register on the phone.
-
Click Save.
-
Restart the phone.
Result
Section titled “Result”-
The template settings are applied to the phone automatically.
-
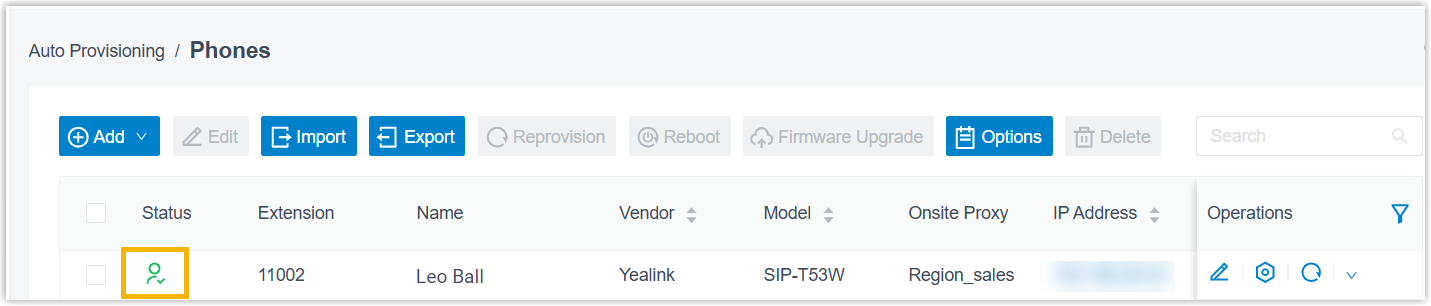
The extension registers on the phone through the Onsite Proxy. You can confirm the registration state on Auto Provisioning > Phones:
 The assigned extension is registered on the phone.
 The assigned extension is not registered on the phone.
Auto provision Non-PnP phones
Section titled “Auto provision Non-PnP phones”Phones that do not support PnP can’t be discovered automatically, so you add them to the PBX by hand and then publish the provisioning link where the phones can reach it.
Once the link is reachable, each phone downloads its configuration file from the server named in the link, and the Onsite Proxy in its subnet relays the extension registration request to the PBX.
The example below uses a Grandstream GHP621W running firmware 1.0.1.71, provisioned through an Onsite Proxy together with a DHCP (Dynamic Host Configuration Protocol) server.
Prerequisites
Section titled “Prerequisites”- An Onsite Proxy is deployed in the same subnet as the phone and is connected to the PBX. See Onsite Proxy Overview.
- The phone is on the list of models supported for auto provisioning. See Auto Provisioning - Supported Devices.
- You have the phone’s vendor, model, and MAC address.
- You have downloaded the provisioning template for the phone model, at Auto Provisioning > Resource Repository > Default Templates. See Update a Default Auto Provisioning Template.
The process has two parts:
- Step 1. Generate a configuration file for the phone on the PBX
- Step 2. Make the configuration file reachable by the phone
Step 1. Generate a configuration file for the phone on the PBX
Section titled “Step 1. Generate a configuration file for the phone on the PBX”-
If the phone has been used before, reset it to factory defaults.
-
Sign in to your Cloud Voice management portal and open Auto Provisioning > Phones.
-
Click Add to create a new phone entry.
-
Under IP Phone, enter the device details:
- Vendor: Select the phone’s vendor.
- Model: Select the phone’s model.
- MAC Address: Enter the phone’s MAC address.
-
Under Options, configure the following:
-
Template: Select a template from the drop-down list.
-
Provisioning Link: A provisioning server URL is generated for you and shown on the page.
-
Register via Onsite Proxy: Select the checkbox.
-
Onsite Proxy: Select the Onsite Proxy that serves the phone’s subnet.
-
-
Under Assign Extension, choose the extension to register on the phone.
-
Click Save.
Step 2. Make the configuration file reachable by the phone
Section titled “Step 2. Make the configuration file reachable by the phone”Set up a DHCP server on the phone’s network and point DHCP option 66 at the provisioning link. The steps below use the Tftpd32 DHCP server as an example.
-
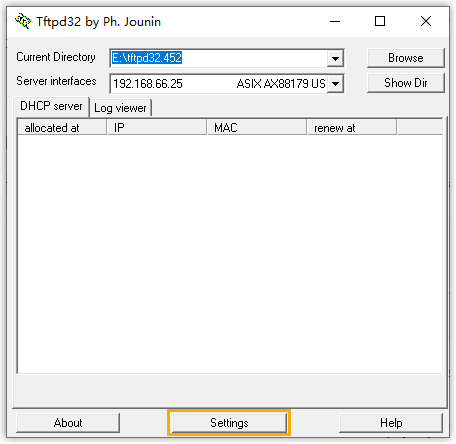
Launch Tftpd32 and click Settings at the bottom of the window.
-
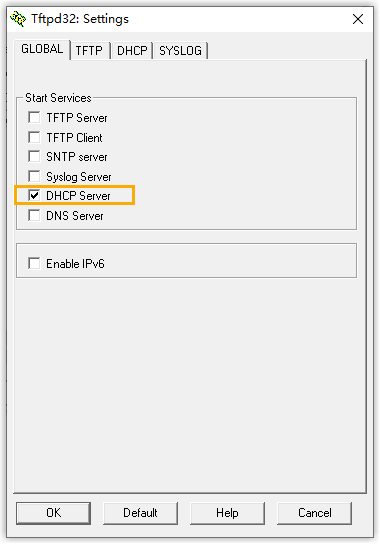
In the window that opens, go to the GLOBAL tab and select the DHCP Server checkbox.
-
Go to the DHCP tab and set the server parameters.
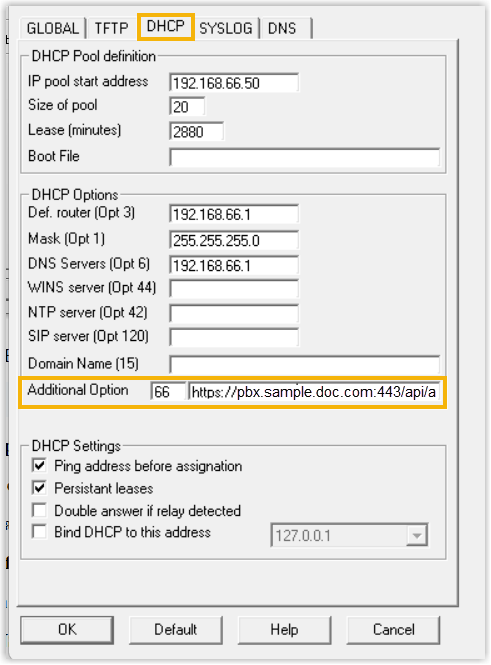
- IP pool start address: The first IP address to hand out.
- Size of pool: How many addresses are available.
- Lease time: How long each address stays assigned.
- Def. Router (Opt 3): The gateway IP address.
- Mask (Opt 1): The subnet mask for the address range.
- DNS Server (Opt 6): The DNS (Domain Name System) server address.
- Additional Option: Set the option number to
66and paste the PBX provisioning link from Step 1 next to it.
-
Click OK.
-
Restart the phone.
Result
Section titled “Result”-
The phone receives an IP address and the provisioning link from the DHCP server, then downloads its configuration file from that link to complete auto provisioning.
-
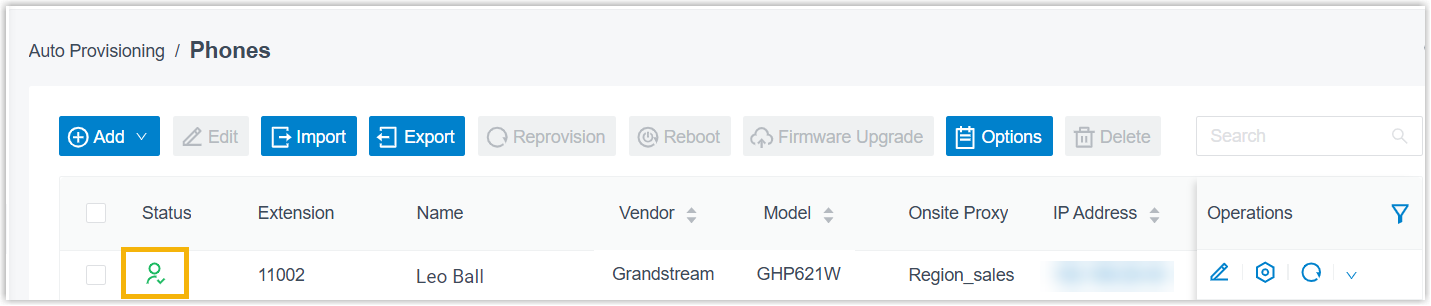
The extension registers on the phone through the Onsite Proxy. You can confirm the registration state on Auto Provisioning > Phones:
- The assigned extension is registered on the phone.
- The assigned extension is not registered on the phone.
Question about this page?
Ask the AI assistant. It starts from this page, then searches the rest of the docs.
Ask Cloud Voice AI
Answers are AI-generated from the docs and may contain mistakes. Verify with the linked pages.