
Customize Outbound Caller IDs for Outbound Calls
The number and name shown to the person you’re calling can be tailored to your organization so recipients recognize who’s reaching out. Cloud Voice gives you several ways to set the outbound caller ID: one shared value for an entire trunk, dedicated values per extension, or a caller ID chosen by the number being dialed. This page walks through each approach.
Before you begin
Section titled “Before you begin”It helps to be familiar with two concepts before you configure anything:
Set a general caller ID for a trunk
Section titled “Set a general caller ID for a trunk”Use this method to apply one caller ID to every call that leaves through a given trunk.
- In the PBX web portal, go to Extension and Trunk > Trunk and open the trunk you want to edit.
- Select the Outbound Caller ID tab.
- Under General, fill in the Outbound Caller ID and Outbound Caller ID Name for the trunk.
- Click Save, then Apply.
From now on, calls placed through this trunk present the general caller ID and name to the called party.
Assign caller IDs to individual extensions
Section titled “Assign caller IDs to individual extensions”You can tie a caller ID to a specific extension on a trunk, so that extension sends its own number when its user dials out. A per-extension outbound caller ID like this is called a DOD (Direct Outward Dialing) number, which is why several of the settings below are labeled DOD.
- In the PBX web portal, go to Extension and Trunk > Trunk and open the desired trunk.
- Select the Outbound Caller ID tab.
- In the Outbound Caller ID List section, click Add under the Outbound Caller ID tab. You can define the mapping one of two ways, described below.
- Click Save, then Apply.
Once configured, an extension’s assigned caller ID is displayed to the called party whenever its user calls out over this trunk.
Option 1: Shared outbound caller ID
Section titled “Option 1: Shared outbound caller ID”Choose Shared Outbound Caller ID to point one caller ID at several extensions at once, then complete these fields:
| Setting | Description |
|---|---|
| Short Code | Optional. A short code for this caller ID. Combined with the feature code prefix, it lets users select the caller ID for actions such as setting it as the default or dialing out with it. |
| Outbound Caller ID | The number that appears as the caller ID on the recipient’s device. |
| Outbound Caller ID Name | Optional. The name shown next to the caller ID on the recipient’s device. |
| Default DOD Label | Optional. A default label that identifies this caller ID. |
| Associated Extensions | The extension(s) this caller ID applies to. Their users are authorized to place calls with these numbers. |
Option 2: Outbound caller ID range
Section titled “Option 2: Outbound caller ID range”Choose Outbound Caller ID Range to map a block of consecutive caller IDs to a block of consecutive extensions, one to one, then complete these fields:
| Setting | Description |
|---|---|
| Outbound Caller ID Range | The start and end numbers that define the range of caller IDs to add. |
| Extension Range | The range of extensions to pair one-to-one with the caller IDs above. |
| Outbound Caller ID Name | Optional. The name shown next to the caller ID on the recipient’s device. |
| Default DOD Label | Optional. A default label that identifies the caller IDs. |
Set a caller ID by dialed number
Section titled “Set a caller ID by dialed number”When you call into different regions, you may want the recipient to see a local number that matches the area code being dialed. You can drive the caller ID from the dialed number by setting it on the outbound route that handles those calls.
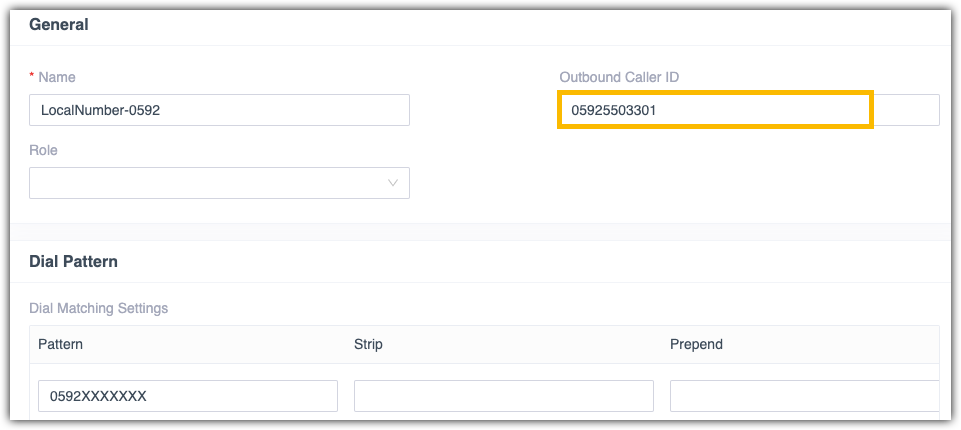
For example, to present the caller ID 05925503301 on calls to local numbers in the 0592 area code:
-
In the PBX web portal, go to Call Control > Outbound Route and open the outbound route used for local calls in the
0592area code. -
Under General, type the caller ID in the Outbound Caller ID field.
-
Click Save, then Apply.
Question about this page?
Ask the AI assistant. It starts from this page, then searches the rest of the docs.
Ask Cloud Voice AI
Answers are AI-generated from the docs and may contain mistakes. Verify with the linked pages.