
Monitor Time Condition Status
A time condition determines whether the system is treating the current moment as Business Hours, Outside Business Hours, or a Holiday, and inbound routes send calls to different destinations accordingly. If you assign a Busy Lamp Field (BLF) key on a user’s IP phone, that user can see the active status at a glance and tell where incoming calls are currently going.
There are two ways for a user to keep an eye on the time condition:
- On the desk phone. Program a BLF key on the extension’s phone. This page covers that method.
- On the Operator Panel. Users who are allowed to override the time condition on the Operator Panel can also view the current status there.
The BLF setup differs slightly depending on how the matching inbound route decides its schedule. Use the section below that matches your configuration.
Prerequisites
Section titled “Prerequisites”Before you add the function key, the target IP phone must already be connected to the PBX (Private Branch Exchange, your phone system) and linked to the user’s extension through auto provisioning. If you have not done that yet, set it up first:
Inbound route based on Global Business Hours
Section titled “Inbound route based on Global Business Hours”Use this when the inbound route follows Business Hours configured in the system’s default time zone.
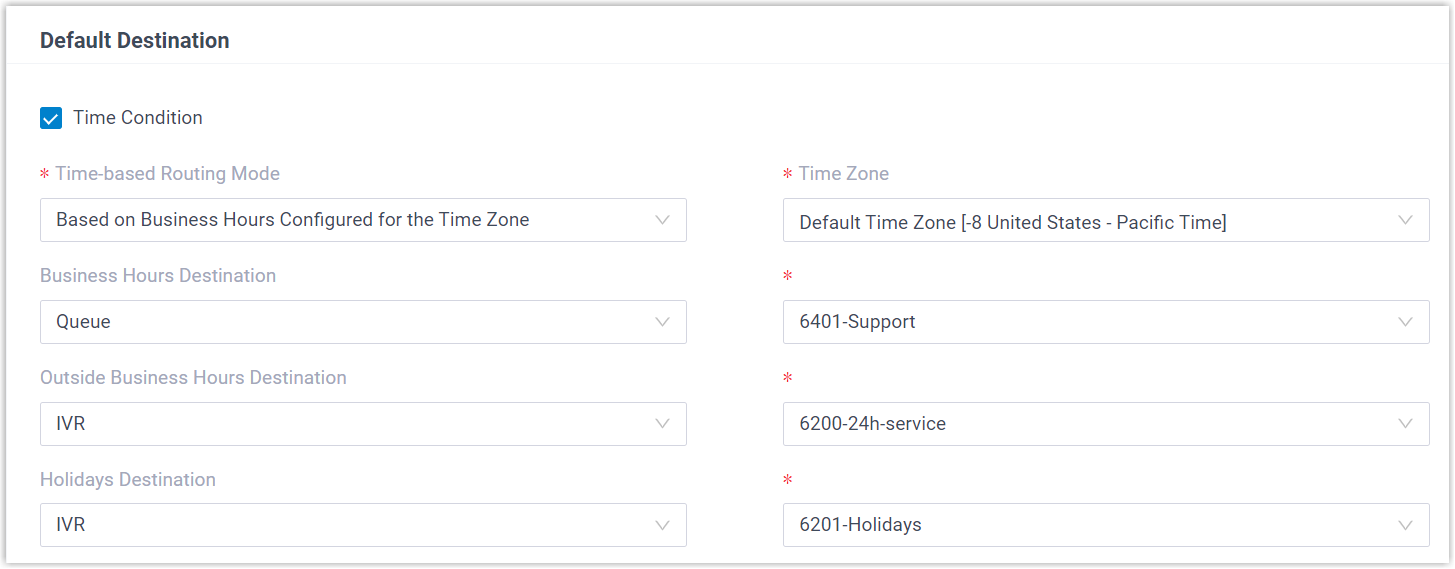
The status is switched with the Switch Business Hours and Holidays Status feature code, which is *99 by default. That is the value you monitor.

Assign the function key
Section titled “Assign the function key”-
Sign in to the PBX web portal and open Extension and Trunk > Extension, then click the edit icon next to the extension you want to configure.
-
Open the Function Keys tab.
-
Add a key with these settings, then click Save:
- Type:
BLF - Value: the Switch Business Hours and Holidays Status feature code,
*99in this example. - Label: optional text to show on the phone screen.

- Type:
Reprovision the phone
Section titled “Reprovision the phone”If the extension is already provisioned to a phone, push the change so the key appears:
- Go to Auto Provisioning > Phones.
- Click the reprovision (refresh) icon next to the phone assigned to this extension.
- Confirm with OK in the dialog.
Result
Section titled “Result”The key updates on the phone automatically, and the BLF LED reflects the current status:
- Red: the system is in Business Hours.
- Green: the system is in Outside Business Hours or Holidays.
- Off: the BLF settings are incorrect.
Inbound route based on Custom Business Hours
Section titled “Inbound route based on Custom Business Hours”Use this when the inbound route uses a Custom Business Hours schedule that follows the system’s default time zone.
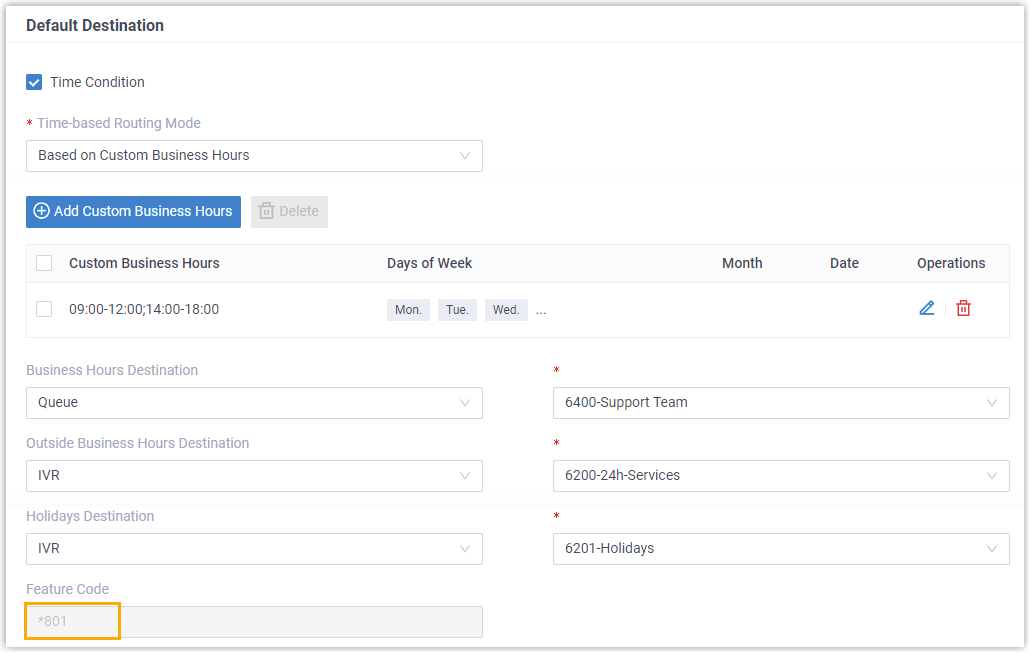
Assign the function key
Section titled “Assign the function key”-
Sign in to the PBX web portal and open Extension and Trunk > Extension, then click the edit icon next to the extension you want to configure.
-
Open the Function Keys tab.
-
Add a key with these settings, then click Save:
- Type:
BLF - Value: the feature code of the inbound route,
*801in this example. - Label: optional text to show on the phone screen.

- Type:
Reprovision the phone
Section titled “Reprovision the phone”If the extension is already provisioned to a phone, push the change so the key appears:
- Go to Auto Provisioning > Phones.
- Click the reprovision (refresh) icon next to the phone assigned to this extension.
- Confirm with OK in the dialog.
Result
Section titled “Result”The key updates on the phone automatically, and the BLF LED reflects the current status:
- Red: the system is in Business Hours.
- Green: the system is in Outside Business Hours or Holidays.
- Off: the BLF settings are incorrect.
Inbound route based on Custom Time Periods
Section titled “Inbound route based on Custom Time Periods”Use this when the inbound route uses Custom Time Periods that follow the system’s default time zone.
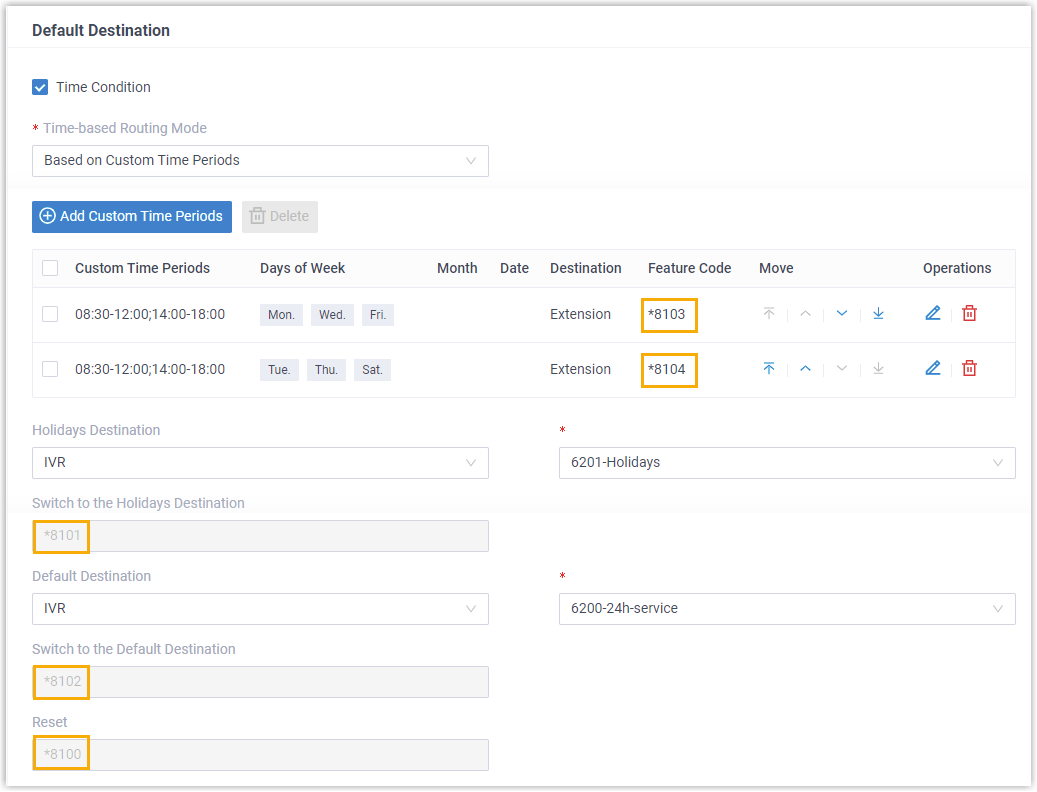
Assign the function key
Section titled “Assign the function key”-
Sign in to the PBX web portal and open Extension and Trunk > Extension, then click the edit icon next to the extension you want to configure.
-
Open the Function Keys tab.
-
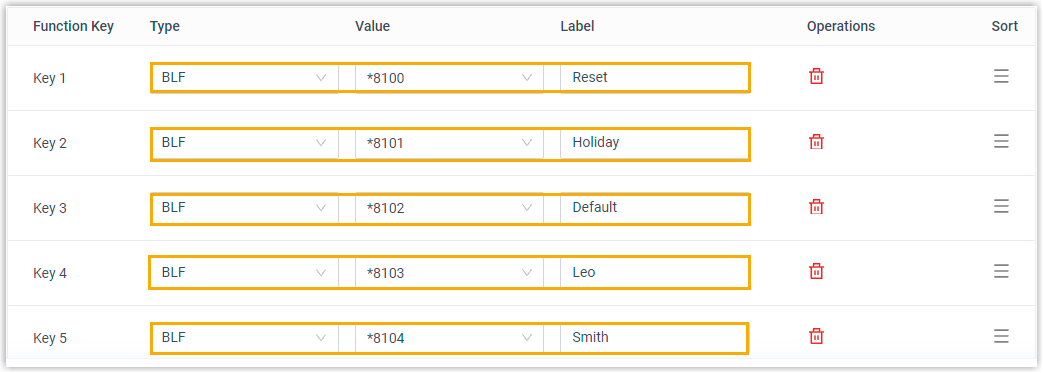
Add one key per time period you want to monitor, then click Save:
- Type:
BLF - Value: the feature code for the time period you want to track. Add as many keys as you need.
- Label: optional text to show on the phone screen.
- Type:
Reprovision the phone
Section titled “Reprovision the phone”If the extension is already provisioned to a phone, push the change so the keys appear:
- Go to Auto Provisioning > Phones.
- Click the reprovision (refresh) icon next to the phone assigned to this extension.
- Confirm with OK in the dialog.
Result
Section titled “Result”The keys update on the phone automatically, and each BLF LED reflects the current status:
- Red: the system is in Business Hours.
- Green: the system is in Outside Business Hours or Holidays.
- Off: the BLF settings are incorrect.
Question about this page?
Ask the AI assistant. It starts from this page, then searches the rest of the docs.
Ask Cloud Voice AI
Answers are AI-generated from the docs and may contain mistakes. Verify with the linked pages.