
Forward Incoming Calls to Another Destination
Cloud Voice can redirect an extension’s incoming calls to a different destination depending on the user’s presence status. You can define these forwarding rules ahead of time for each extension, and you can also turn on feature codes so users can change where their calls go simply by dialing a code from their phone.
Preset a forwarding destination for each presence status
Section titled “Preset a forwarding destination for each presence status”Every extension can have its own forwarding destination tied to each presence status. When the user switches status, incoming calls automatically follow the destination you defined for that status. You can also route internal and external callers differently within the same status.
-
Sign in to the PBX (Private Branch Exchange, your phone system) web portal and go to Extension and Trunk > Extension, then open the extension you want to configure.
-
Select the Presence tab.
-
In the status bar, choose the presence status you want the forwarding rule to apply to.
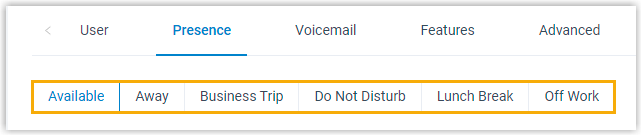
-
Under Internal Calls and External Calls, pick a forwarding action and set the destination for each.
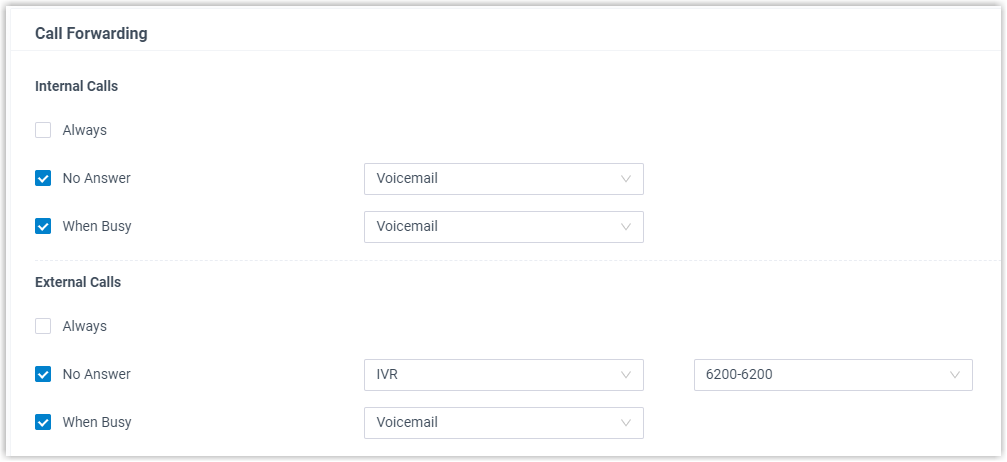
-
Click Save, then Apply.
Once saved, any call to the extension is evaluated against the user’s current presence status. The system determines whether the caller is internal or external and routes the call to the matching destination you configured.
Let users change destinations with a feature code
Section titled “Let users change destinations with a feature code”Extension users can adjust their preset forwarding destinations directly in the Cloud Voice App. For users who don’t have the app, enable feature codes so they can dial a code from any phone to change where their calls are forwarded. A feature code is a short dial sequence (often a star code, such as *71) that triggers a phone-system action from the handset.
-
Sign in to the PBX web portal and go to Call Features > Feature Code.
-
In the Call Forwarding section, turn on and set up the feature codes you need.

- Enable “Forward All Calls” / “Forward When Busy” / “Forward No Answer”: Select the checkbox and assign a feature code. Users dial this code to send calls to voicemail or to a specific number. See Call Forwarding Feature Code for details.
- Disable “Forward All Calls” / “Forward When Busy” / “Forward No Answer”: Select the checkbox and assign a feature code. Users dial this code to turn off automatic forwarding.
-
To let some users change the forwarding destinations of other extensions, set up permission rules:
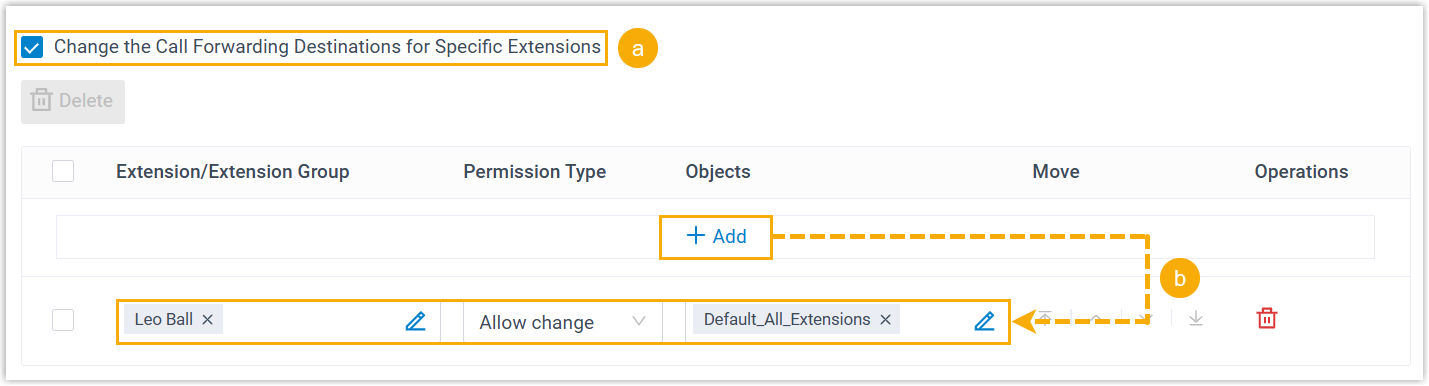
a. Select the Change the Call Forwarding Destinations for Specific Extensions checkbox. b. Click Add to create a permission rule that defines which users may change the forwarding destinations of which extensions.
Item Description Extension/Extension Group Click the  icon to choose which extension is allowed to change forwarding destinations for others. Options: All extensions, or Specific extensions and extension groups.
Permission Type Select Allow change. Objects Click the icon to choose the extensions or extension groups whose forwarding destinations the authorized user may change. Options: All extensions and extension groups, Groups that the extension belongs to, Selected extensions and groups, or Specific extensions and extension groups. -
Click Save, then Apply.
After the feature codes are live:
- When a user dials their feature code, calls received under their current presence status are routed to the destination they specify.
- When an authorized user dials the feature code followed by a target extension number and a destination number, calls that the target extension receives under its current presence status are routed to the specified destination.
Question about this page?
Ask the AI assistant. It starts from this page, then searches the rest of the docs.
Ask Cloud Voice AI
Answers are AI-generated from the docs and may contain mistakes. Verify with the linked pages.