
Auto Provision IP Phones Remotely via RPS Method
RPS (Redirection and Provisioning Service) provisioning lets you deploy and update IP phones that are not on the same network as the PBX (Private Branch Exchange, the phone system that manages your extensions and calls). Once you create a phone entry in the portal, the vendor’s redirection service points the device to your provisioning server the next time it reboots, so it downloads its configuration automatically. This makes RPS well suited to rolling out or refreshing phones in bulk without visiting each location.
Supported IP phones
Section titled “Supported IP phones”This method works with any phone that supports RPS provisioning and appears in Auto Provisioning - Supported Devices.
Before you start
Section titled “Before you start”- Download the provisioning template for the phone model you plan to deploy. Templates live under Auto Provisioning > Resource Repository > Default Templates. See Update a Default Auto Provisioning Template.
- Have the phone’s Vendor, Model, and MAC address on hand. The MAC (Media Access Control) address is the device’s unique hardware ID, usually printed on a label on the underside of the phone or on the box.
Step 1: Generate the configuration file on the PBX
Section titled “Step 1: Generate the configuration file on the PBX”-
If the phone was used previously, reset it to factory defaults first.
-
Sign in to the PBX web portal and go to Auto Provisioning > Phones.
-
Click Add.
-
In the IP Phone section, identify the device:
- Vendor: Choose the phone’s manufacturer.
- Model: Choose the phone model.
- MAC Address: Enter the phone’s MAC address.
-
In the Options section, set the following:
-
Template: Pick a template from the drop-down list. The template supplies every setting except the extension assignment. You can use the default template that matches the model or build your own.
-
Provisioning Link: The PBX fills in the provisioning server URL for you.
-
Authentication for the First-time Auto Provisioning: When enabled, the phone prompts for credentials before it provisions for the first time.
-
-
In the Assign Extension section, choose the extension to bind to the phone.
-
Click Save.
The PBX generates the configuration file and reports an RPS Request Success event notification, confirming the phone’s MAC address was added to the RPS server.
Step 2: Reboot the phone to pull the configuration
Section titled “Step 2: Reboot the phone to pull the configuration”-
Reboot the IP phone.
-
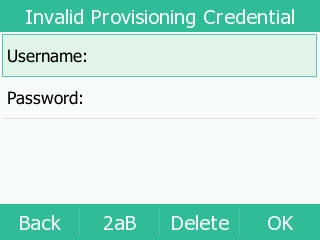
If you enabled Authentication for the First-time Auto Provisioning, enter the credentials on the phone to finish provisioning:
- Username: The extension number assigned to the phone.
- Password: The extension’s Voicemail Access PIN.
Result
Section titled “Result”The registration status of each provisioned phone appears under Auto Provisioning > Phones:
 The assigned extension is registered on the phone.
 The assigned extension is not registered on the phone.

Question about this page?
Ask the AI assistant. It starts from this page, then searches the rest of the docs.
Ask Cloud Voice AI
Answers are AI-generated from the docs and may contain mistakes. Verify with the linked pages.