
Set up Organizations
An organizational structure lets you arrange extensions to match how your business is actually run, which keeps directories tidy and makes it easier for people to reach the right colleagues. This page walks you through turning the feature on and building out your departments.
Capacity limits
Section titled “Capacity limits”The number of departments you can create scales with the size of your system, while the depth of the hierarchy stays the same regardless of extension count.
| Total extensions (N) | Department layers | Departments |
|---|---|---|
| N ≤ 50 | 15 | 50 |
| 50 < N ≤ 200 | 15 | 200 |
| N > 200 | 15 | 500 |
Before you begin
Section titled “Before you begin”Your system must be running Cloud Voice version 84.7.0.17 or later.
Step 1: Turn on Organization Management
Section titled “Step 1: Turn on Organization Management”-
Sign in to the Cloud Voice web portal and go to PBX Settings > Preferences. PBX stands for Private Branch Exchange, the business phone system you are configuring.
-
Switch on Organization Management.

-
In the Company Name field, type your company’s name. This becomes the top-level (root) organization that everything else hangs beneath.
-
Click Save, then Apply.
Step 2: Build your departments
Section titled “Step 2: Build your departments”-
Go to Extension and Trunk > Extension > Organization. Your root organization, named after your company, appears at the top of the tree.

-
Click
 next to the root organization.
 -
In the dialog that opens, fill in the fields below and click Save.
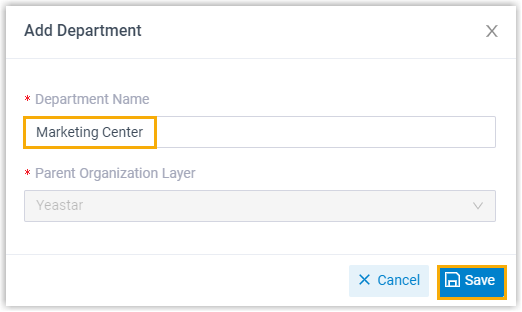
- Department Name: A name for the new department.
- Parent Organization Layer: Prefilled with the root organization.
Result
Section titled “Result”Your department is now in place. Repeat the steps above to add more departments; each time, the parent organization is filled in for you rather than chosen by hand.
By default, everyone sees every department in the Cloud Voice App. To hide specific departments from certain users, see Set up Extension Visibility.
What to do next
Section titled “What to do next”Add Users to Organizations to place your extensions into the departments you just created.
Question about this page?
Ask the AI assistant. It starts from this page, then searches the rest of the docs.
Ask Cloud Voice AI
Answers are AI-generated from the docs and may contain mistakes. Verify with the linked pages.