
Upload a Custom Ringtone
Custom ringtones let you replace the standard incoming ring with an audio file of your choosing. Once uploaded, a ringtone can be assigned as a distinctive tone for the members of an IVR (Interactive Voice Response, an automated phone menu), a call queue, or a ring group. Callers to those destinations then ring through with a recognizable sound on each member’s Cloud Voice App, so staff can tell which line or department a call is coming from before they answer. This page walks through uploading a ringtone file to your system. Assigning it to a call feature is covered in the next-steps links at the bottom.
Before you begin
Section titled “Before you begin”- Confirm your PBX (Private Branch Exchange, the phone system) server is running firmware 84.20.0.21 or newer. Custom ringtones are not available on older firmware.
- Have an audio file ready that meets these requirements. The system enforces both, so a file in another format or larger than 4 MB is rejected at upload:
- Format:
.wavor.mp3. - Size: 4 MB maximum.
- Format:
How many ringtones you can store
Section titled “How many ringtones you can store”The number of custom ringtones your system can hold depends on its maximum extension capacity (N, the largest number of extensions the system supports):
| Maximum number of extensions (N) | N ≤ 50 | 50 < N ≤ 200 | N > 200 |
|---|---|---|---|
| Maximum custom ringtones | 64 | 128 | 128 |
Upload the ringtone
Section titled “Upload the ringtone”-
Sign in to the PBX web portal and open PBX Settings > Voice Prompt > Custom Ringtone.
-
Click Upload.
-
In the dialog that appears, click Browse, choose the audio file from your computer, then click Upload.
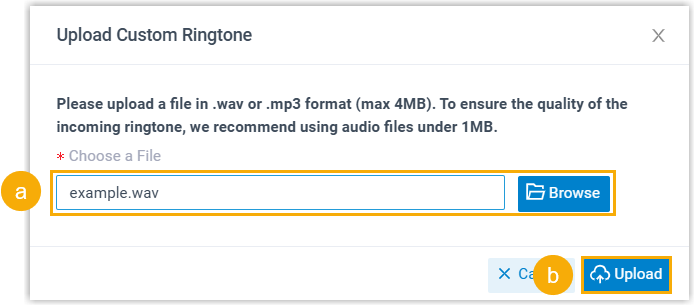
The file now appears in the list on the Custom Ringtone page and is ready to assign.
Next steps
Section titled “Next steps”With the ringtone uploaded, assign it to a call feature to turn on distinctive ringing for that destination’s members in the Cloud Voice App:
Question about this page?
Ask the AI assistant. It starts from this page, then searches the rest of the docs.
Ask Cloud Voice AI
Answers are AI-generated from the docs and may contain mistakes. Verify with the linked pages.