
Manage Custom Auto Provisioning Templates
Once you have built custom Auto Provisioning templates, you can keep them current, remove the ones you no longer need, push their settings out to devices, and move them between systems. This page walks through each of those tasks. All of them start from the same place in the web portal: Auto Provisioning > Resource Repository > Custom Templates.
Edit a custom template
Section titled “Edit a custom template”- Sign in to the Cloud Voice web portal and go to Auto Provisioning > Resource Repository > Custom Templates.
- Find the template you want to change and click the edit icon
 next to it.
 - Adjust the device settings as needed.
- Click Save.
When you save, Cloud Voice asks whether you also want to apply the updated settings to the devices that currently use the template:
- Yes: Cloud Voice builds new configuration files and provisions every device tied to the template right away.
- No: Cloud Voice stores your changes and generates the new configuration files, but holds off on provisioning. You can push the update to individual devices whenever you are ready.
Delete custom templates
Section titled “Delete custom templates”- Sign in to the Cloud Voice web portal and go to Auto Provisioning > Resource Repository > Custom Templates.
- Remove the templates you no longer need:
- To delete one template, click the delete icon
 beside it.
 - To delete several at once, select their checkboxes and click Delete.
- To delete one template, click the delete icon
- Click Yes in the confirmation dialog.
Push a template to all applicable devices
Section titled “Push a template to all applicable devices”Use this task to send a template’s current configuration to every device that relies on it.
- Sign in to the Cloud Voice web portal and go to Auto Provisioning > Resource Repository > Custom Templates.
- Choose what to update:
- For a single template, click the update icon
 beside it.
 - For multiple templates, select their checkboxes and click Update to Device.
- For a single template, click the update icon
- Click Yes to start provisioning.
Download and upload custom templates
Section titled “Download and upload custom templates”Cloud Voice lets you export custom Auto Provisioning templates and import them elsewhere, so you can reuse the same templates across multiple systems instead of rebuilding them by hand.
Requirement: the firmware must be version 84.19.0.70 or later.
-
Sign in to the Cloud Voice web portal and go to Auto Provisioning > Resource Repository > Custom Templates.
-
To export templates:
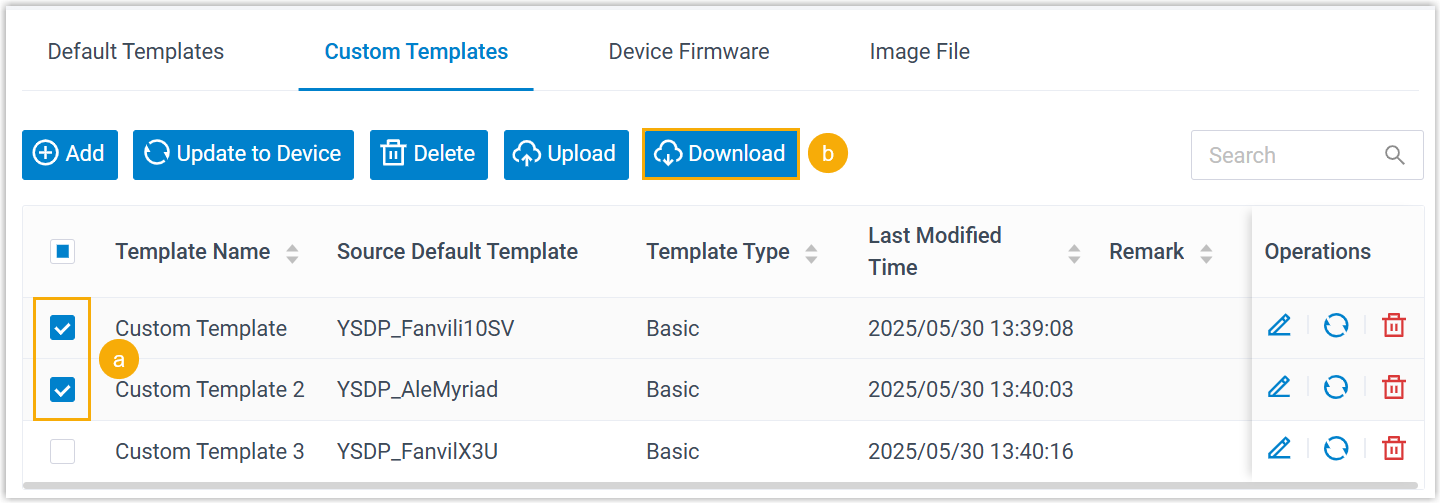
a. Select one or more templates. b. Click Download at the top of the list. The files are saved to your computer in
.custformat. -
To import a template:
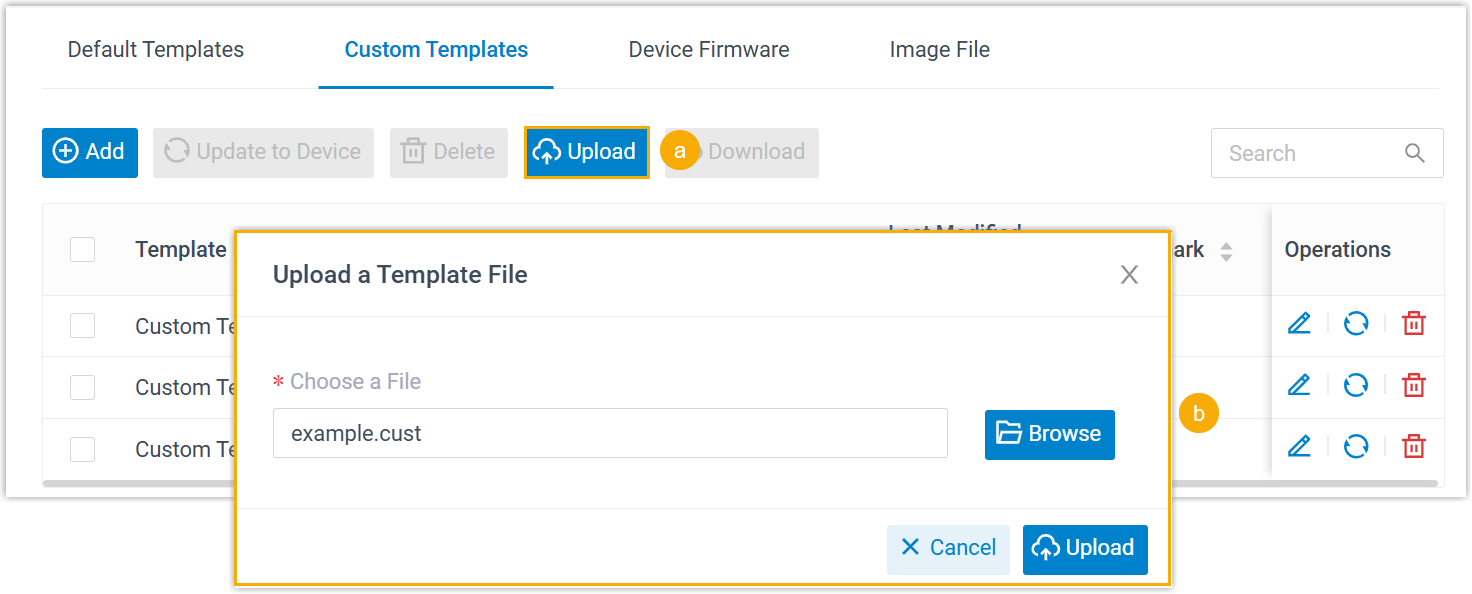
a. Click Upload at the top of the list. b. In the window that opens, click Browse, choose the
.custfile you saved earlier, and click Upload. The template appears in the list once the import finishes.
Question about this page?
Ask the AI assistant. It starts from this page, then searches the rest of the docs.
Ask Cloud Voice AI
Answers are AI-generated from the docs and may contain mistakes. Verify with the linked pages.