
Create a Holiday
Holidays let Cloud Voice treat certain days differently from your normal business hours, so inbound and outbound calls can be handled specially while your office is closed. Each holiday belongs to a time zone, and you can define it in whichever way best matches how the date recurs. You configure holidays in the Cloud Voice PBX (Private Branch Exchange, the system that routes your phone calls) web portal.
Choose a holiday type
Section titled “Choose a holiday type”When you add a holiday, pick the type that fits how the date behaves from year to year:
- By Date: the holiday lands on different calendar dates each year (for example, a lunar-calendar festival). You set an explicit start and end date.
- By Month: the holiday always falls on the same month and day (for example, December 25). You set the month and day.
- By Week: the holiday always falls in a particular week of a month (for example, the last week of May).
- By Weekday: the holiday always falls on a specific weekday of a month (for example, the first Monday in September).
Before you start: holiday prompts
Section titled “Before you start: holiday prompts”Every holiday can optionally play an audio prompt to callers. A couple of things apply to all holiday types:
- The prompts you can choose come from PBX Settings > Voice Prompt > Custom Prompt. You can also click Upload on the holiday form to add a new one.
- Selecting a prompt on the holiday alone does not play it (see the caution below).
Create a holiday by date
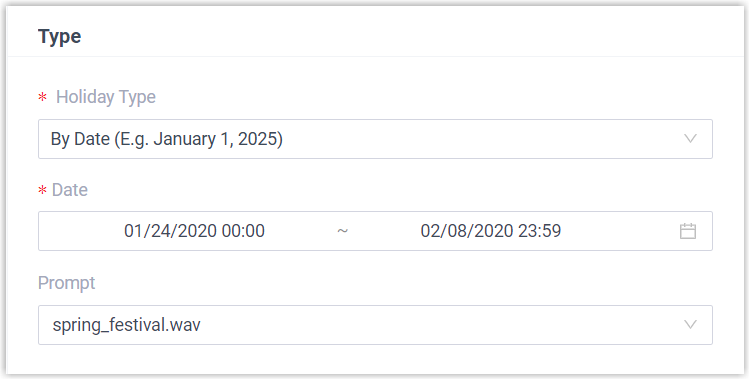
Section titled “Create a holiday by date”Use this type when the date shifts each year. In this example, the 2020 Chinese Spring Festival ran from January 24 to February 8.
-
Log in to the PBX web portal and go to Call Control > Business Hours and Holidays, then click the time zone you want.
-
On the Holidays page, click Add, then fill in the holiday settings:
- In the Basic section, enter a name in the text field, such as
2020 Chinese Spring Festival. - In the Type section, configure the following:
- Holiday Type: Select By Date.
- Date: Choose the start date and end date of the holiday.
- Prompt: Optional. Select an existing prompt or click Upload to add one.
- In the Basic section, enter a name in the text field, such as
-
Click Save, then Apply.
Create a holiday by month
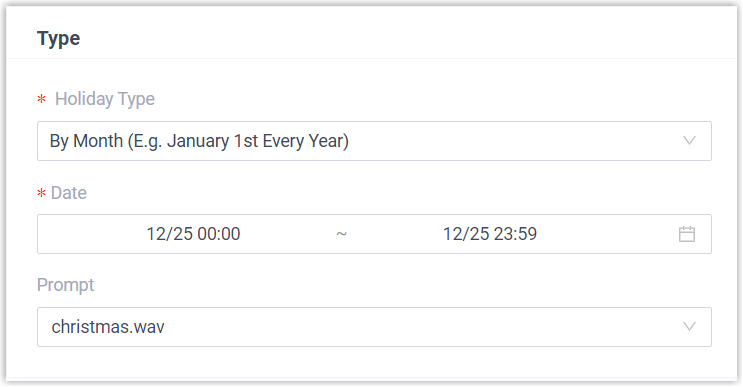
Section titled “Create a holiday by month”Use this type when the holiday lands on the same month and day every year. In this example, Christmas falls on December 25.
-
Log in to the PBX web portal and go to Call Control > Business Hours and Holidays, then click the time zone you want.
-
On the Holidays page, click Add, then fill in the holiday settings:
- In the Basic section, enter a name in the text field, such as
Christmas. - In the Type section, configure the following:
- Holiday Type: Select By Month.
- Date: Choose the start date and end date of the holiday.
- Prompt: Optional. Select an existing prompt or click Upload to add one.
- In the Basic section, enter a name in the text field, such as
-
Click Save, then Apply.
Create a holiday by week
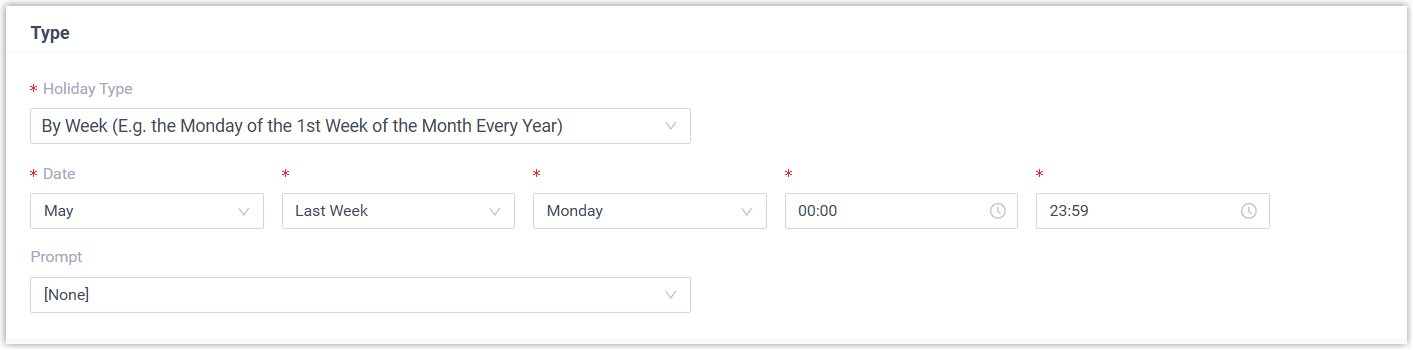
Section titled “Create a holiday by week”Use this type when the holiday falls in a particular week of a month rather than on a fixed date. In this example, 2024 Memorial Day fell on the Monday of the last week of May.
-
Log in to the PBX web portal and go to Call Control > Business Hours and Holidays, then click the time zone you want.
-
On the Holidays page, click Add, then fill in the holiday settings:
- In the Basic section, enter a name in the text field, such as
Memorial Day. - In the Type section, configure the following:
- Holiday Type: Select By Week.
- Date: Choose the month and the day within the specific week of that month.
- Prompt: Optional. Select an existing prompt or click Upload to add one.
- In the Basic section, enter a name in the text field, such as
-
Click Save, then Apply.
Create a holiday by weekday
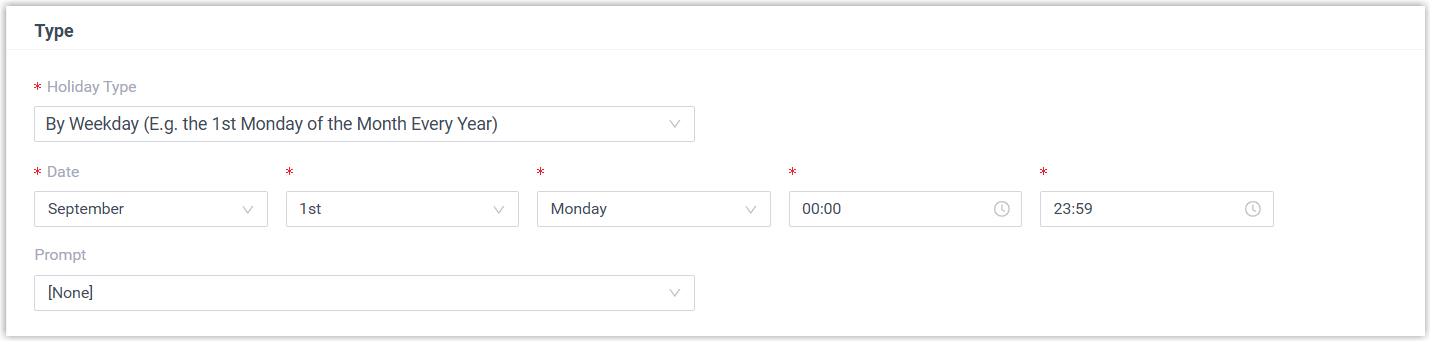
Section titled “Create a holiday by weekday”Use this type when the holiday always lands on a specific weekday of a month. In this example, Labor Day falls on the first Monday of September.
-
Log in to the PBX web portal and go to Call Control > Business Hours and Holidays, then click the time zone you want.
-
On the Holidays page, click Add, then fill in the holiday settings:
- In the Basic section, enter a name in the text field, such as
Labor Day. - In the Type section, configure the following:
- Holiday Type: Select By Weekday.
- Date: Choose the month and the weekday of that month.
- Prompt: Optional. Select an existing prompt or click Upload to add one.
- In the Basic section, enter a name in the text field, such as
-
Click Save, then Apply.
What to do next
Section titled “What to do next”- To route inbound calls based on your holidays, see Set up an Inbound Route.
- To restrict outbound calling during holidays, see Set up an Outbound Route.
Question about this page?
Ask the AI assistant. It starts from this page, then searches the rest of the docs.
Ask Cloud Voice AI
Answers are AI-generated from the docs and may contain mistakes. Verify with the linked pages.