
Auto Provision Function Keys for Phones
Function keys turn the programmable buttons on an extension user’s IP phone (and in the Cloud Voice App) into shortcuts. Depending on the key type, a button can monitor the live status of another extension, trunk, or queue, or launch a common action such as parking a call, dialing a saved number, or checking voicemail. This page explains the key types you can assign and how to push them to phones through Auto Provisioning, both one phone at a time and in bulk with a template.
Supported key types
Section titled “Supported key types”You can assign any of the following key types to an extension.
| Key type | What it does |
|---|---|
| N/A | No function assigned. |
| Line | Sets up a line key. |
| BLF | Monitors and acts on another object. BLF stands for Busy Lamp Field. Depending on the value you choose, a BLF key can watch an extension to show its call status, Do Not Disturb (DND) presence, and default outbound caller ID (DOD), place or pick up its calls, and set its DOD as default; an extension group (call status of members; pick up the first ringing call); a trunk (its status; seize it to dial out); or a queue (an agent’s pause status). See Provision a BLF key. |
| Speed Dial | Dials a frequently used number or extension. |
| Set Presence | Switches the extension to a chosen presence status. See Switch Extension Presence by Function Key. |
| Check Voicemail | Shows the voicemail indicator and opens the mailbox to review messages. |
| Check Group Voicemail | Shows the indicator for a shared group mailbox and opens it to review messages. |
| Park & Retrieve | Shows the status of a parking slot, parks a call to it, and retrieves a parked call from it. |
| Intercom | Places an intercom call to a monitored extension to make an announcement. |
| DTMF | Sends a preset DTMF (touch-tone) sequence instead of keying the digits by hand each time. |
| Agent Login/Logout | Shows login status for a queue and logs the agent in or out of it. |
| Agent Pause/Unpause | Shows service status for a queue and pauses or resumes call delivery from it. |
| LDAP Directory | Opens the LDAP (Lightweight Directory Access Protocol) phonebook to look up contacts. Available on IP phones only. |
| Boss-Secretary Feature | For a boss extension, monitors the secretary’s call status; for a secretary extension, monitors the boss’s call status. |
| Call Forward | Turns call forwarding on or off. Available on IP phones only. See Forward All Incoming Calls to Another Destination by BLF Key. |
| Action URL | Sends an HTTP GET request to a URL you specify to report an event. Available on IP phones only. |
Before you start
Section titled “Before you start”- The IP phone must already be connected to the system and tied to an extension through Auto Provisioning. If you haven’t done this yet, see Auto Provision IP Phones Remotely via RPS Method or Auto Provision IP Phones Remotely with Proxy.
- Some key values are built from feature codes. Have the relevant codes on hand from Call Features > Feature Code.
Provision a BLF key
Section titled “Provision a BLF key”The steps below use a BLF key as the example, since it is the most configurable type. Set the key on the extension, then reprovision the phone so the button takes effect.
Step 1. Configure the key
Section titled “Step 1. Configure the key”-
Sign in to the management portal and go to Auto Provisioning > Phones.
-
Click the edit icon (
 ) next to the phone you want to change. The settings page for the extension assigned to that phone opens.
 -
Open the Function keys tab and configure a BLF key for the object you want to monitor, using one of the patterns below.
Monitor an extension
Section titled “Monitor an extension”Watch a specific extension in real time, and place a call to it or pick up its ringing calls with one press.
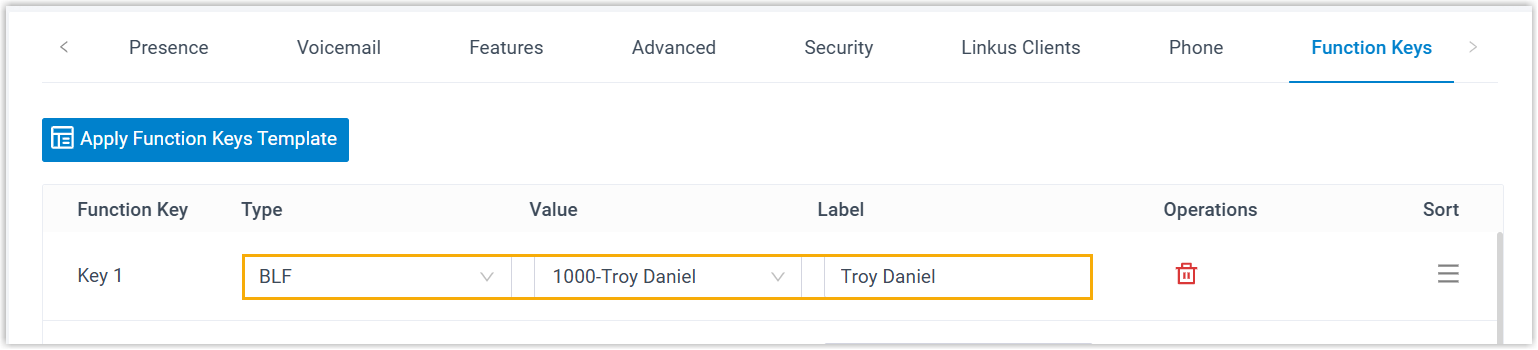
- Type: Select BLF.
- Value: Choose the extension to monitor from the drop-down list.
- Label: Optional. Text to show next to the key on the phone screen.
Monitor an extension’s default DOD
Section titled “Monitor an extension’s default DOD”Show whether a given DOD (default outbound caller ID) is currently set as the extension’s default, and switch it to the default with one press.

- Type: Select BLF.
- Value: Enter the feature-code string in the format
DOD Prefix feature code+extension number+*+DOD short code/specific DOD number. For example, to monitor DOD number5503301(short code123) on extension2001, enter*0852001*123or*0852001*5503301. - Label: Optional. Text to show next to the key on the phone screen.
Monitor an extension group
Section titled “Monitor an extension group”Watch whether any member of an extension group has a ringing call, and pick up that call with one press.
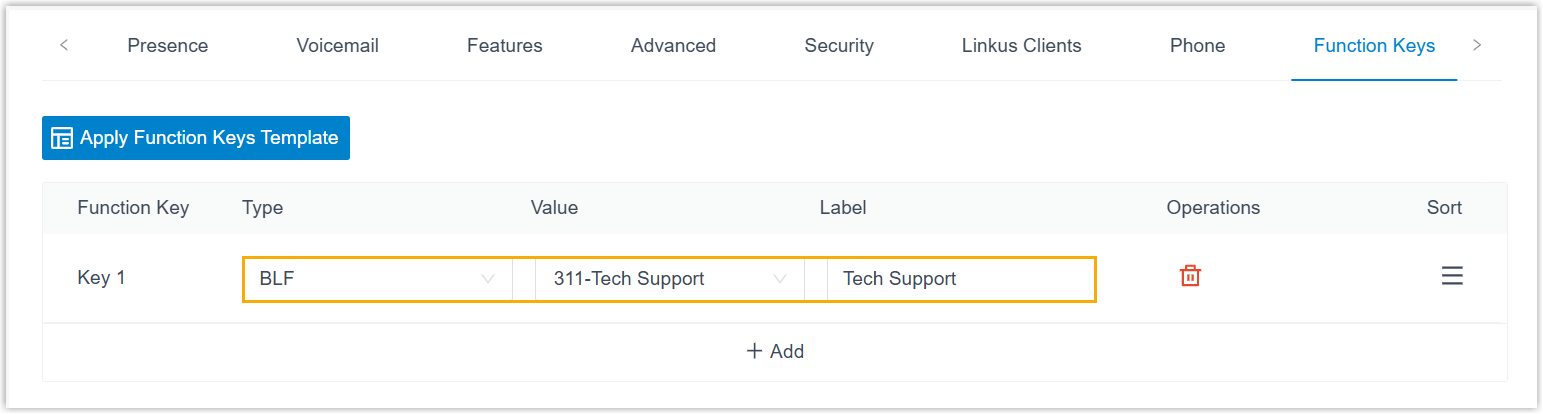
- Type: Select BLF.
- Value: Select the extension group the extension belongs to.
- Label: Optional. Text to show next to the key on the phone screen.
Monitor a trunk
Section titled “Monitor a trunk”Watch a trunk’s status and seize it to place an outbound call with one press.
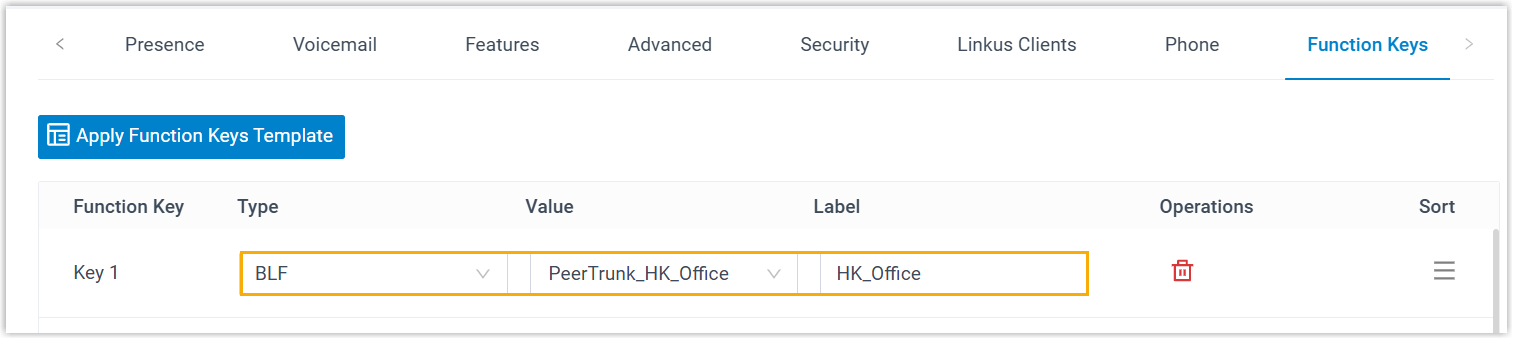
- Type: Select BLF.
- Value: Enter the name of the trunk to monitor.
- Label: Optional. Text to show next to the key on the phone screen.
Monitor an agent’s pause status
Section titled “Monitor an agent’s pause status”Watch a queue agent’s pause status for a specific pause reason.
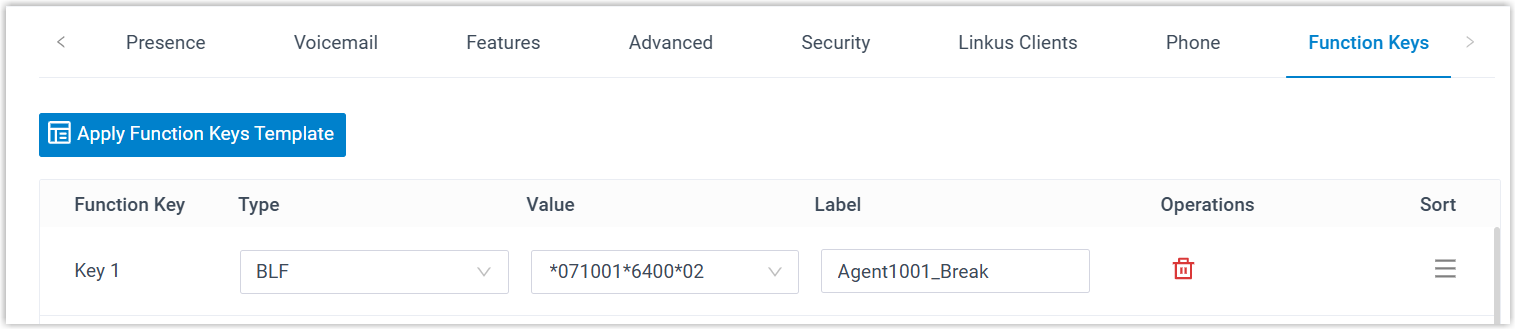
- Type: Select BLF.
- Value: Enter the feature-code string in the format
Pause feature code+extension number+*+queue number+pause reason feature code. For example,*071001*6400*01. - Label: Optional. Text to show next to the key on the phone screen.
-
Click Save.
Step 2. Reprovision the phone
Section titled “Step 2. Reprovision the phone”- Go to Auto Provisioning > Phones.
- Click the reprovision icon (
 ) next to the phone.
 - In the confirmation window, click OK.
The phone applies the change automatically, and the BLF key begins showing the live status of whatever it monitors.
What the BLF LED shows
Section titled “What the BLF LED shows”Once the key is provisioned, its LED reflects the state of the monitored object. The colors mean different things depending on what the key watches.
Monitoring an extension
Section titled “Monitoring an extension”- Solid green: The extension is being monitored and is idle.
- Solid red: The extension is placing or on a call, or its presence is set to DND.
- Flashing red: The extension is ringing.
- Off: The extension isn’t registered, or it has been deleted from the system.
Monitoring an extension’s default DOD
Section titled “Monitoring an extension’s default DOD”- Solid green: The DOD number is currently the extension’s default outbound caller ID.
- Solid red: The DOD number is not the extension’s default outbound caller ID.
Monitoring an extension group
Section titled “Monitoring an extension group”- Solid green: No members of the group have an incoming call.
- Flashing red: At least one member is ringing.
Monitoring a trunk
Section titled “Monitoring a trunk”- Solid green: The trunk is being monitored and is idle.
- Solid red: The trunk is busy.
- Off: The key configuration failed.
Monitoring an agent’s pause status
Section titled “Monitoring an agent’s pause status”- Solid green: The agent is not in the specified pause status.
- Flashing red: The agent is in the specified pause status.
- Off: The key configuration failed.
Provision function keys in bulk with a template
Section titled “Provision function keys in bulk with a template”If you manage many phones and want the same key layout on all of them, build a function key template once and apply it to a group of extensions.
Step 1. Create a function key template
Section titled “Step 1. Create a function key template”-
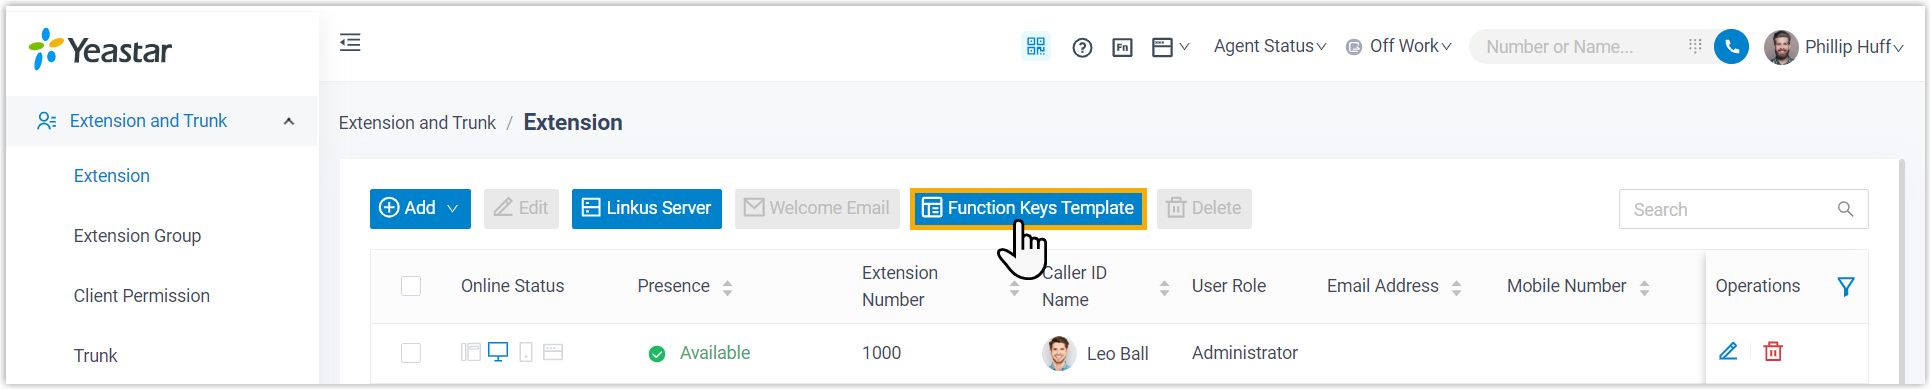
Sign in to the management portal and go to Extension and Trunk > Extension.
-
Click Function Keys Template.
-
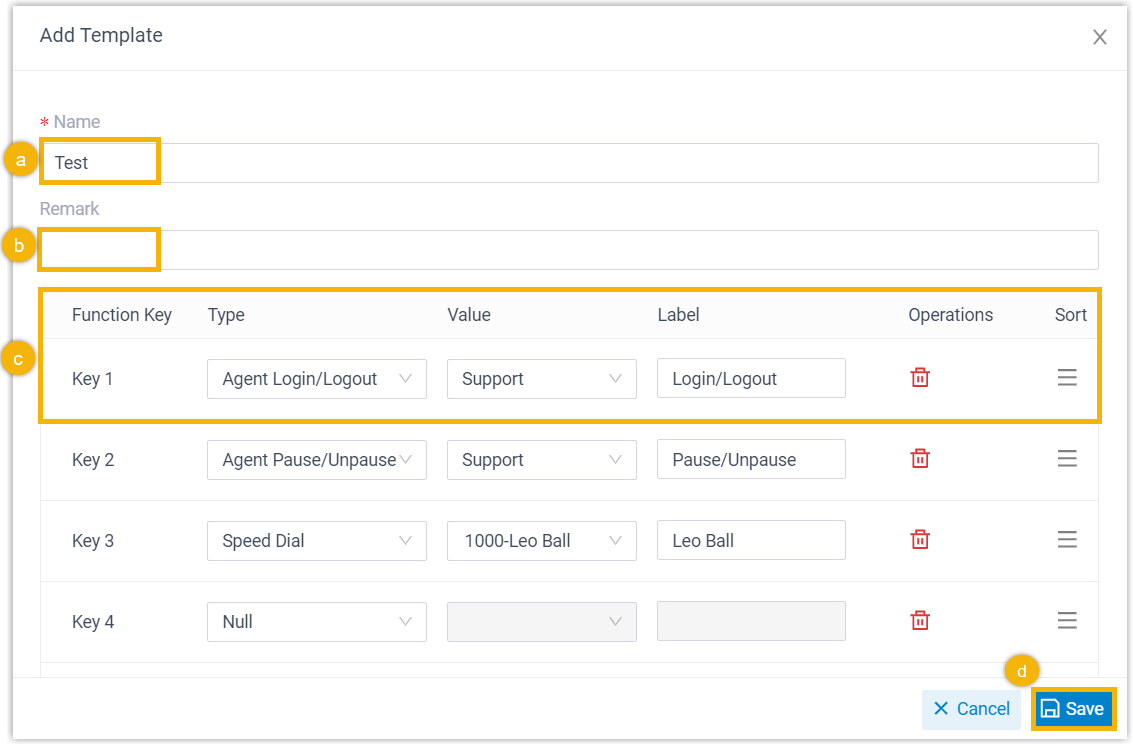
Click Add, then fill in the template.
-
In Name, enter a name that identifies the template.
-
(Optional) In Remark, add a short description.
-
In the key list, set up each key:
- Type: Choose the key type.
- Value: Set the value for that key type.
- Label: Optional. Text to help users recognize the key.
-
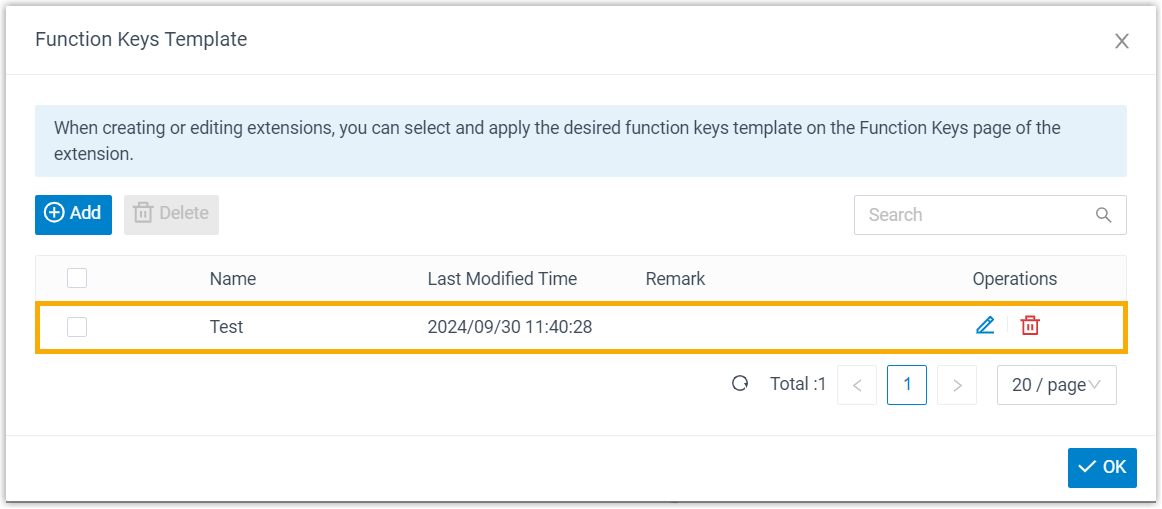
Click Save. The template appears in the list.
-
-
Click OK.
Step 2. Apply the template to extensions
Section titled “Step 2. Apply the template to extensions”-
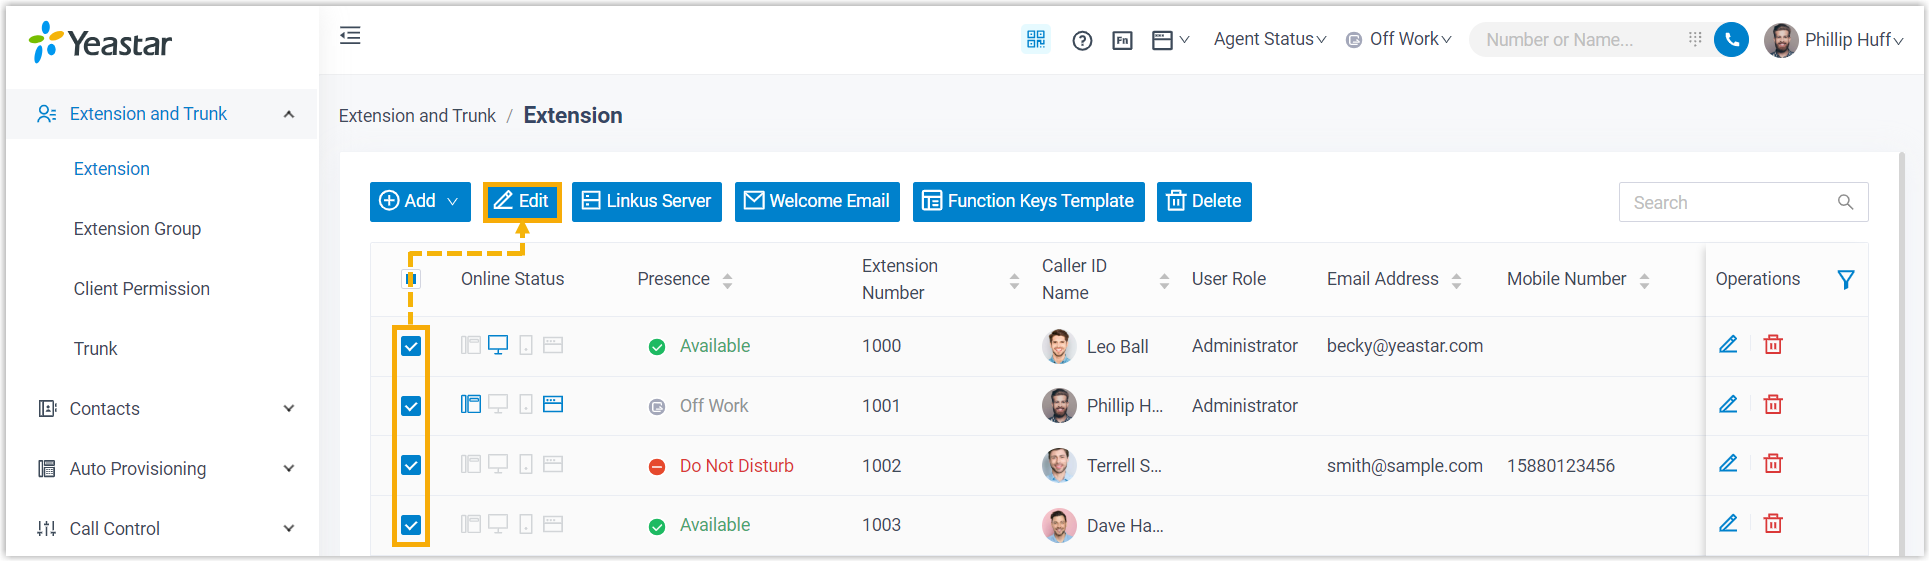
On the extension list, select the extensions you want, then click Edit.
-
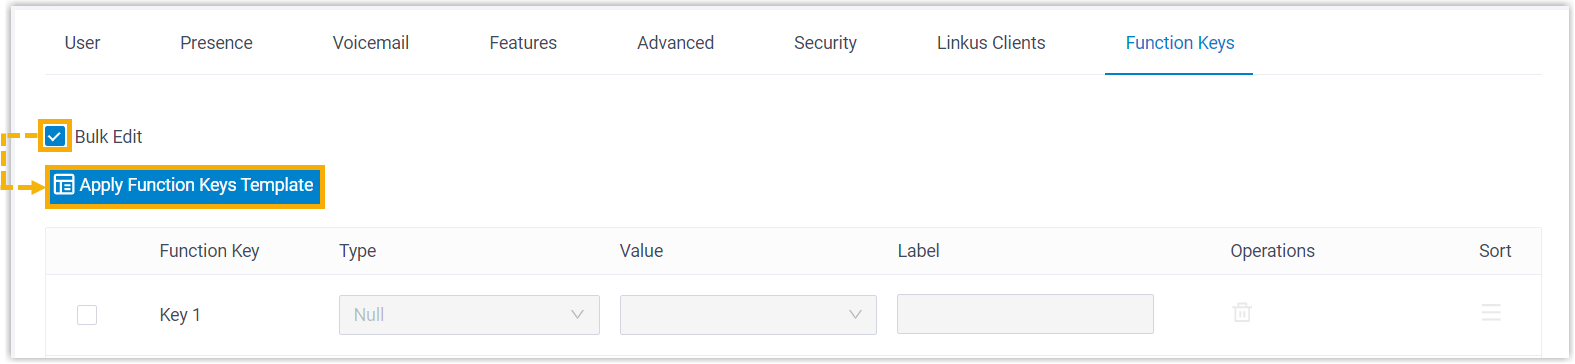
On the Function Keys tab, select Bulk Edit, then click Apply Function Keys Template.
-
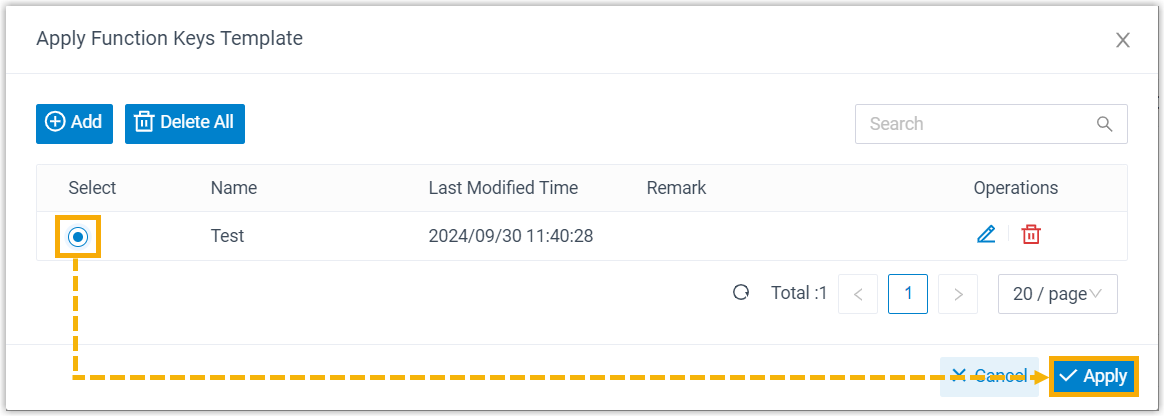
In the pop-up window, choose the template, then click Apply.
-
Click Save.
Step 3. Reprovision the phones
Section titled “Step 3. Reprovision the phones”-
Go to Auto Provisioning > Phones.
-
Select the phones you want, then click Reprovision.

-
In the confirmation window, click OK.
The phones apply the changes automatically. Check the keys on the phones to confirm the layout took effect.
Question about this page?
Ask the AI assistant. It starts from this page, then searches the rest of the docs.
Ask Cloud Voice AI
Answers are AI-generated from the docs and may contain mistakes. Verify with the linked pages.