
Set up IVR Prompts
An IVR (Interactive Voice Response) is the automated menu that answers a call and lets the caller choose where to go by pressing a key. The audio a caller hears when they reach an IVR shapes their first impression of your business. By replacing the default recording with your own greeting and menu, you can guide callers to the right destination in your own voice. This page explains what an IVR prompt is made of and how to apply your custom audio to an IVR.
What an IVR prompt includes
Section titled “What an IVR prompt includes”A complete IVR prompt usually strings together a few distinct pieces:
- Welcome greeting: the opening message callers hear the moment they enter the IVR, for example “Thank you for calling IZT.”
- Menu prompt: the list of choices you offer, along with the keypad digit that selects each one. When a caller presses a key, the phone sends a DTMF (Dual-Tone Multi-Frequency) tone that the IVR acts on. For example, “For something urgent, press 1 to reach support. To leave a voicemail, press 2.”
- Goodbye greeting: a closing message that plays just before the call ends.
Choose how to structure your audio
Section titled “Choose how to structure your audio”Cloud Voice ships with a default IVR prompt, but you’ll almost always want your own. You can supply that audio as one file or as several shorter clips.
A single audio file holds the greeting, menu, and any other messaging in one recording. This keeps things tidy and means you only manage one prompt.
Multiple audio clips let you assign up to five separate files to a single IVR. Cloud Voice plays them back-to-back, in the order you list them. Splitting your prompt across clips is worth doing when:
- You revise the menu often. Every menu change means re-recording the prompt. If you break the audio into pieces by purpose, one clip for the welcome greeting, another for the menu options, and so on, you only need to swap the clip that actually changed.
- One recording is too large. A single prompt file can’t exceed 8 MB, and every file must meet the audio file requirements. Dividing a long recording into smaller clips keeps each one under the limit.
Apply custom prompts to an IVR
Section titled “Apply custom prompts to an IVR”-
In the management portal, go to PBX Settings > Voice Prompt > Custom Prompt and either upload a custom prompt or record a custom prompt.
-
Go to Call Features > IVR and open the IVR you want to change.
-
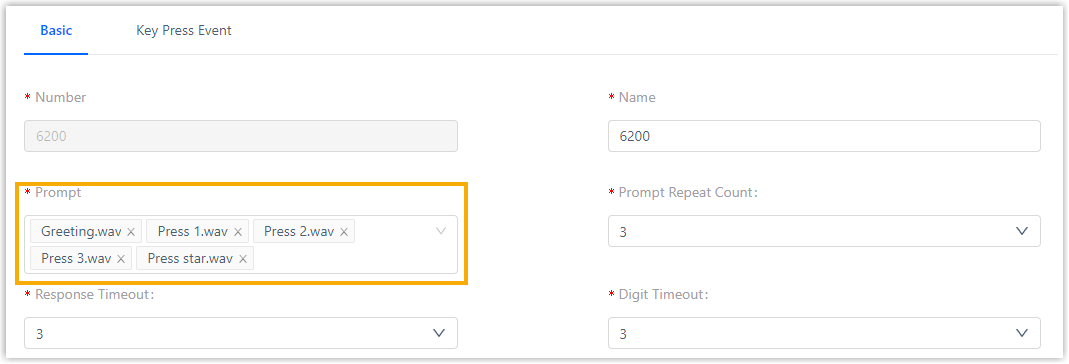
From the Prompt drop-down list, choose your custom prompts. You can pick up to five audio files, and they play in the order shown.
-
From the Prompt Repeat Count drop-down list, set how many times the prompt should replay.
-
Click Save, then Apply.
Question about this page?
Ask the AI assistant. It starts from this page, then searches the rest of the docs.
Ask Cloud Voice AI
Answers are AI-generated from the docs and may contain mistakes. Verify with the linked pages.