
Provision an Alcatel-Lucent Enterprise (ALE) IP Phone
Provisioning lets Cloud Voice hand a phone its extension and settings automatically, so an Alcatel-Lucent Enterprise (ALE) handset comes online without anyone typing in SIP (Session Initiation Protocol, the standard phones use to register and place calls) account details by hand. How you do it depends on how many phones you are setting up. The walkthroughs below use an ALE M3 running firmware 2.13.39.000.2217 as the worked example; the same flow applies to the other supported models.
Supported models and firmware
Section titled “Supported models and firmware”Provisioning works only when both the handset and the PBX (Private Branch Exchange, your Cloud Voice phone system) meet the minimum firmware shown here. Find your model and confirm both versions before you begin.
| Model | Minimum phone firmware | Minimum PBX firmware |
|---|---|---|
| ALE-2 | 2.51.04.000.3530 or later | 84.11.0.30 or later |
| ALE-3 | 2.51.04.000.3530 or later | 84.11.0.30 or later |
| H2 | 2.10.00.0001083 or later | 84.9.0.18 or later |
| H2P | 2.10.00.0001083 or later | 84.9.0.18 or later |
| H3P | 2.12.43.010.2272 or later | 84.9.0.18 or later |
| H3G | 2.12.43.010.2272 or later | 84.9.0.18 or later |
| H6 | 2.12.43.010.2272 or later | 84.9.0.18 or later |
| M3 | 2.13.37.000.2202 or later | 84.9.0.18 or later |
| M3s | 2.15.10.000.3000 or later | 84.18.0.18 or later |
| M5 | 2.13.37.000.2202 or later | 84.9.0.18 or later |
| M5s | 2.15.10.000.3000 or later | 84.18.0.18 or later |
| M7 | 2.13.37.000.2202 or later | 84.9.0.18 or later |
| M7s | 2.15.10.000.3000 or later | 84.18.0.18 or later |
| M7s-Pro | 2.15.10.000.3000 or later | 84.18.0.18 or later |
| M8 | 2.13.32.000.1535 or later | 84.9.0.18 or later |
Choose a provisioning method
Section titled “Choose a provisioning method”Pick the approach that matches the size of your rollout.
| Setting up | What to do |
|---|---|
| A single ALE phone | Add the phone in the PBX, then paste the provisioning link the PBX generates into the phone’s own web interface. The phone pulls its configuration from that link. |
| Several ALE phones at once | Add each phone in the PBX, then publish the provisioning link through DHCP option 66. DHCP (Dynamic Host Configuration Protocol) is the network service that hands out IP addresses, and option 66 is the field in that service used to point devices at their configuration. Every phone on the subnet receives the link automatically when it boots and configures itself. |
Provision a single phone manually
Section titled “Provision a single phone manually”Before you start
Section titled “Before you start”-
Confirm the provisioning template for your model has already been downloaded to the PBX. You manage templates under Auto Provisioning > Resource Repository > Default Templates.
-
If the handset has been in service before, factory-reset it so no leftover configuration gets in the way.
-
Have the phone’s vendor, model, and MAC (Media Access Control) address on hand. You enter them when you add the device.
Step 1: Add the phone in the PBX
Section titled “Step 1: Add the phone in the PBX”Adding the phone tells the PBX to build a configuration file keyed to that handset’s MAC address.
-
Sign in to the PBX web portal and go to Auto Provisioning > Phones.
-
Click Add > Add.
-
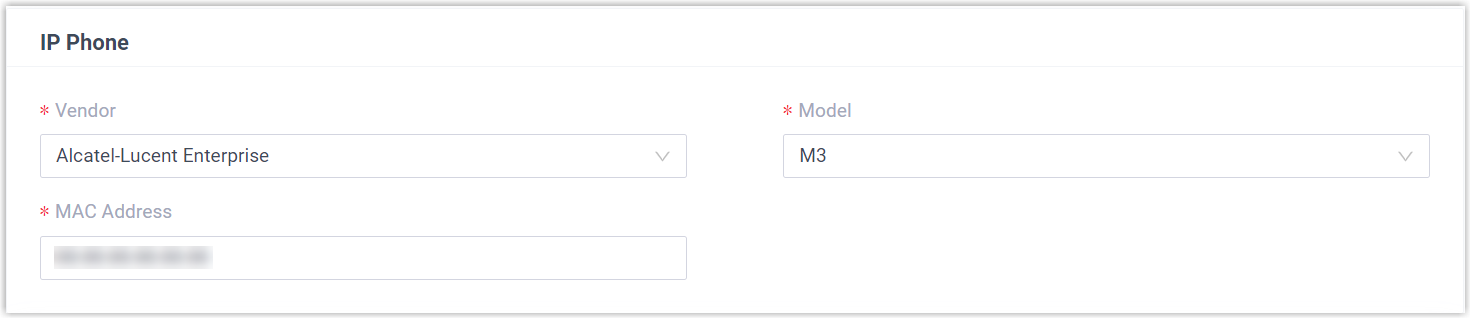
In the IP Phone section, identify the device.
-
Vendor: Choose Alcatel-Lucent Enterprise.
-
Model: Choose your phone model. In this example, choose M3.
-
MAC Address: Type the phone’s MAC address.
-
-
In the Options section, set the provisioning details.

-
Template: Select a template from the drop-down list.
-
Provisioning Link: Generated automatically. It points to where the phone’s configuration file lives.
-
-
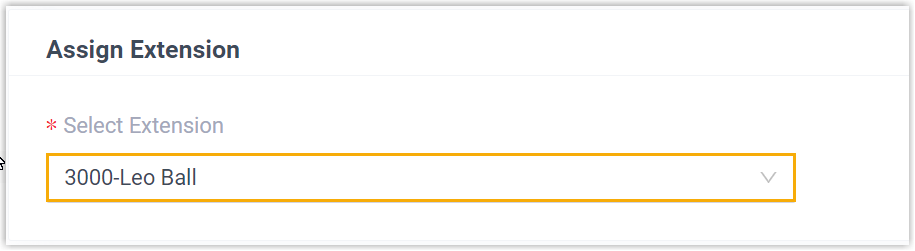
In the Assign Extension section, choose the extension to bind to this phone.
-
Click Save.
Step 2: Point the phone at the provisioning server
Section titled “Step 2: Point the phone at the provisioning server”Enter the PBX’s provisioning link in the ALE phone’s own web interface.
-
Log in to the phone’s web interface.
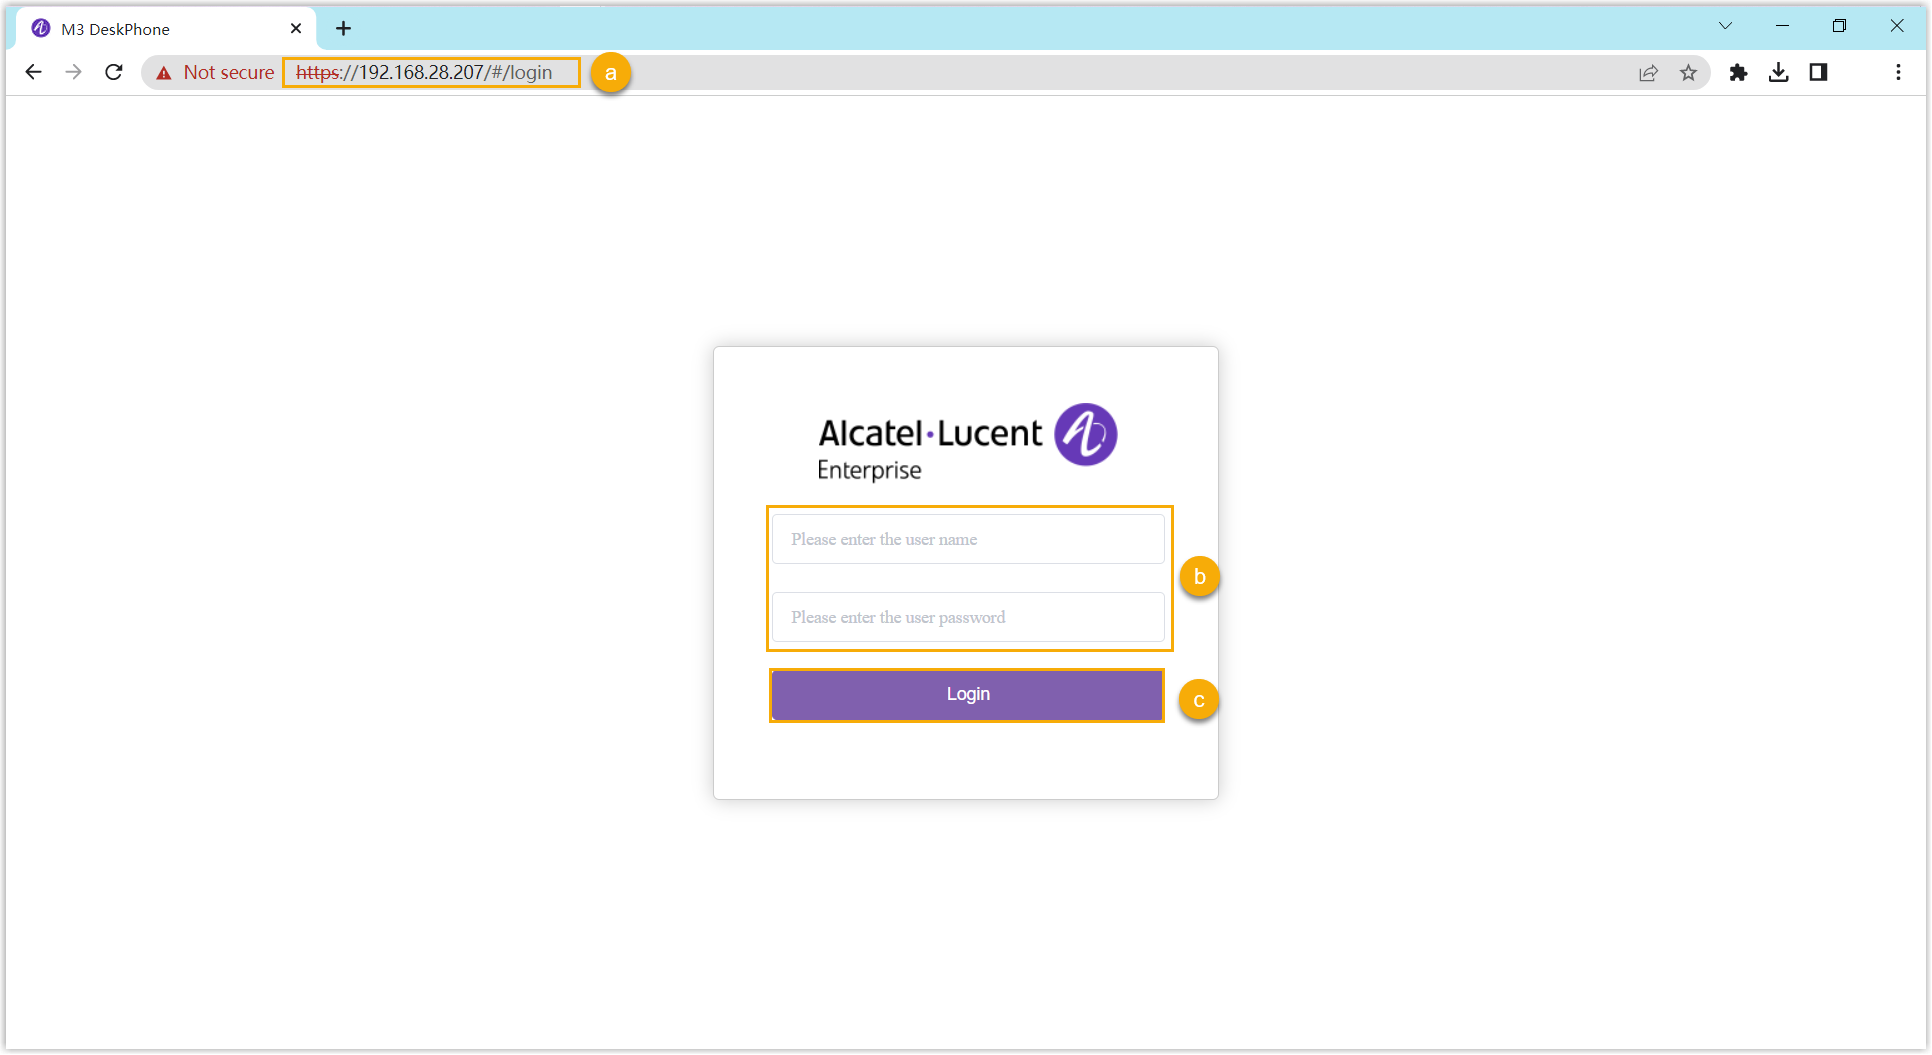
- Type the phone’s IP address into your browser’s address bar.
- Enter the username
adminand its password. In this example, the default password is123456. - Click Login.
-
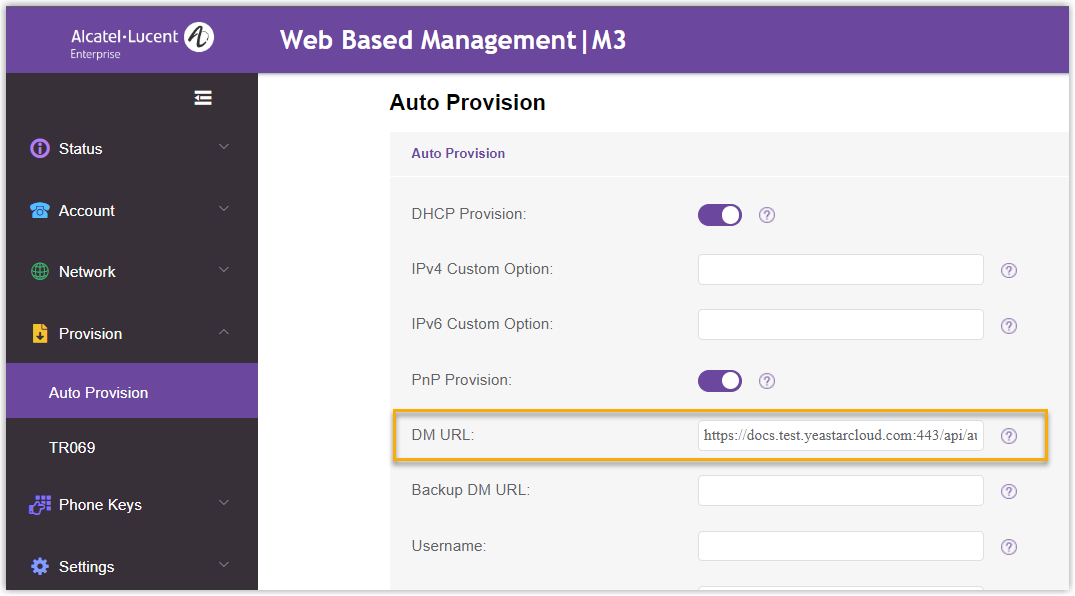
In the left navigation bar, go to Provision > Auto Provision.
-
Paste the provisioning link into the DM URL field.
-
Click Submit.
-
Click Auto Provision Now.
Result
Section titled “Result”Once the phone restarts, it downloads its configuration from the PBX and applies the settings, and the assigned extension registers on the handset. To confirm, open Auto Provisioning > Phones in the PBX web portal and check the registration status.

Provision multiple phones automatically
Section titled “Provision multiple phones automatically”Before you start
Section titled “Before you start”-
Make sure the subnet where the phones are deployed has only one DHCP server, or the phones may fail to get IP addresses.
-
Confirm the provisioning template for your model has already been downloaded to the PBX (Auto Provisioning > Resource Repository > Default Templates).
-
Factory-reset any handset that has been in service before.
-
Have each phone’s vendor, model, and MAC (Media Access Control) address ready.
Step 1: Add each phone in the PBX
Section titled “Step 1: Add each phone in the PBX”Add every phone so the PBX builds a configuration file for each MAC address. Repeat these steps for each handset.
-
Sign in to the PBX web portal and go to Auto Provisioning > Phones.
-
Click Add > Add.
-
In the IP Phone section, identify the device.
-
Vendor: Choose Alcatel-Lucent Enterprise.
-
Model: Choose your phone model. In this example, choose M3.
-
MAC Address: Type the phone’s MAC address.
-
-
In the Options section, set the provisioning details.
-
Template: Select a template from the drop-down list.
-
Provisioning Link: Generated automatically. It points to where the phone’s configuration file lives.
-
-
In the Assign Extension section, choose the extension to bind to this phone.
-
Click Save.
Step 2: Configure DHCP option 66
Section titled “Step 2: Configure DHCP option 66”On the subnet where the phones live, publish the provisioning link through option 66 on your DHCP server. Option 66 is the DHCP field that tells each phone where to fetch its configuration when it boots.
-
In the PBX web portal, open a phone’s detail page and copy its provisioning link.

-
On the DHCP server, set option 66 to the provisioning link. The example below shows a typical router configuration.
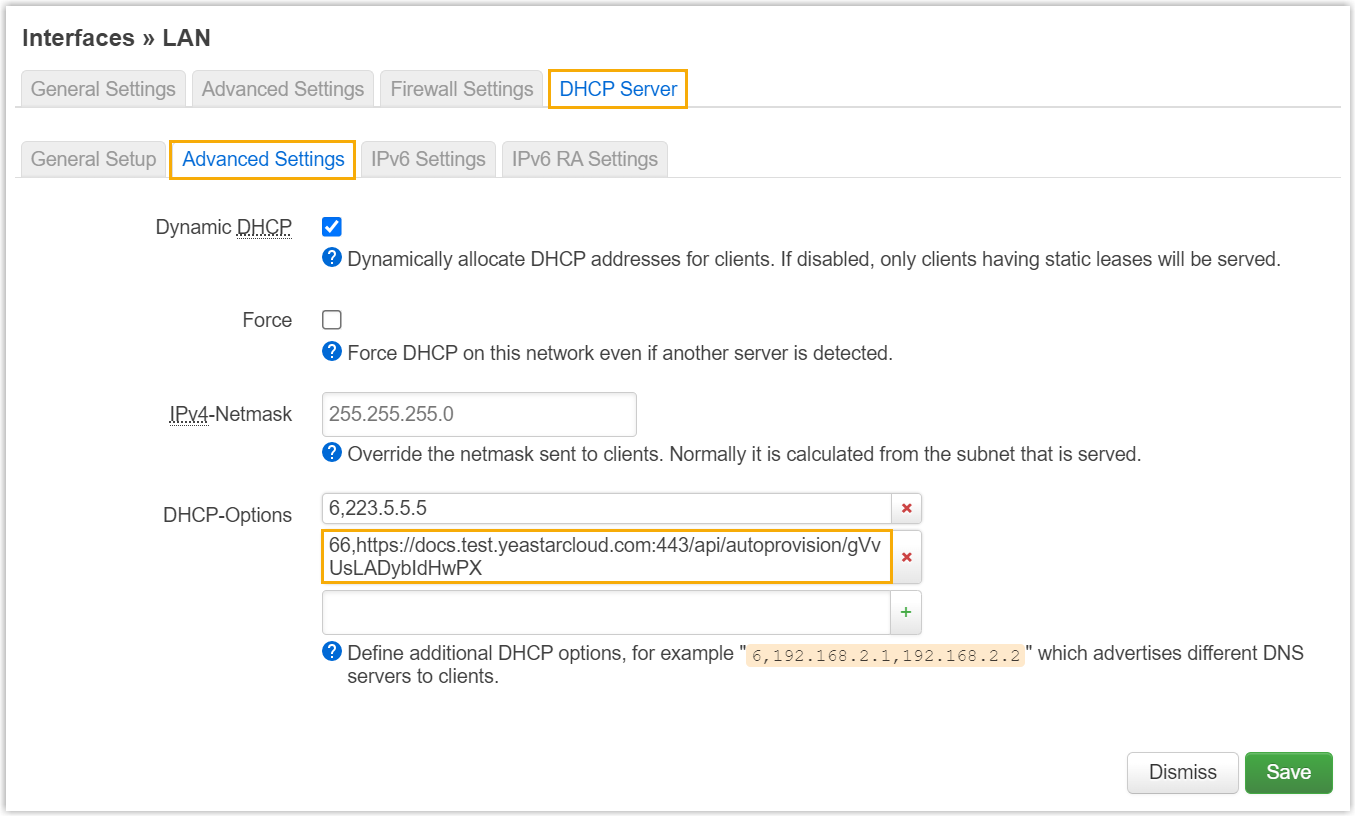
Result
Section titled “Result”After each phone restarts, it obtains an IP address from the DHCP server, downloads its configuration from the PBX over the provisioning link, and applies the settings automatically. The assigned extension then registers on the handset. To confirm, open Auto Provisioning > Phones in the PBX web portal and check the registration status.
Question about this page?
Ask the AI assistant. It starts from this page, then searches the rest of the docs.
Ask Cloud Voice AI
Answers are AI-generated from the docs and may contain mistakes. Verify with the linked pages.