
Configure Distinctive Ringtones for Mitel IP Phone
Distinctive ringtones let a Mitel IP phone play a different sound depending on the kind of call coming in, so a user can tell an internal call from an outside call, or a queue call from a ring group call, without looking at the display. Cloud Voice signals the call type by attaching an Alert-Info header, and the phone matches that header to a ringtone you have chosen for it. Setting this up takes two passes: first you tag each call type with an Alert-Info keyword on the platform, then you map those keywords to specific ringtones on the phone. The steps below use a Mitel 6867i (firmware 5.0.0.1018) as the example.
Supported models and firmware
Section titled “Supported models and firmware”Distinctive ringtones work on the Mitel models listed below once both the phone firmware and Cloud Voice meet the minimum versions.
| Model | Phone firmware | Cloud Voice version |
|---|---|---|
| 6863i | R5.1.0SP6 or later | 84.23.0.83 or later |
| 6865i | R5.1.0SP6 or later | 84.23.0.83 or later |
| 6867i | R5.1.0SP6 or later | 84.23.0.83 or later |
| 6869i | R5.1.0SP6 or later | 84.23.0.83 or later |
| 6873i | R5.1.0SP6 or later | 84.23.0.83 or later |
| 6905 | 6.3 SP3 or later | 84.23.0.83 or later |
| 6910 | 6.3 SP3 or later | 84.23.0.83 or later |
| 6915 | 6.3 SP3 or later | 84.23.0.83 or later |
| 6920 | 6.3.1 SP1 or later | 84.23.0.83 or later |
| 6930 | 6.3.1 SP1 or later | 84.23.0.83 or later |
| 6940 | 6.3.1 SP1 or later | 84.23.0.83 or later |
Before you begin
Section titled “Before you begin”Provision the Mitel IP phone with Cloud Voice first. See Auto Provision a Mitel IP Phone.
Step 1: Tag each call type with an Alert-Info keyword
Section titled “Step 1: Tag each call type with an Alert-Info keyword”Decide which call types you want to distinguish, then set an Alert-Info keyword for each one in the management portal. A Mitel phone only understands a fixed set of keywords, so you must choose from the list below.
The keyword lives in a different place for each call type. Configure the ones you need and remember which keyword you assigned to each, you will reuse them in Step 2.
Internal calls
Section titled “Internal calls”-
Sign in to the management portal and go to PBX Settings > SIP Settings > Advanced. SIP (Session Initiation Protocol) is the signaling standard Cloud Voice uses to set up calls, and the Alert-Info header rides along inside it.
-
In the SIP Request Header section, enter a keyword in the Internal Alert Info field. This keyword triggers the ringtone whenever an internal (extension to extension) call arrives. This example uses
alert-internal.
-
Click Save, then Apply.
External calls
Section titled “External calls”-
Go to Call Control > Inbound Route and edit the inbound route you want to tag.
-
In the General section, enter a keyword in the Inbound Alert Info field. This keyword triggers the ringtone for outside calls that arrive through this route. This example uses
alert-external.
-
Click Save, then Apply.
Queue calls
Section titled “Queue calls”-
Go to Call Features > Queue and edit the queue you want to tag.
-
Open the Preferences tab.
-
In the Basic section, enter a keyword in the Queue Alert Info field. This keyword triggers the ringtone for calls delivered through this queue. This example uses
alert-community-1.
-
Click Save, then Apply.
Ring group calls
Section titled “Ring group calls”-
Go to Call Features > Ring Group and edit the ring group you want to tag.
-
In the Ring Group Alert Info field, enter a keyword. This keyword triggers the ringtone for calls delivered through this ring group. This example uses
alert-group.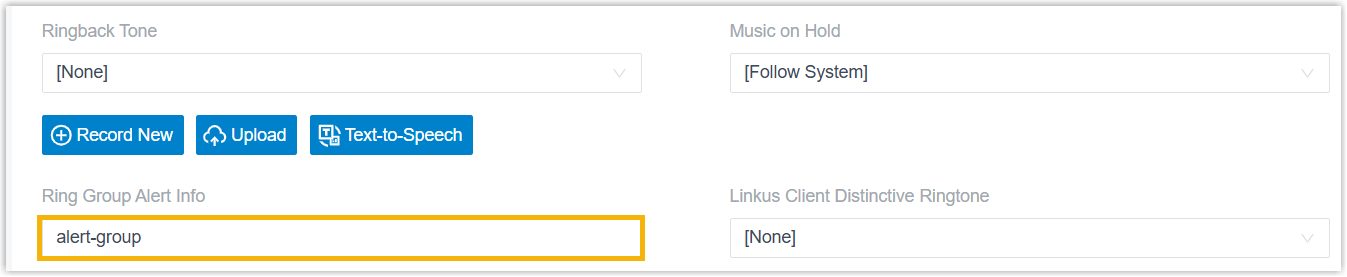
-
Click Save, then Apply.
IVR calls
Section titled “IVR calls”An IVR (Interactive Voice Response) is the automated menu that answers a call and lets the caller pick an option, for example “press 1 for sales.”
-
Go to Call Features > IVR and edit the IVR you want to tag.
-
In the IVR Alert Info field, enter a keyword. This keyword triggers the ringtone for calls that come through this IVR. This example uses
alert-community-3.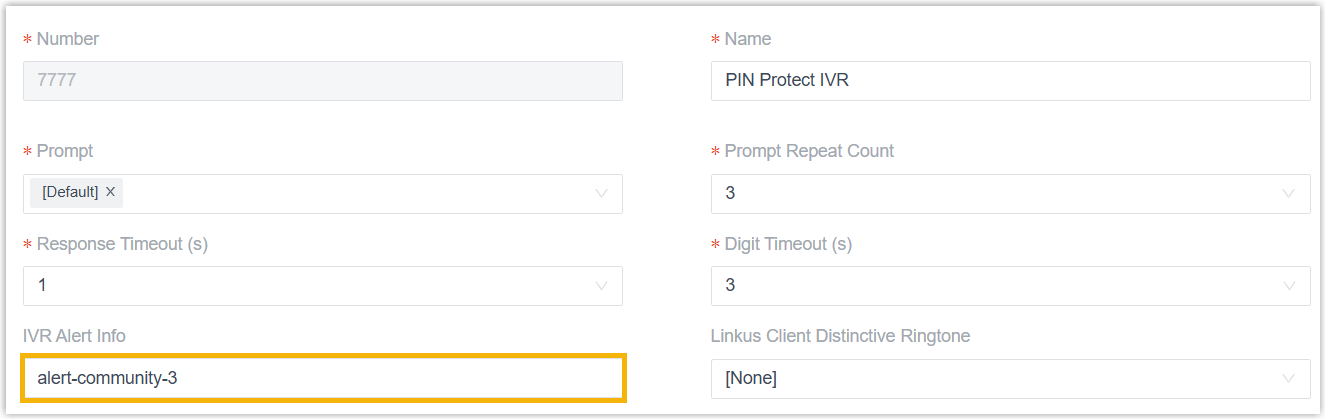
-
Click Save, then Apply.
Step 2: Map the keywords to ringtones on the phone
Section titled “Step 2: Map the keywords to ringtones on the phone”With your Alert-Info keywords in place, assign a ringtone to each one in the phone’s provisioning settings.
-
Go to Auto Provisioning > Phones and click the settings icon
 next to the Mitel IP phone.
-
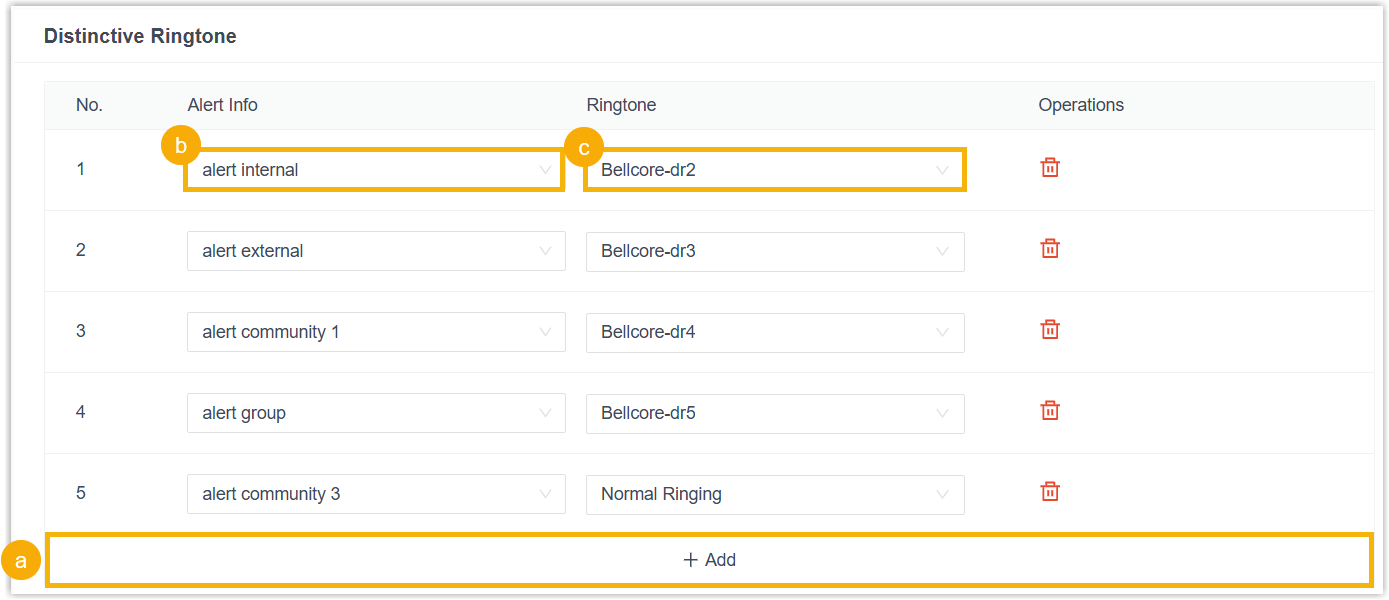
Scroll to the Distinctive Ringtone section and add an entry for each call type you want to distinguish.
-
Click Add.
-
In the Alert Info field, enter the mapping text for the keyword you set in Step 1.
Alert-Info keyword Mapping text alert-acdalert auto call distribution alert-internalalert internal alert-externalalert external alert-community-1alert community 1 alert-community-2alert community 2 alert-community-3alert community 3 alert-community-4alert community 4 alert-emergencyalert emergency alert-groupalert group alert-priorityalert priority -
From the Ringtone drop-down list, select the ringtone to play for this Alert-Info.
-
To cover more call types, repeat steps a through c for each one.
-
-
Click Save. The portal returns you to the phone list.
-
Click the reprovision icon
 next to the Mitel IP phone to push the new configuration to it.
Result
Section titled “Result”The phone pulls the ringtone configuration during reprovisioning and, from then on, plays the matching ringtone based on the Alert-Info header carried by each call. For instance, an internal call arrives with the alert-internal keyword, which the phone maps to alert internal and answers with the ringtone you assigned, in the example setup, Bellcore-2.wav.
Question about this page?
Ask the AI assistant. It starts from this page, then searches the rest of the docs.
Ask Cloud Voice AI
Answers are AI-generated from the docs and may contain mistakes. Verify with the linked pages.