
Auto Provision Mitel Expansion Module with Cloud Voice
A Mitel expansion module adds a bank of extra programmable keys to a Mitel desk phone. Once the phone is provisioned by Cloud Voice, you can assign function keys to that module and have them applied automatically, either by picking key types in the management portal or by defining the keys in a custom provisioning template.
Supported models and templates
Section titled “Supported models and templates”Check that your expansion module, phone model, and provisioning template line up before you begin. Each module pairs with a specific set of phones and requires a minimum template version.
| Expansion module | Compatible phone models | Provisioning template |
|---|---|---|
| M685 | 6865i, 6867i, 6869i, 6873i | YSDP_Mitel68XX (1.0.5 or later) |
| M695 | 6920, 6930, 6940 | YSDP_Mitel69XX (1.0.5 or later) |
Before you begin
Section titled “Before you begin”- Connect the Mitel expansion module to a compatible Mitel desk phone.
- Provision the phone with Cloud Voice through auto provisioning first. See Auto Provision a Mitel IP Phone.
Choosing a method
Section titled “Choosing a method”You can assign the module’s function keys in two ways:
- From the management portal: select each key type from a menu and configure it individually. Best when you only need to set a handful of keys.
- From a custom provisioning template: define the keys as configuration parameters in a template file and apply them in bulk. Best when you are comfortable with the phone’s raw parameters and want to repeat the setup across devices.
Both methods rely on the same underlying rule: keys that go beyond the phone’s own programmable buttons spill over onto the connected module.
Method 1: Assign keys from the management portal
Section titled “Method 1: Assign keys from the management portal”Here you build the key list by choosing a type for each key and setting its behavior directly in the portal.
-
Add and configure the function keys.
-
Sign in to the management portal and go to Extension and Trunk > Extension, then edit the extension tied to the phone.
-
Open the Function Keys tab.
-
Click Add to create each function key for the module.
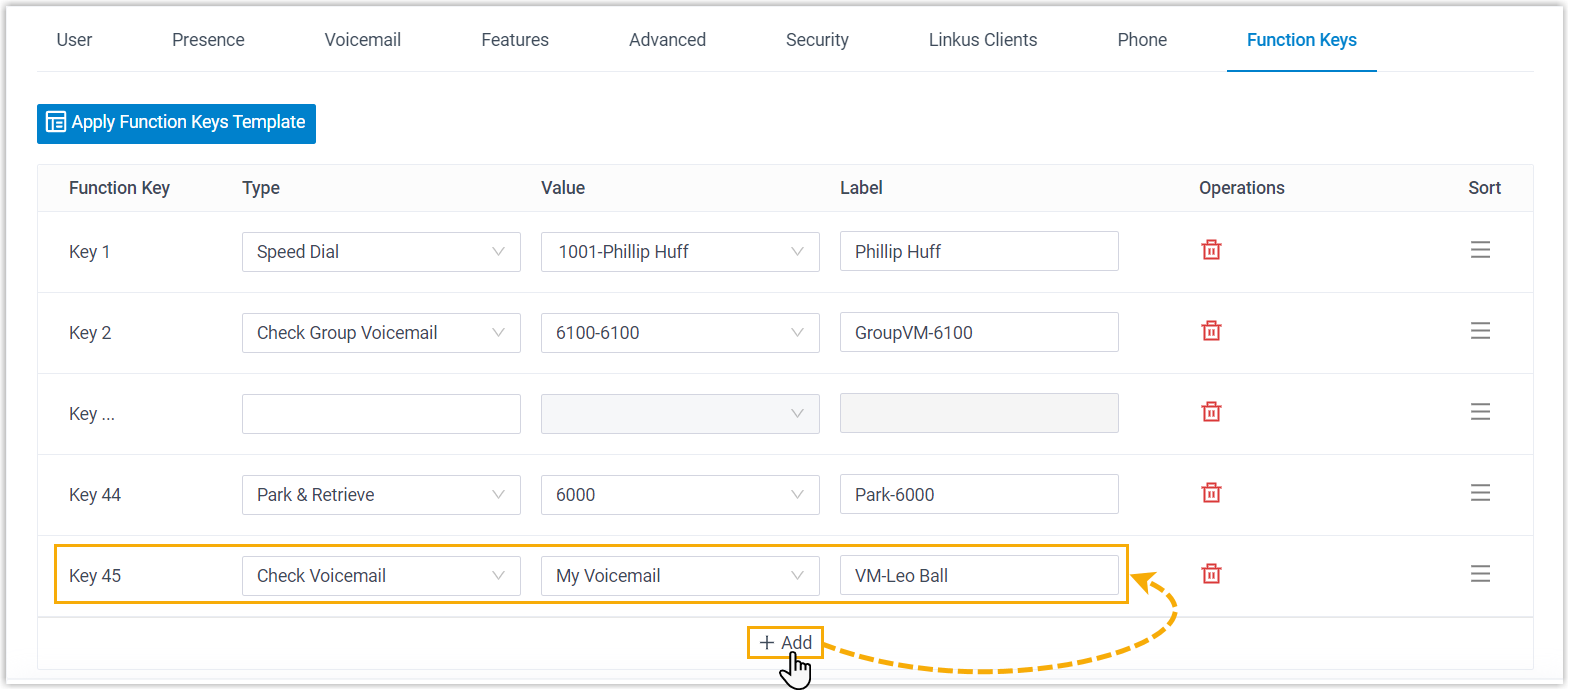
- Type: Choose the kind of key you want.
- Value: Enter the value that matches the key type.
- Label: Optional. Add text to show on the phone’s display.
-
Click Save.
-
-
Reprovision the phone so the new keys take effect.
- Go to Auto Provisioning > Phones.
- Click the reprovision icon
 next to the phone.
 - In the confirmation window, click OK.
Method 2: Assign keys from a custom template
Section titled “Method 2: Assign keys from a custom template”If you know the phone’s configuration parameters, you can define the module’s function keys in a template. The settings are pushed to both the phone and the module at once, which saves time when repeating the same layout.
-
Create the custom provisioning template.
-
Go to Auto Provisioning > Resource Repository > Custom Templates.
-
Click Add.
-
In the Basic section, fill in the core details:
- Template Name: Give the template a recognizable name.
- Source Default Template: Search for and select the default template for your phone model. This example uses YSDP_Mitel68XX.
- Template Type: Select Advanced.
- Remark: Optional. Add a note describing the template.
-
Optional: Adjust the Preference, Codecs, and LDAP Directory sections as needed. (LDAP, the Lightweight Directory Access Protocol, is a shared network directory the phone can search for names and numbers.)
-
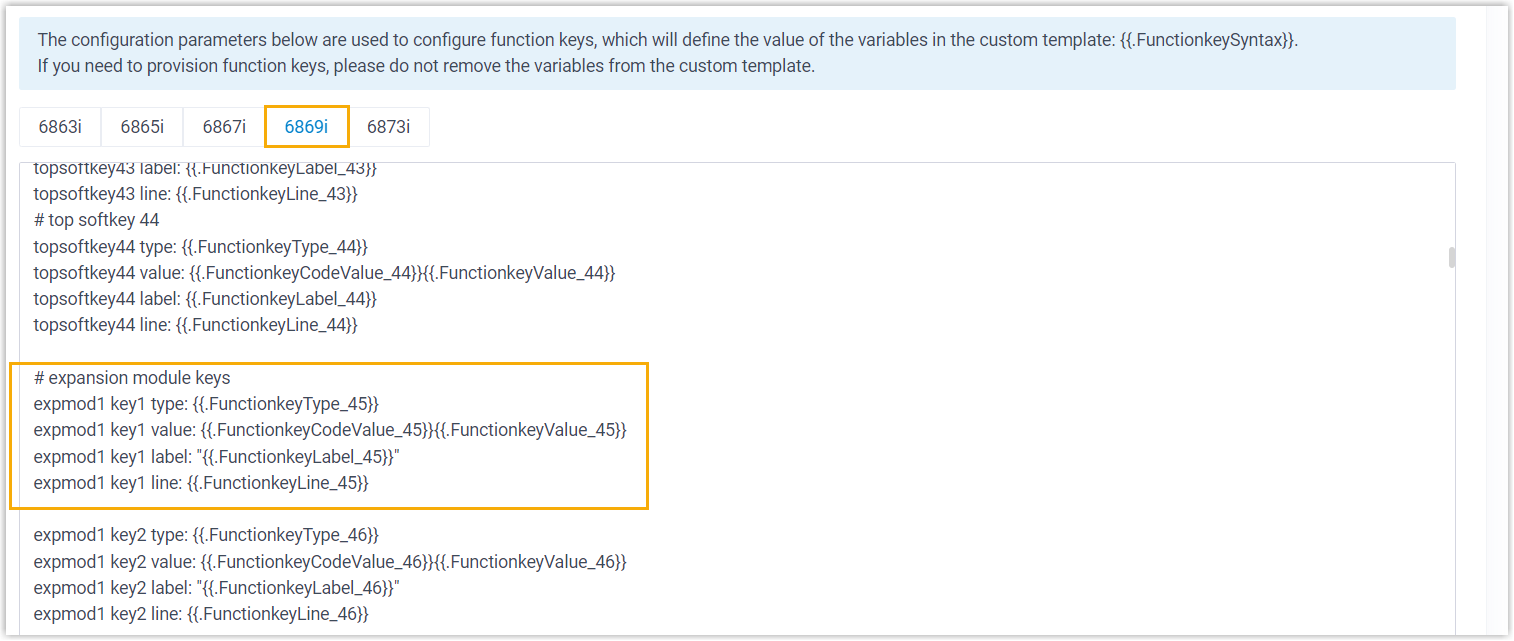
In the second text box of the Customize Configuration Parameters in Text section, select the phone model, then add the function-key parameters for the module by following that model’s configuration parameter reference.
-
-
Apply the template to the phone.
- Go to Auto Provisioning > Phones and edit the phone.
- In the Options section, choose your template from the Template drop-down list.
- Click Save.
-
Reprovision the phone so the template takes effect.
- Go to Auto Provisioning > Phones.
- Click the reprovision icon next to the phone.
- In the confirmation window, click OK.
Question about this page?
Ask the AI assistant. It starts from this page, then searches the rest of the docs.
Ask Cloud Voice AI
Answers are AI-generated from the docs and may contain mistakes. Verify with the linked pages.