
Provision a Grandstream IP Phone with Cloud Voice
Cloud Voice builds a configuration file for each Grandstream phone you register and serves it from a provisioning link. Point the phone at that link and it pulls down its settings and registers the assigned extension on its own. The examples below use a Grandstream GRP2602 (firmware 1.0.3.67), but the same steps apply to every supported model.
Supported models and firmware
Section titled “Supported models and firmware”Before you start, confirm that both the phone and your Cloud Voice system meet the minimum firmware levels for the model you are provisioning.
| Model | Minimum phone firmware | Minimum system firmware |
|---|---|---|
| GAC2500 | 1.0.3.45 | 84.11.0.22 |
| GAC2570 | 1.0.1.36 | 84.11.0.22 |
| GHP610 | 1.0.1.71 | 84.18.0.18 |
| GHP610W | 1.0.1.71 | 84.17.0.17 |
| GHP611 | 1.0.1.71 | 84.18.0.18 |
| GHP611W | 1.0.1.71 | 84.17.0.17 |
| GHP620 | 1.0.1.71 | 84.18.0.18 |
| GHP620W | 1.0.1.71 | 84.17.0.17 |
| GHP621 | 1.0.1.71 | 84.18.0.18 |
| GHP621W | 1.0.1.71 | 84.17.0.17 |
| GHP630 | 1.0.1.71 | 84.18.0.18 |
| GHP630W | 1.0.1.40 | 84.17.0.17 |
| GHP631 | 1.0.1.40 | 84.18.0.18 |
| GRP2601 | 1.0.3.63 | 84.9.0.18 |
| GRP2601P | 1.0.3.63 | 84.9.0.18 |
| GRP2602 | 1.0.3.63 | 84.9.0.18 |
| GRP2602P | 1.0.3.63 | 84.9.0.18 |
| GRP2602G | 1.0.3.63 | 84.9.0.18 |
| GRP2602W | 1.0.3.63 | 84.9.0.18 |
| GRP2603 | 1.0.3.63 | 84.9.0.18 |
| GRP2603P | 1.0.3.63 | 84.9.0.18 |
| GRP2604 | 1.0.3.63 | 84.9.0.18 |
| GRP2604P | 1.0.3.63 | 84.9.0.18 |
| GRP2612 | 1.0.7.25 | 84.9.0.18 |
| GRP2612P | 1.0.7.25 | 84.9.0.18 |
| GRP2612G | 1.0.7.25 | 84.9.0.18 |
| GRP2612W | 1.0.7.25 | 84.9.0.18 |
| GRP2613 | 1.0.7.25 | 84.9.0.18 |
| GRP2614 | 1.0.7.25 | 84.9.0.18 |
| GRP2615 | 1.0.7.25 | 84.9.0.18 |
| GRP2616 | 1.0.7.25 | 84.9.0.18 |
| GRP2624 | 1.0.7.25 | 84.9.0.18 |
| GRP2634 | 1.0.7.25 | 84.9.0.18 |
| GRP2670 | 1.0.7.25 | 84.9.0.18 |
| GXP1610 | 1.0.7.13 | 84.9.0.18 |
| GXP1620 | 1.0.7.13 | 84.9.0.18 |
| GXP1625 | 1.0.7.13 | 84.9.0.18 |
| GXP1628 | 1.0.7.13 | 84.9.0.18 |
| GXP1630 | 1.0.7.13 | 84.9.0.18 |
| GXP2130 | 1.0.11.16 | 84.9.0.18 |
| GXP2135 | 1.0.11.16 | 84.9.0.18 |
| GXP2140 | 1.0.11.16 | 84.9.0.18 |
| GXP2160 | 1.0.11.16 | 84.9.0.18 |
| GXP2170 | 1.0.11.16 | 84.9.0.18 |
| GXW4216 | 1.0.23.4 | 84.6.0.24 |
| GXW4224 | 1.0.23.4 | 84.6.0.24 |
| GXW4232 | 1.0.23.4 | 84.6.0.24 |
| GXW4248 | 1.0.23.4 | 84.6.0.24 |
| HT801 | 1.0.63.3 | 84.6.0.24 |
| HT802 | 1.0.63.3 | 84.6.0.24 |
| HT812 | 1.0.5.10 | 84.6.0.24 |
| HT814 | 1.0.63.3 | 84.6.0.24 |
| HT818 | 1.0.63.3 | 84.6.0.24 |
| WP825 | 1.0.11.67 | 84.17.0.17 |
Provisioning scenarios
Section titled “Provisioning scenarios”How you deliver the provisioning link depends on how many phones you are setting up:
- A single phone: Enter the link on the phone yourself, in its web interface. See Provision a single phone manually.
- Several phones at once: Publish the link through DHCP (Dynamic Host Configuration Protocol) option 66 so every phone in the subnet picks it up automatically. See Provision multiple phones automatically.
Both paths start the same way: you register the phone in Cloud Voice so a configuration file and link are generated for it.
Provision a single phone manually
Section titled “Provision a single phone manually”Before you begin
Section titled “Before you begin”- Add the default provisioning template for your phone model under Auto Provisioning > Resource Repository > Default Templates.
- If the phone was in service before, reset it to factory defaults so old settings do not interfere.
- Have the phone’s vendor, model, and MAC (Media Access Control) address on hand. The MAC address is the phone’s unique hardware identifier, usually printed on a label on the underside of the unit.
Step 1: Add the phone in Cloud Voice
Section titled “Step 1: Add the phone in Cloud Voice”Registering the phone tells Cloud Voice to build a configuration file keyed to its MAC address.
-
Sign in to the management portal and go to Auto Provisioning > Phones.
-
Click Add > Add.
-
In the IP Phone section, identify the device:
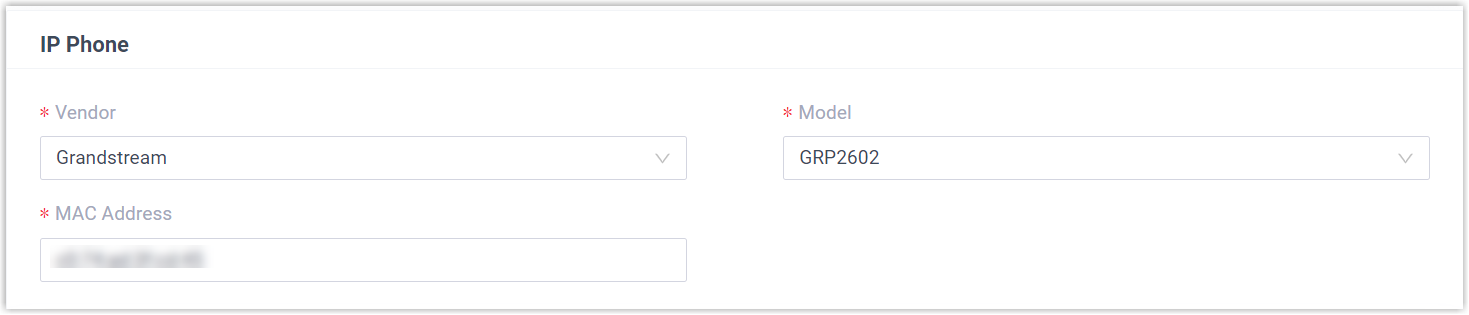
- Vendor: Choose Grandstream.
- Model: Choose the phone model. This example uses GRP2602.
- MAC Address: Type the phone’s MAC address.
-
In the Options section, set the provisioning behavior:

- Template: Pick a template from the list. Use the default template that matches the phone model, or a custom template you have built.
- Provisioning Link: Cloud Voice generates this link and points it at the phone’s configuration file. Copy it down now, because you will paste it onto the phone in the next step.
-
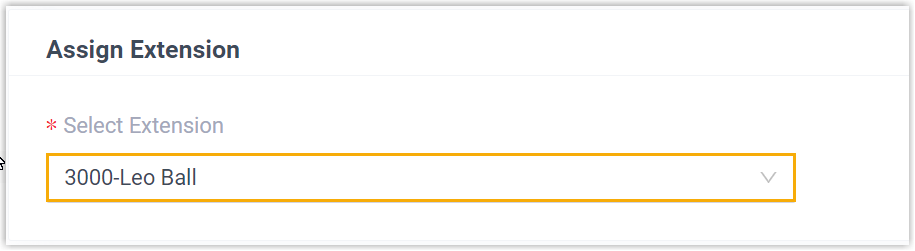
In the Assign Extension section, select the extension to bind to this phone.
-
Click Save.
Step 2: Point the phone at the provisioning server
Section titled “Step 2: Point the phone at the provisioning server”Enter the Cloud Voice provisioning link in the phone’s own web interface.
-
Log in to the Grandstream phone’s web interface:
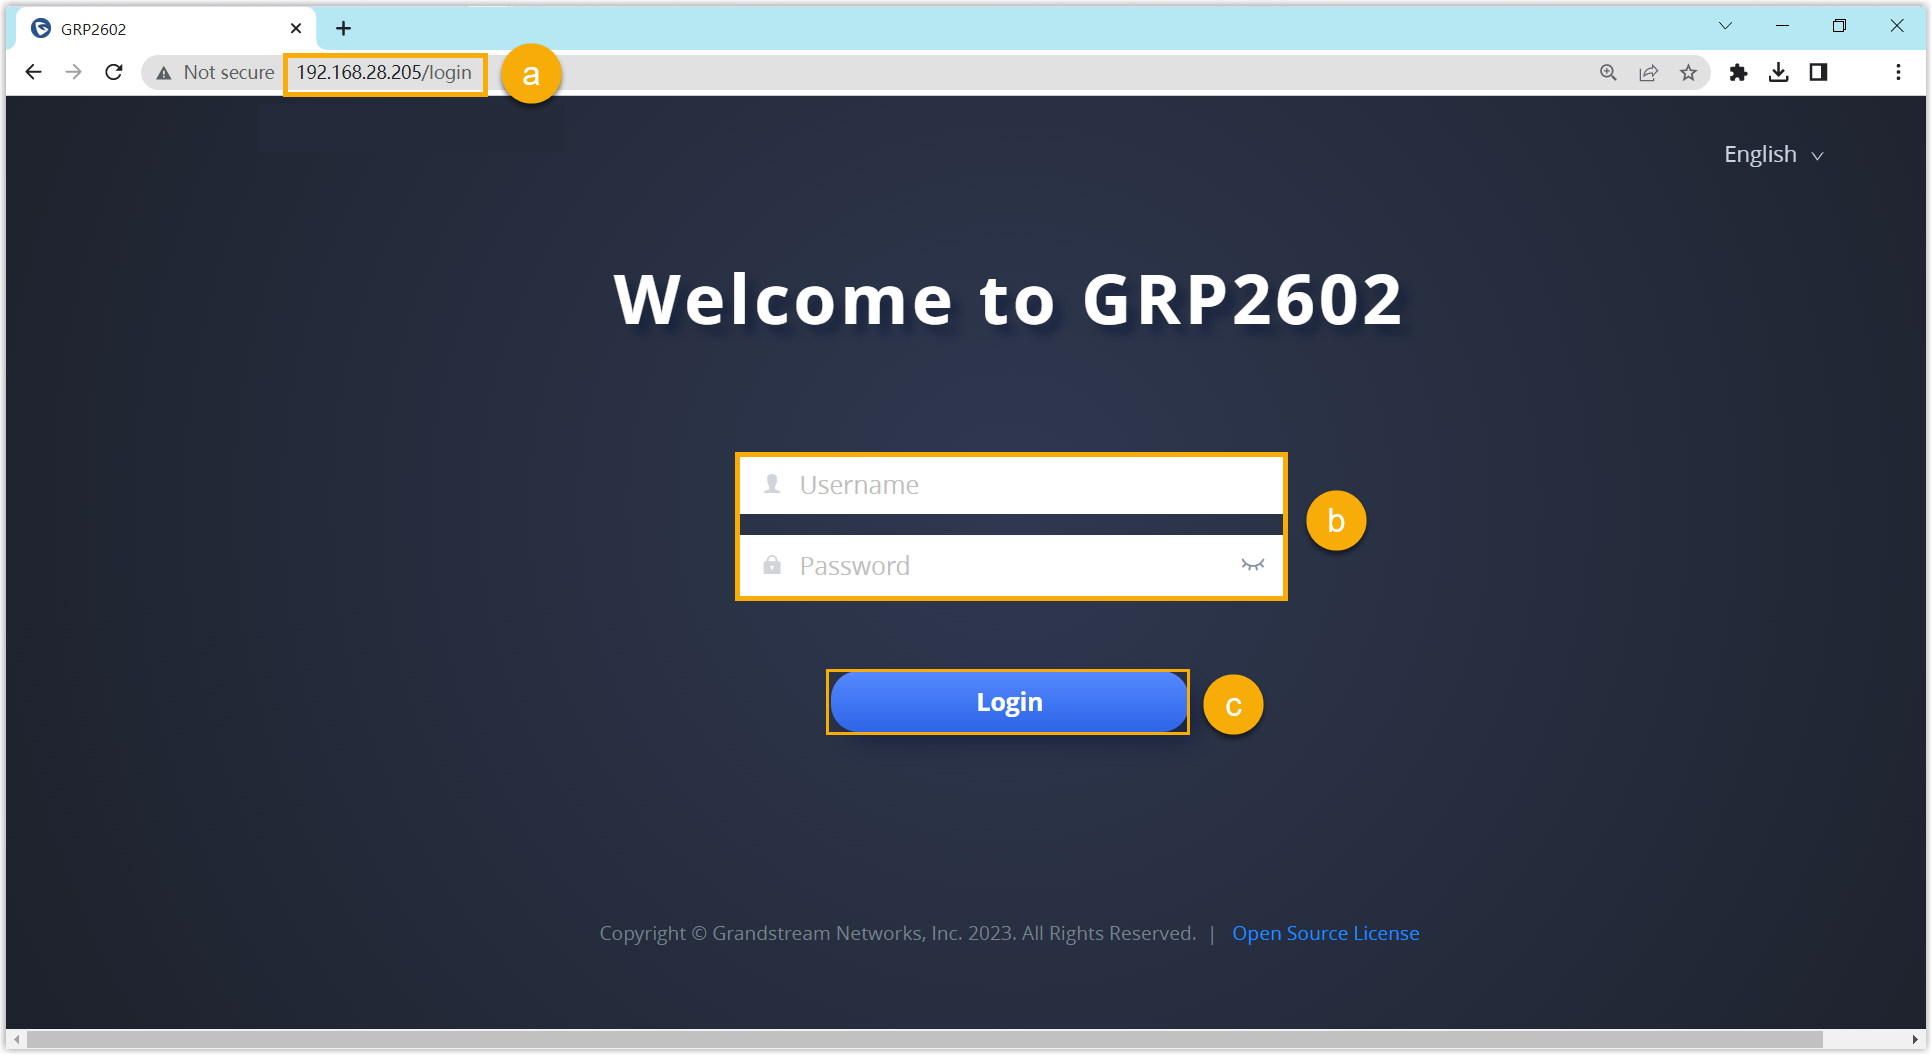
- Type the phone’s IP address in your browser’s address bar.
- Enter the user name
adminand its password. - Click Login.
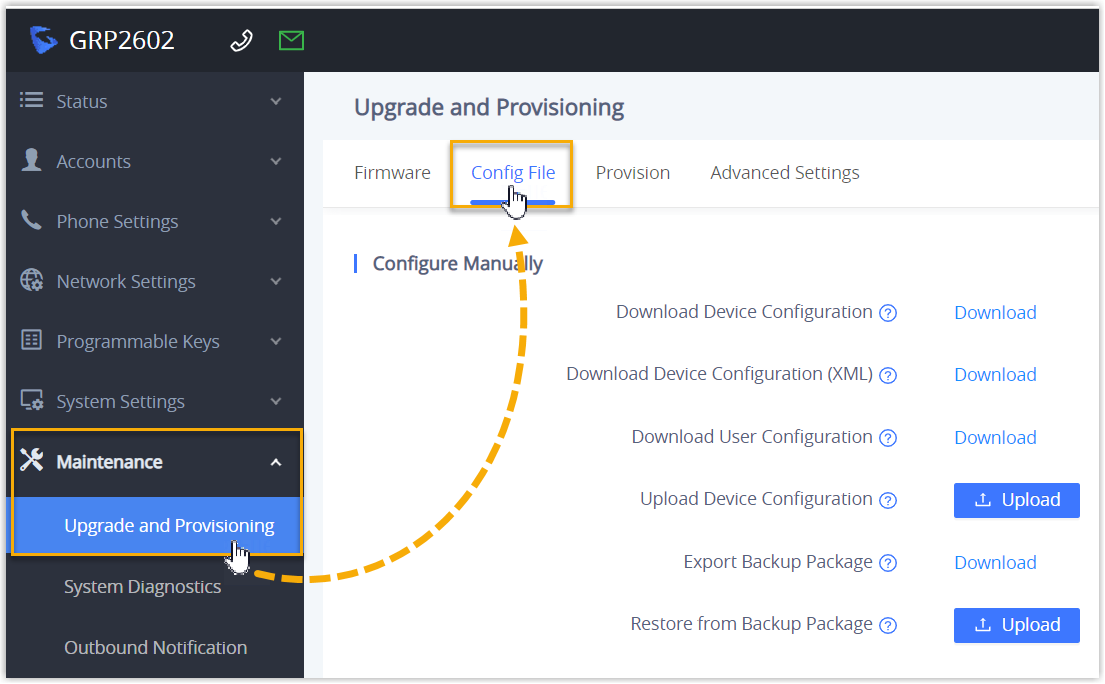
-
In the left navigation bar, go to Maintenance > Upgrade and Provisioning > Config File.
-
In the Configure via Network section, enter the provisioning server details:
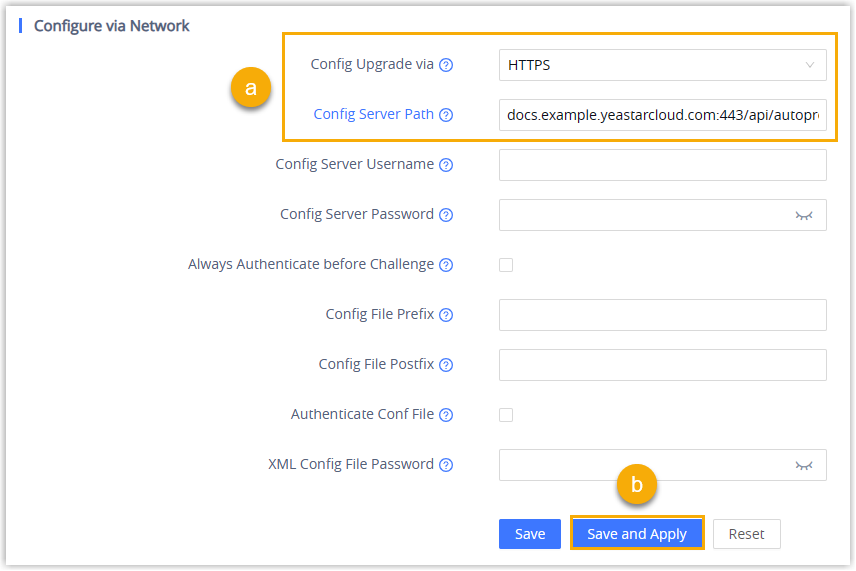
- Config Upgrade via: Select HTTPS.
- Config Server Path: Paste the provisioning link you copied from Cloud Voice.
-
Click Save and Apply.
Result
Section titled “Result”-
Once the phone restarts, it downloads its configuration from Cloud Voice and applies the settings automatically.
-
The assigned extension registers on the phone. Confirm the registration state under Auto Provisioning > Phones in the portal.

What to do next
Section titled “What to do next”Grandstream phones enable every available codec on an account by default, which can interfere with outgoing calls. Trim the account down to the codecs you actually use. See Remove Unnecessary Codecs for Grandstream IP Phone.
Provision multiple phones automatically
Section titled “Provision multiple phones automatically”Instead of touching each phone, you register them all in Cloud Voice and hand the provisioning link to the subnet through DHCP option 66. Every phone that boots on that subnet reads the link, fetches its configuration, and registers.
Before you begin
Section titled “Before you begin”- Make sure the subnet has only one DHCP server, or the phones may fail to obtain IP addresses.
- Add the default provisioning template for your phone model under Auto Provisioning > Resource Repository > Default Templates.
- Reset any phone that was in service before to factory defaults.
- Have each phone’s vendor, model, and MAC address on hand.
Step 1: Add each phone in Cloud Voice
Section titled “Step 1: Add each phone in Cloud Voice”Register every phone as described in Step 1 of the manual procedure: set the vendor, model, and MAC address, choose a template, assign an extension, and save. Cloud Voice generates a configuration file and provisioning link for each device.
Step 2: Set DHCP option 66
Section titled “Step 2: Set DHCP option 66”-
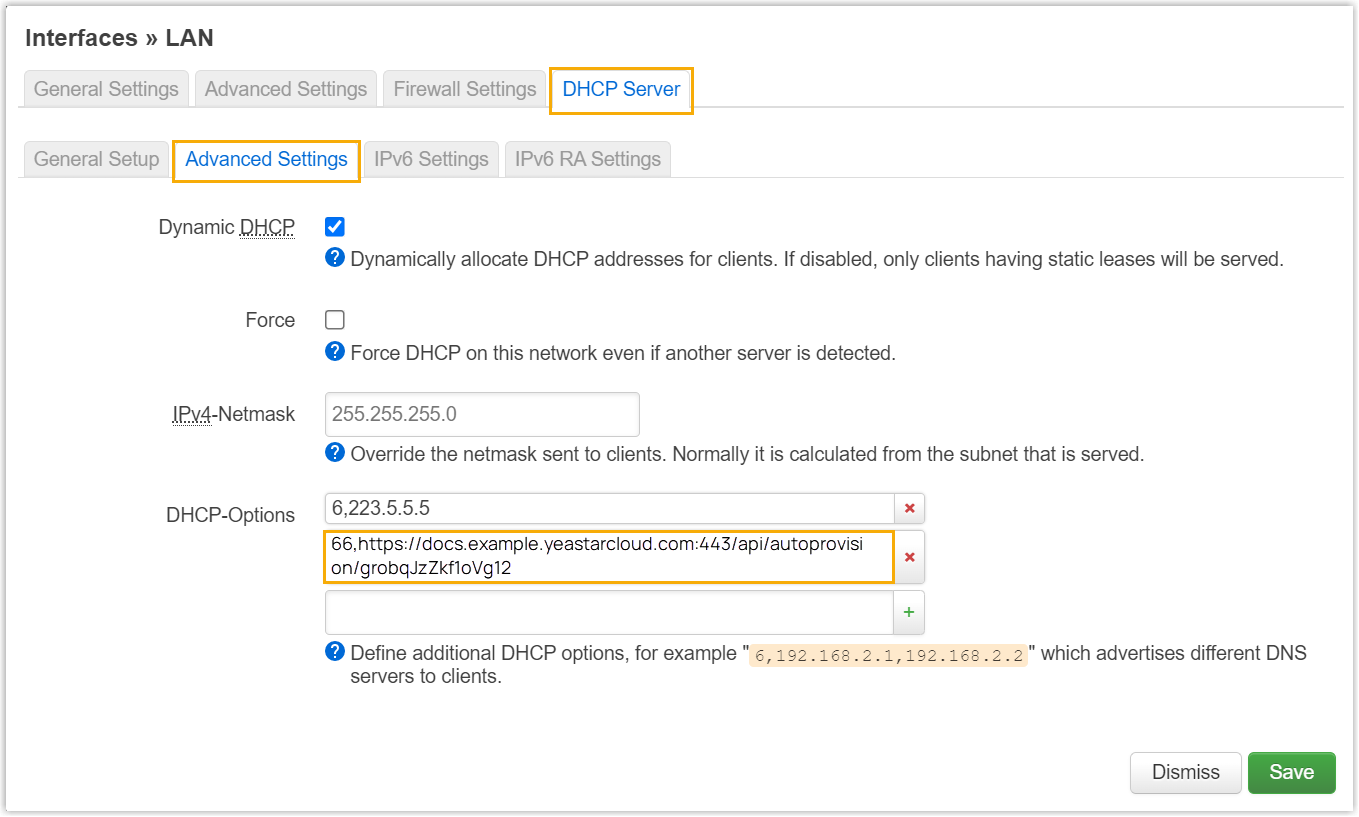
In the portal, open a phone’s detail page and copy its provisioning link.

-
On your DHCP server, configure option 66 with that provisioning link. The example below shows a typical setup:
Result
Section titled “Result”-
After a phone restarts, it leases an IP address from the DHCP server, downloads its configuration from Cloud Voice through the provisioning link, and applies the settings automatically.
-
The assigned extension registers on the phone. Confirm the registration state under Auto Provisioning > Phones in the portal.
What to do next
Section titled “What to do next”Grandstream phones enable every available codec on an account by default, which can interfere with outgoing calls. Trim each registered account down to the codecs you actually use. See Remove Unnecessary Codecs for Grandstream IP Phone.
Question about this page?
Ask the AI assistant. It starts from this page, then searches the rest of the docs.
Ask Cloud Voice AI
Answers are AI-generated from the docs and may contain mistakes. Verify with the linked pages.