
Archive Files to Microsoft SharePoint
Cloud Voice can offload your call recordings and configuration backups to a folder in Microsoft SharePoint, either on a recurring schedule or whenever you choose. Setting this up happens in two stages: first you prepare the Microsoft side (an app registration and a destination folder), then you register that SharePoint location on Cloud Voice and build the tasks that move your files.
Requirements
Section titled “Requirements”| Item | Requirement |
|---|---|
| Firmware | Version 84.22.0.17 or later |
| Plan | Enterprise plan (self-managed system) or Ultimate plan (Cloud Voice-hosted system) |
Limits
Section titled “Limits”- Up to 10 archive servers.
- Up to 200 archive tasks.
How archiving works
Section titled “How archiving works”To send recordings or backups to a specific SharePoint folder, you complete the following:
- On Microsoft’s side, prepare the resources Cloud Voice needs to authenticate:
- A Microsoft account with the Global Administrator role.
- A set of API credentials created on the Azure portal, a tenant ID, a client ID, and a client secret.
- A folder on your SharePoint site to hold the archived files.
- On Cloud Voice, put those pieces to work:
- Add SharePoint as an archive server.
- Create one or more tasks that archive your files there.
When a task runs, Cloud Voice presents the API credentials to Microsoft SharePoint. Once the request is authenticated, the selected files are written to the folder you designated.
Step 1: Register an application in Microsoft Entra
Section titled “Step 1: Register an application in Microsoft Entra”-
Sign in to the Microsoft Azure portal with your Global Administrator account.
-
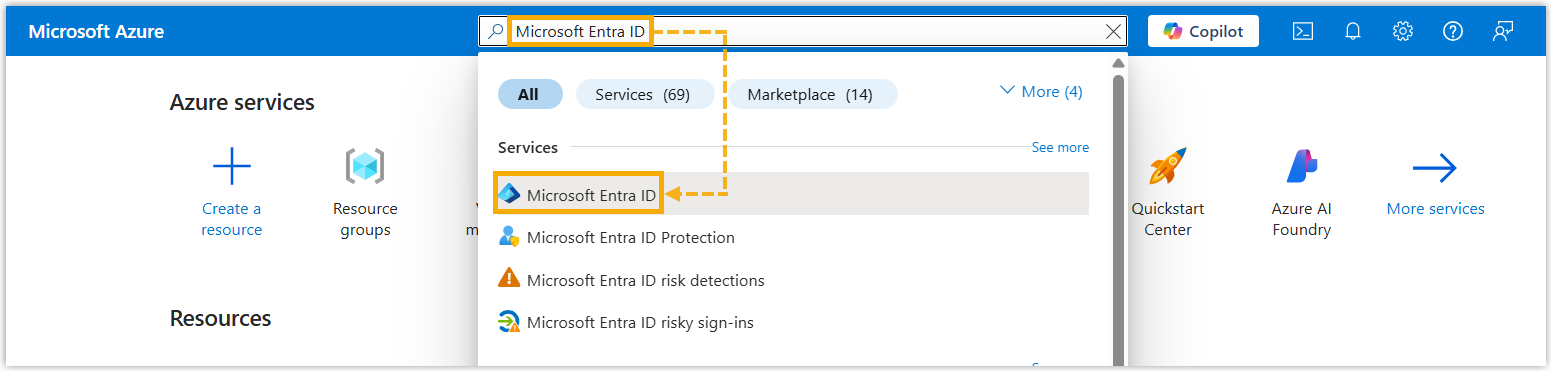
Search for and open the Microsoft Entra ID service to reach your organization’s directory.
-
Register the application:
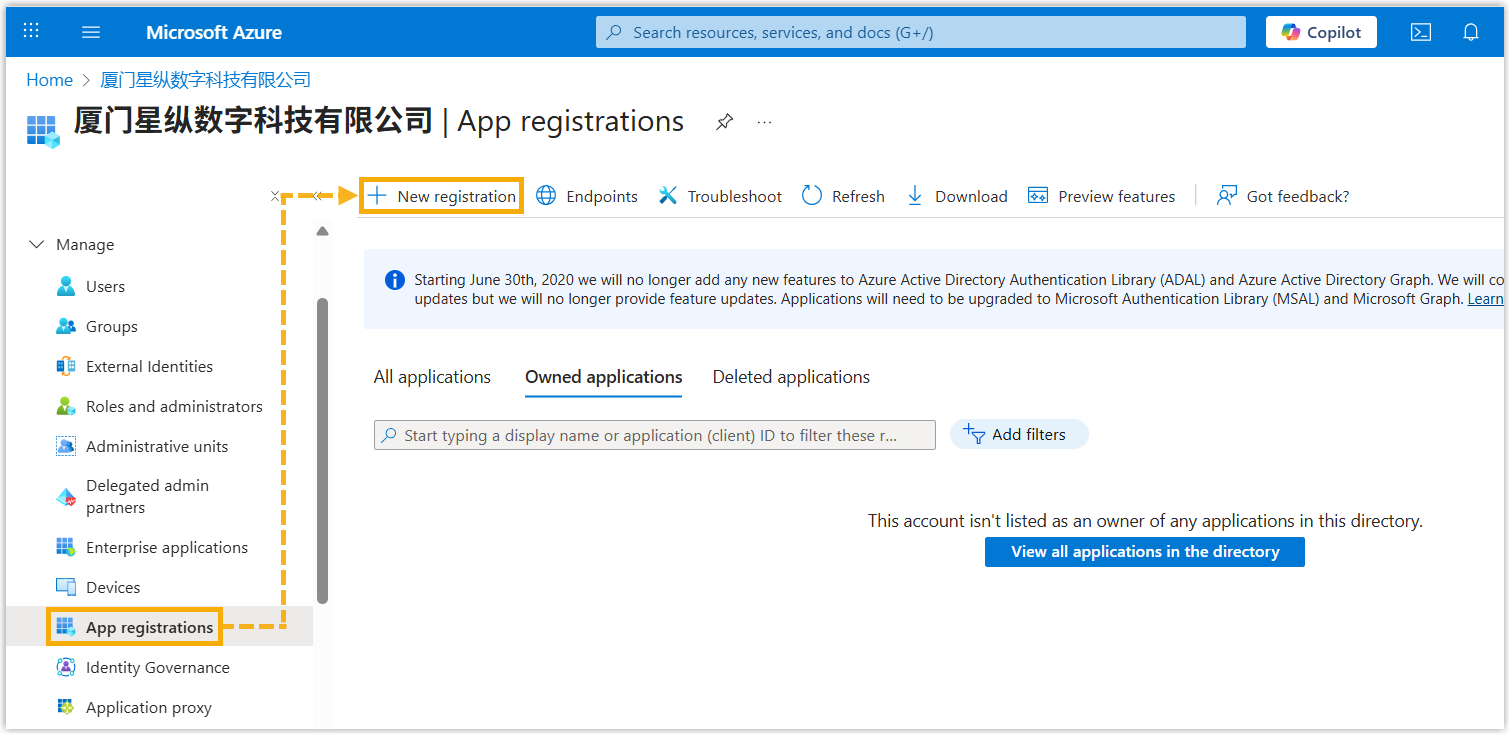
a. In the directory’s left navigation, go to Manage > App registrations and click New registration.
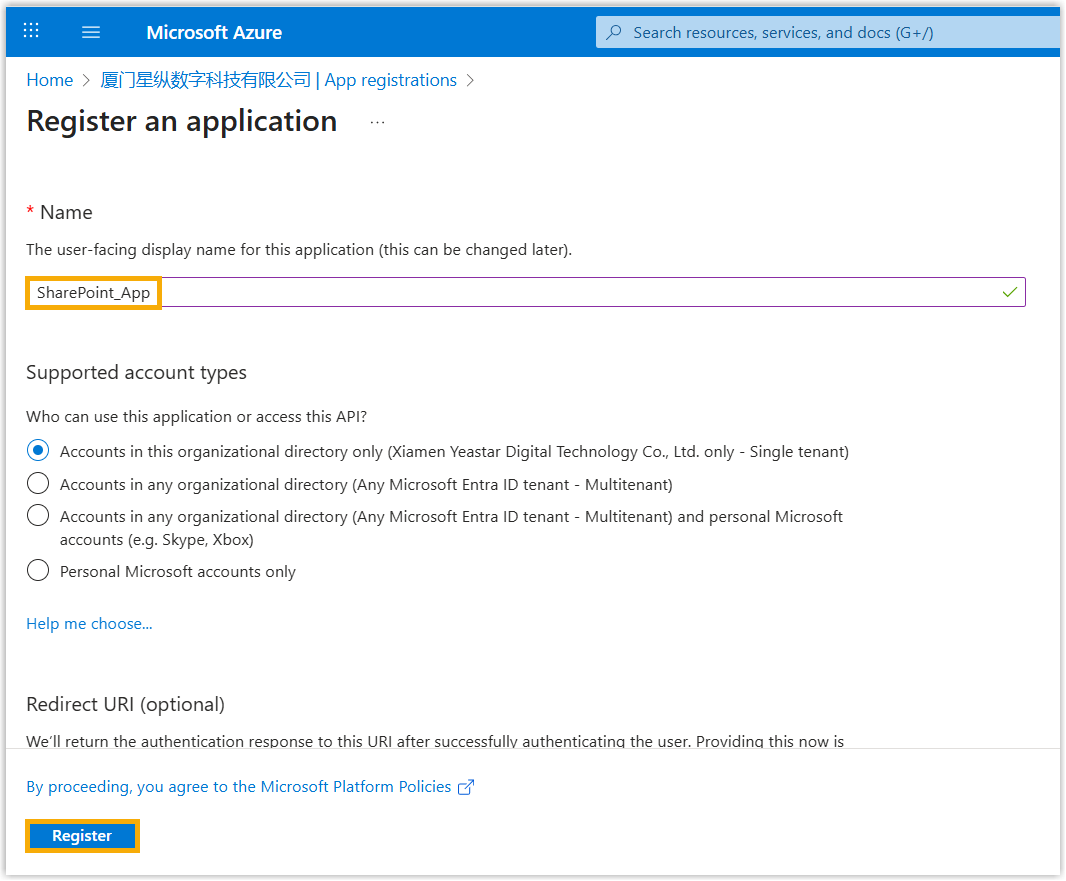
b. Give the application a name that will help you recognize it later, then click Register.
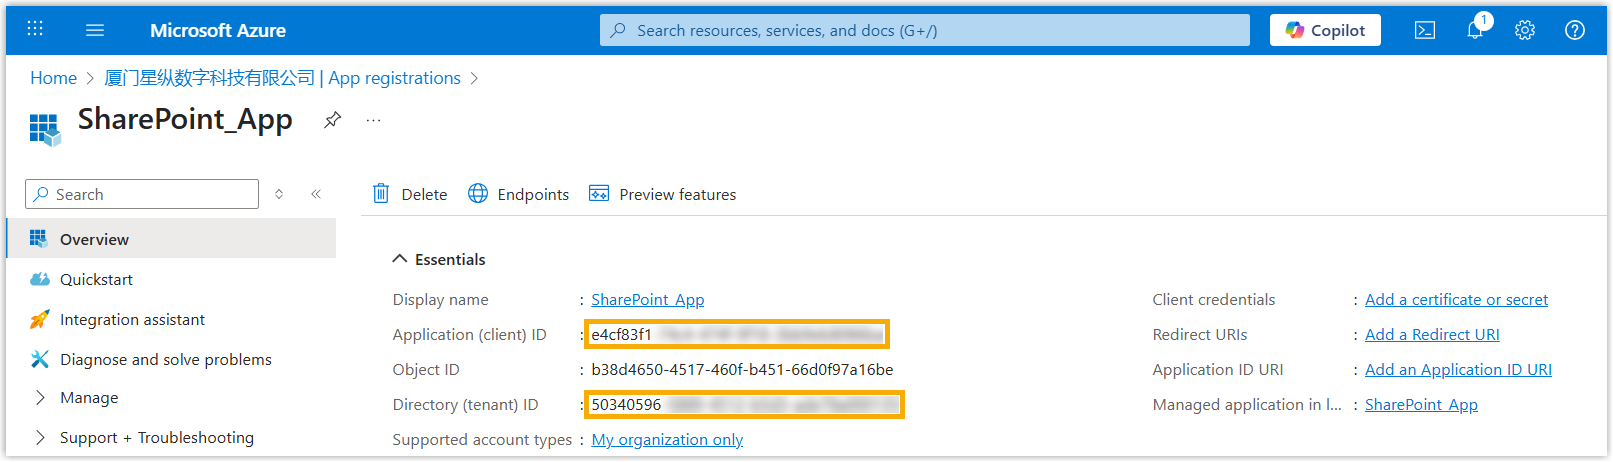
c. Record the Application (client) ID and the Directory (tenant) ID shown on the overview page.
-
Generate a client secret:
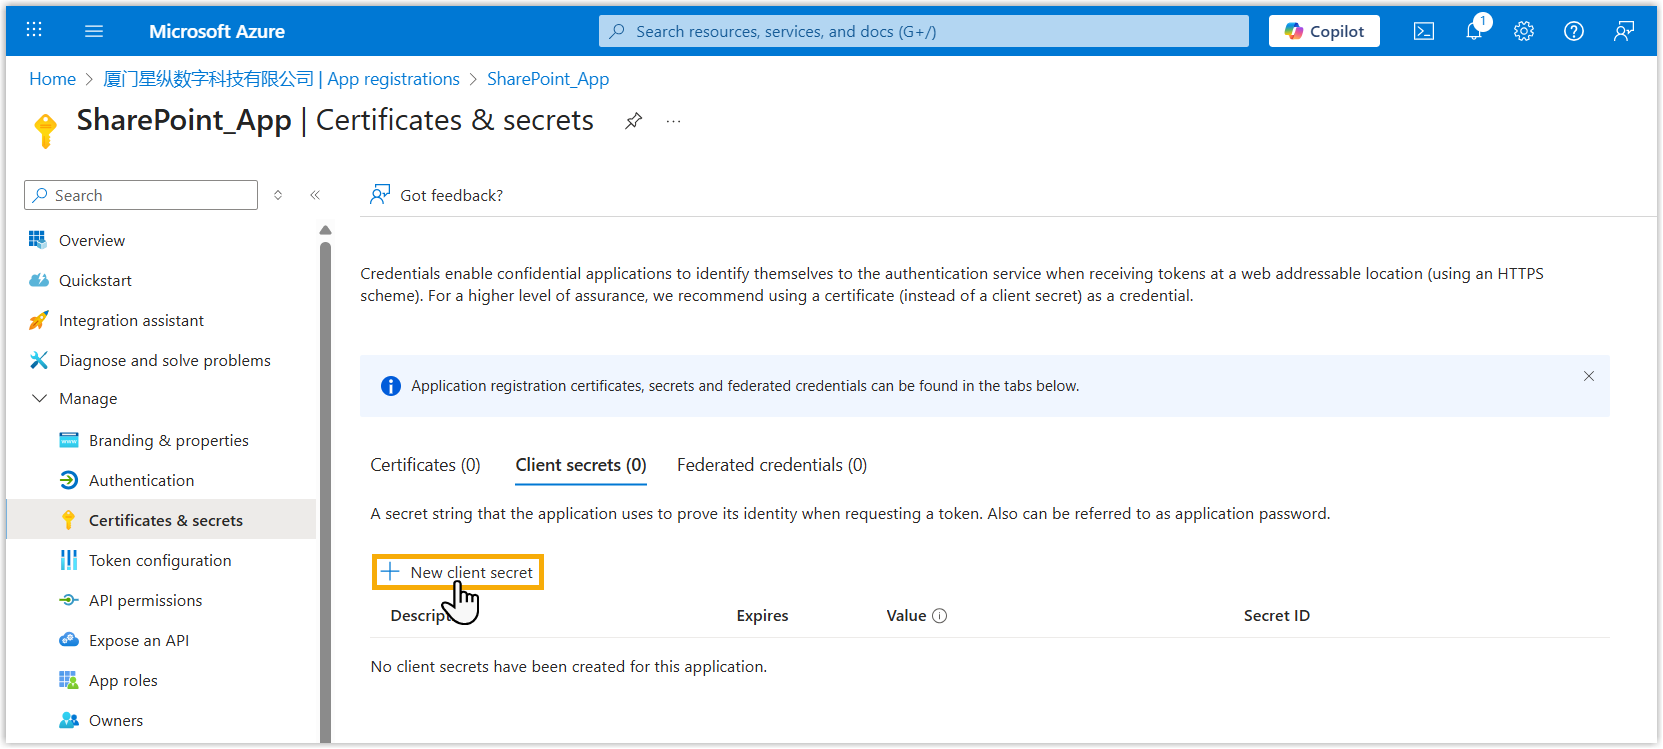
a. In the application’s left navigation, go to Manage > Certificates & secrets > Client secrets and click New client secret.
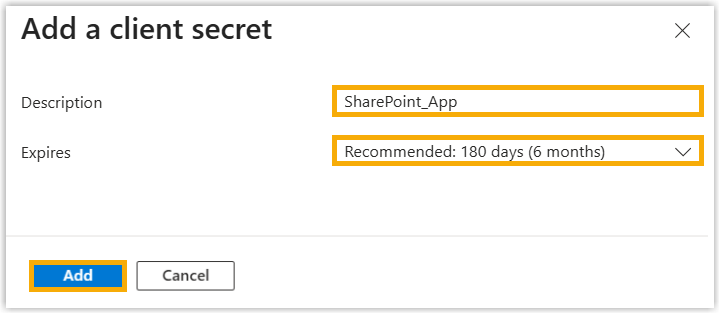
b. Configure the secret (description and expiry), then click Add.
c. Copy the secret’s Value.
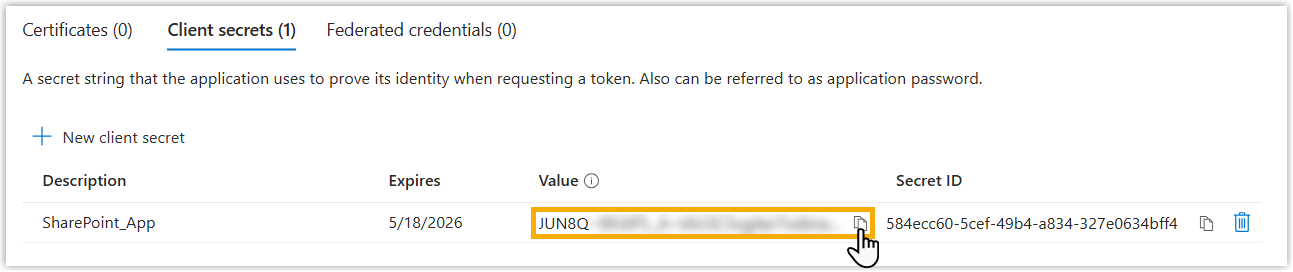
You now have three credentials, the client ID, the tenant ID, and the client secret value, which you will enter into Cloud Voice in Step 4.
Step 2: Grant the application API permissions
Section titled “Step 2: Grant the application API permissions”-
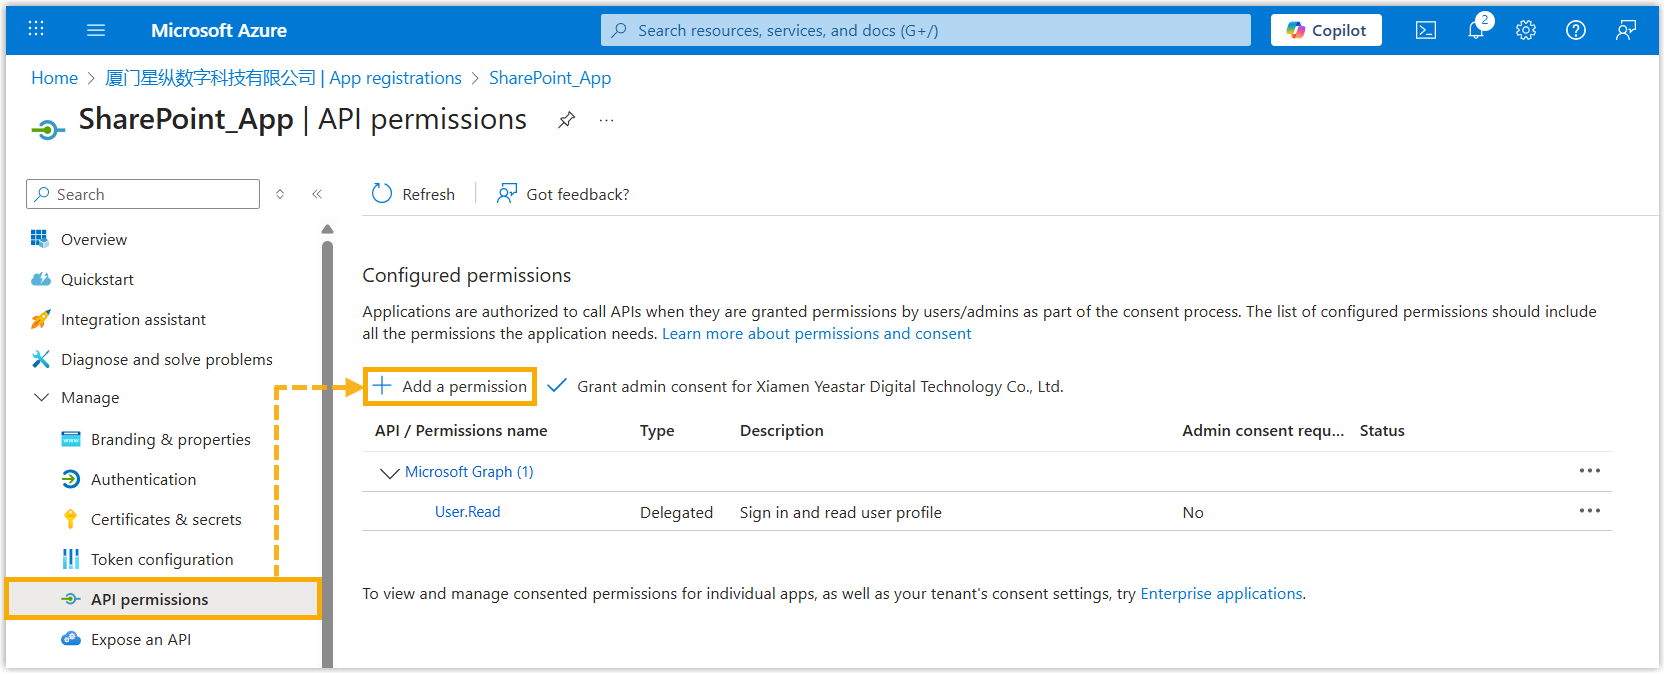
In the application’s left navigation, open API permissions and click Add a permission.
-
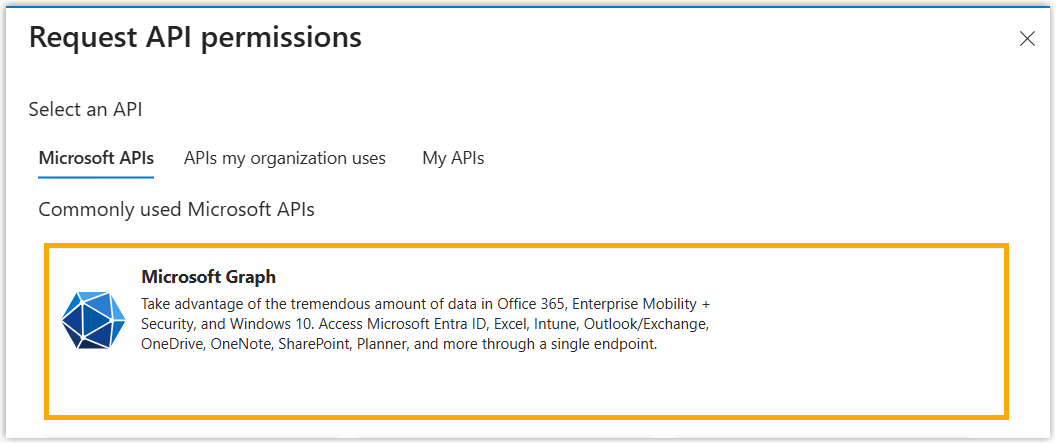
On the Select an API page, choose Microsoft APIs > Microsoft Graph.
-
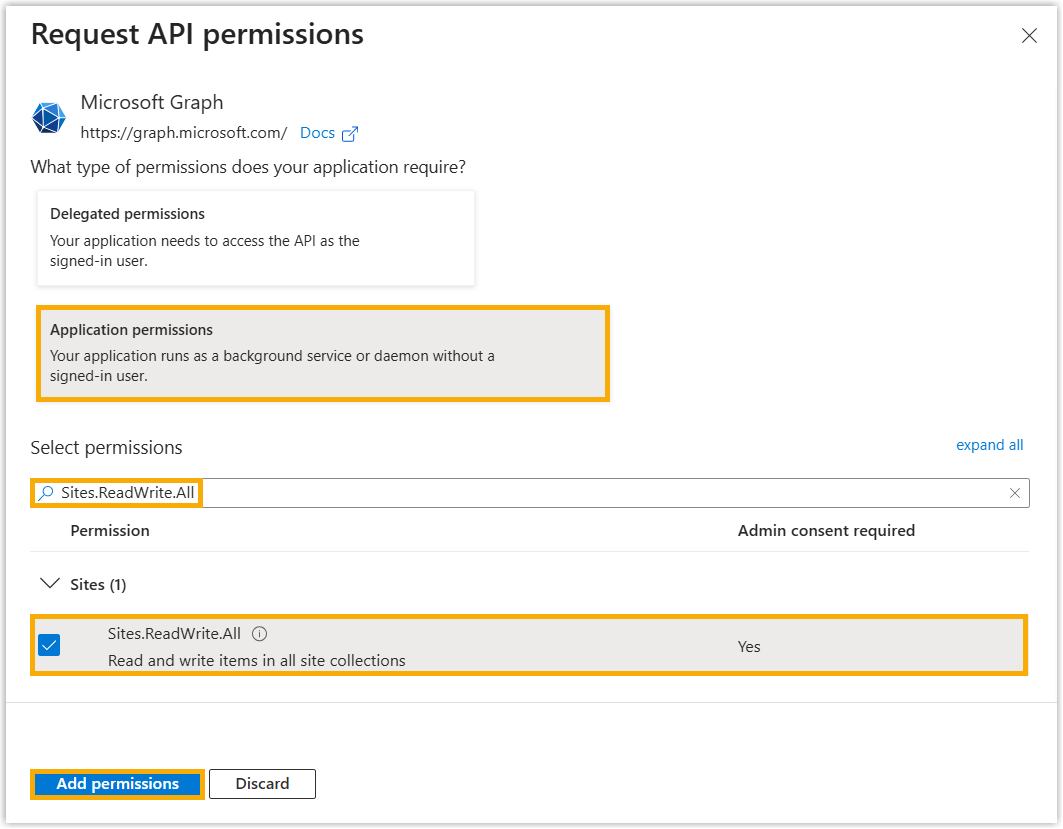
Grant the application read and write access to all site collections:
a. Click Application permissions, search for and select Sites.ReadWrite.All, then click Add permissions.
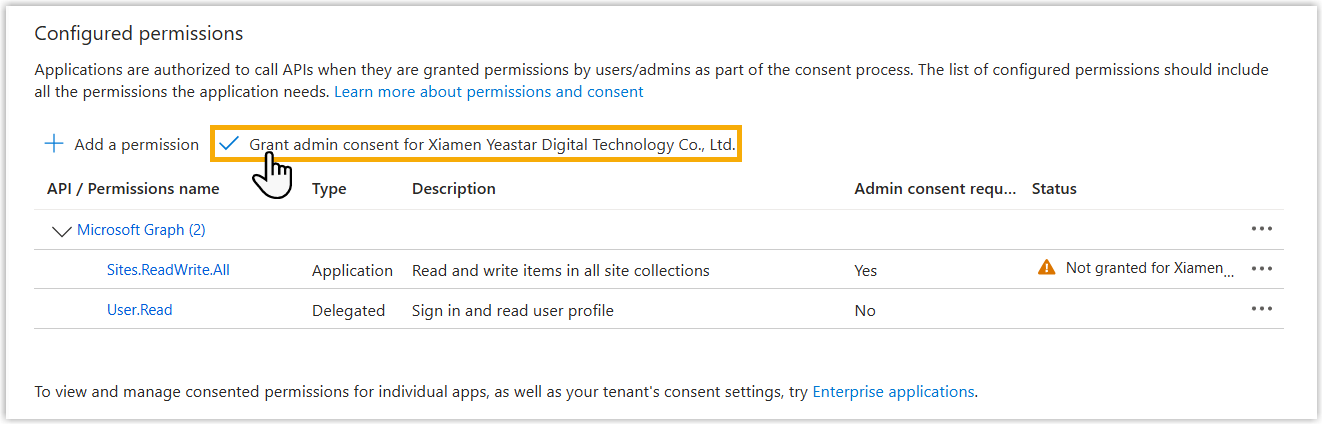
b. Click Grant admin consent for… to apply the permission.
c. In the confirmation dialog, select Yes.
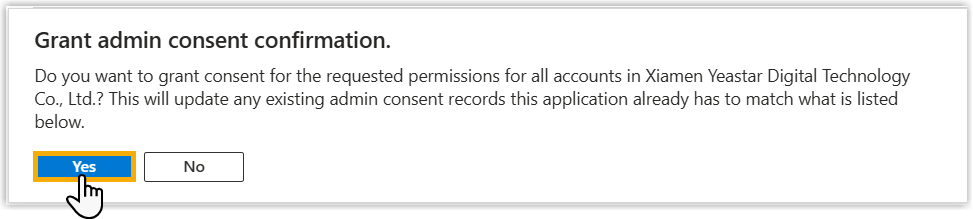
When the permission’s Status shows a green check mark, admin consent has been granted successfully.
Step 3: Create a folder in SharePoint
Section titled “Step 3: Create a folder in SharePoint”-
Open the SharePoint site where you want the folder, then open its document library.
-
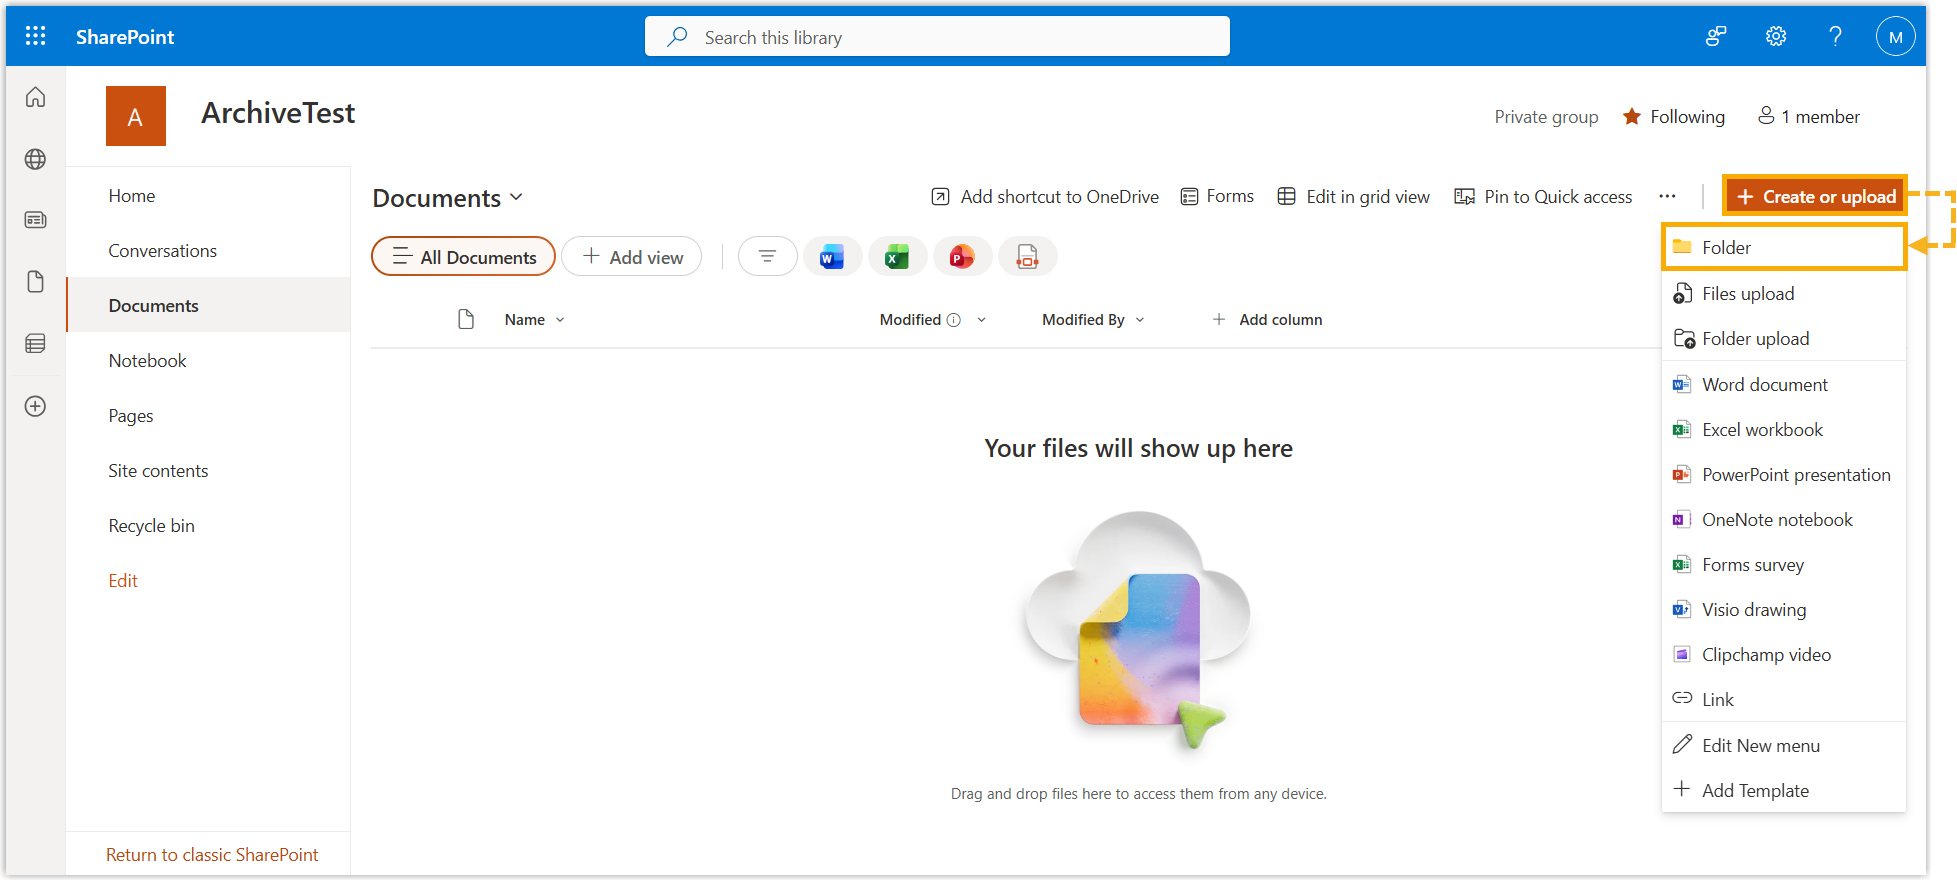
At the top right, click Create or Upload and choose Folder from the menu.
-
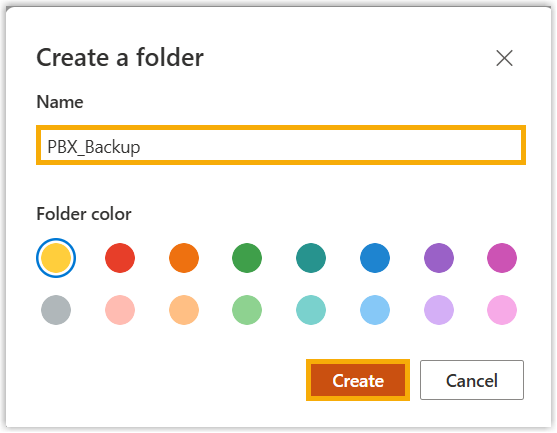
Enter a recognizable name in the Name field and click Create.
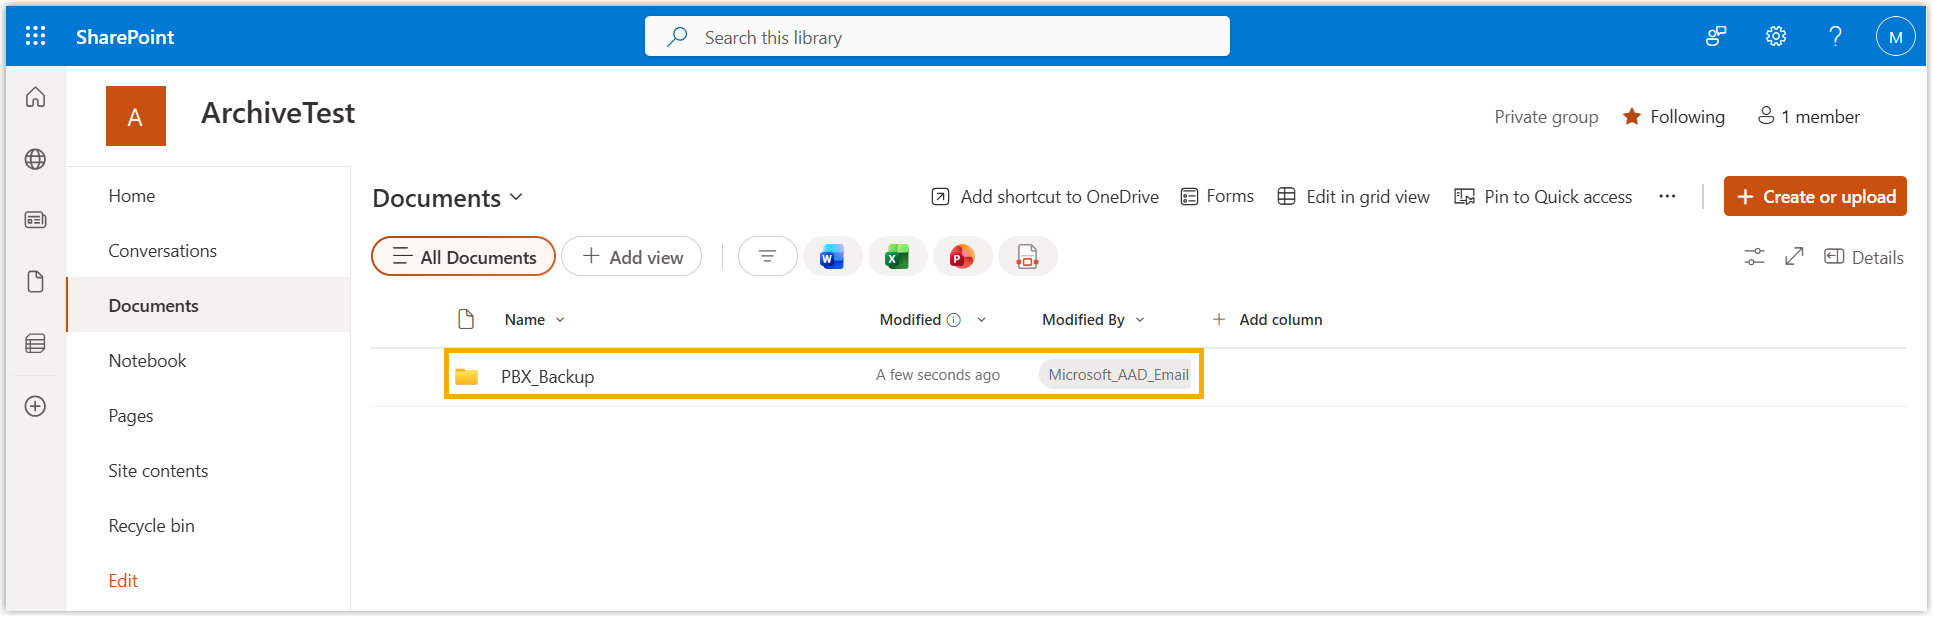
The new folder appears in the document library list.
Step 4: Add SharePoint as an archive server
Section titled “Step 4: Add SharePoint as an archive server”-
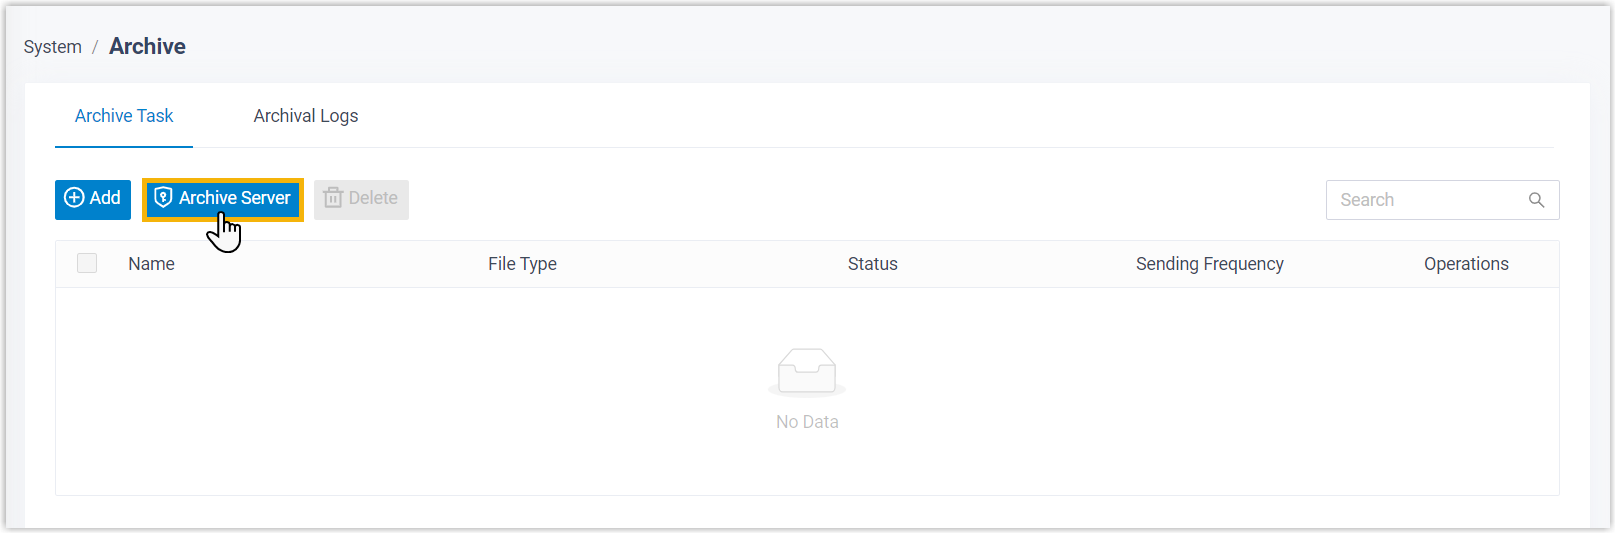
Sign in to the Cloud Voice management portal and go to System > Archive.
-
On the Archive Task tab, click Archive Server.
-
Add the server:
a. Click Add.
b. Complete the settings in the pop-up window.
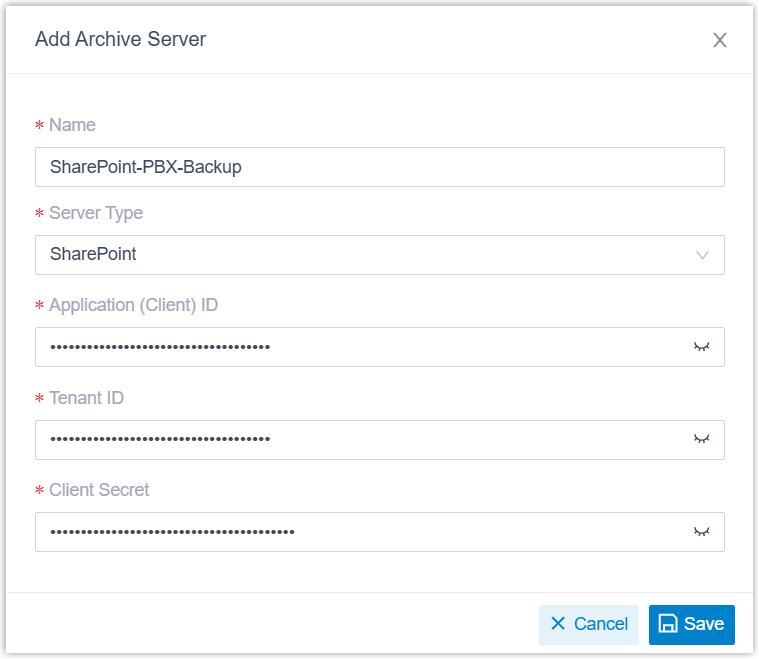
Setting What to enter Name A label that identifies this server. Server Type Select SharePoint. Application (Client) ID The client ID you recorded in Step 1. Tenant ID The directory (tenant) ID you recorded in Step 1. Client Secret The client secret value you copied in Step 1. c. Click Save. SharePoint now appears in the archive server list.
-
Close the window.
Step 5: Create an archive task
Section titled “Step 5: Create an archive task”-
On the Archive Task tab, click Add.
-
In the Task Configuration section, fill in the basic settings.

Setting Description Name A label that identifies the task. File Type Choose Recording Files or Backup Files. Data Range The time range of files to archive. See the note below. Recording File Format The download format for recordings. Available only when the file type is recordings; all recordings in the system are archived in this format. Under Sync Frequency, choose how often the task runs:
- Once: archives immediately after you save the task.
- Daily: pick a time of day; the task runs at that time every day.
- Weekly: pick a day of the week and a time; the task runs then each week.
- Monthly: pick a day of the month and a time; the task runs then each month.
-
In the Storage Configuration section, choose where the files go.
Setting Description Archive Server Select the SharePoint server you added in Step 4. Select Folder/Path Choose the SharePoint folder that will hold the archived files. For Storage Method, pick how files are laid out on the server. The options depend on whether the task runs once or on a schedule.
For a one-time task:
- Create Task Folder: creates a folder named
FileType-TaskNameunder the selected path and stores the files there. - Save Directly to Selected Path: writes files straight to the selected path with no new folder.
For a recurring task:
- Create Folder per Execution: each run creates a folder named
FileType-TaskName-ExecutionDateunder the selected path and stores that run’s files inside it. - Create Task Folder Once and Reuse It: the first run creates
FileType-TaskNameunder the selected path, and every later run adds its files to that same folder. - Save Directly to Selected Path: every run writes files straight to the selected path with no new folder.
The remaining options are optional and apply only to recording-file tasks:
Setting Description Skip archived files When enabled, files already archived are not archived again. When disabled, they are archived again; the file’s stored location is updated, but the earlier copy is left in place on the server. Delete local files after archiving When enabled, local recordings are removed after archiving. They can still be played and downloaded from the Cloud Voice management portal and the Cloud Voice App, but not from the archive server. When disabled, local files are kept. Organize Files by Date applies to any task type. When enabled, the system creates date subfolders (named
YYYYMMDD, for example20260301) under the storage path. When disabled, files are saved directly to the path without date grouping. - Create Task Folder: creates a folder named
-
(Optional) Set a retention policy for the archived files.

Setting Description Retention Type Retention by Quantity keeps a maximum number of files/folders and deletes the oldest once that number is exceeded. Retention by Days keeps files/folders for a maximum period and deletes anything older. Retention Limit The maximum number of files/folders, or the maximum number of days, depending on the retention type. Retention Unit Folder counts the task folders created on the server (available only when the storage method is Create Folder per Execution, and it does not count date subfolders from Organize Files by Date). File counts individual archived files. -
Click Save.
Result
Section titled “Result”Your selected files are archived to the designated SharePoint folder, immediately for a one-time task, or at the scheduled time for a recurring one.
You can confirm the outcome in two places:
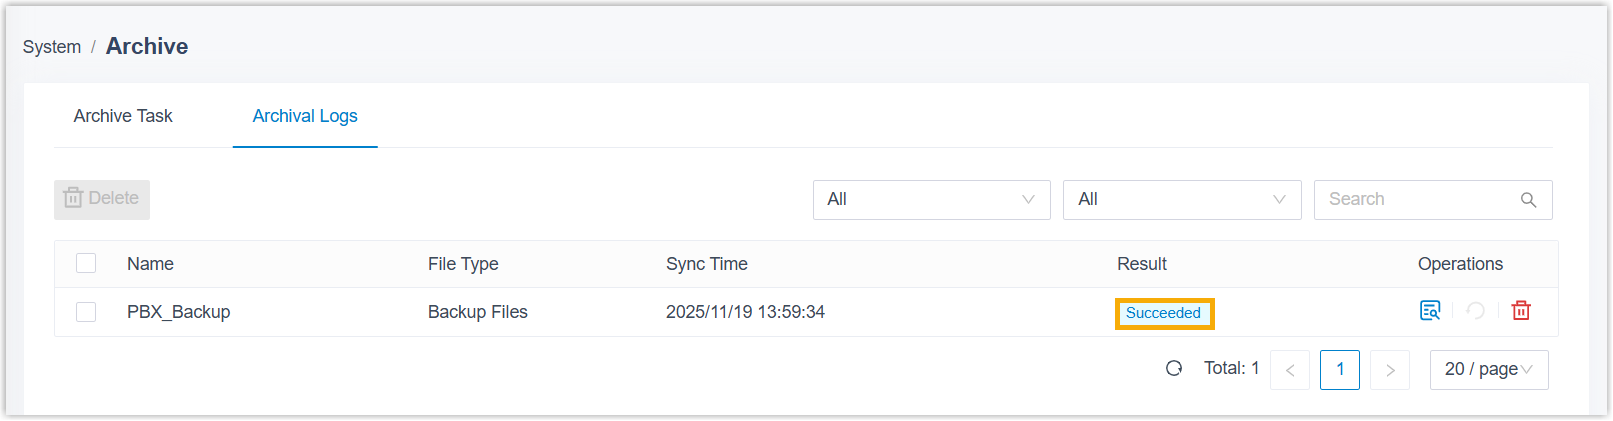
On Cloud Voice: go to System > Archive > Archival Logs. A Result of Succeeded means the files reached SharePoint.

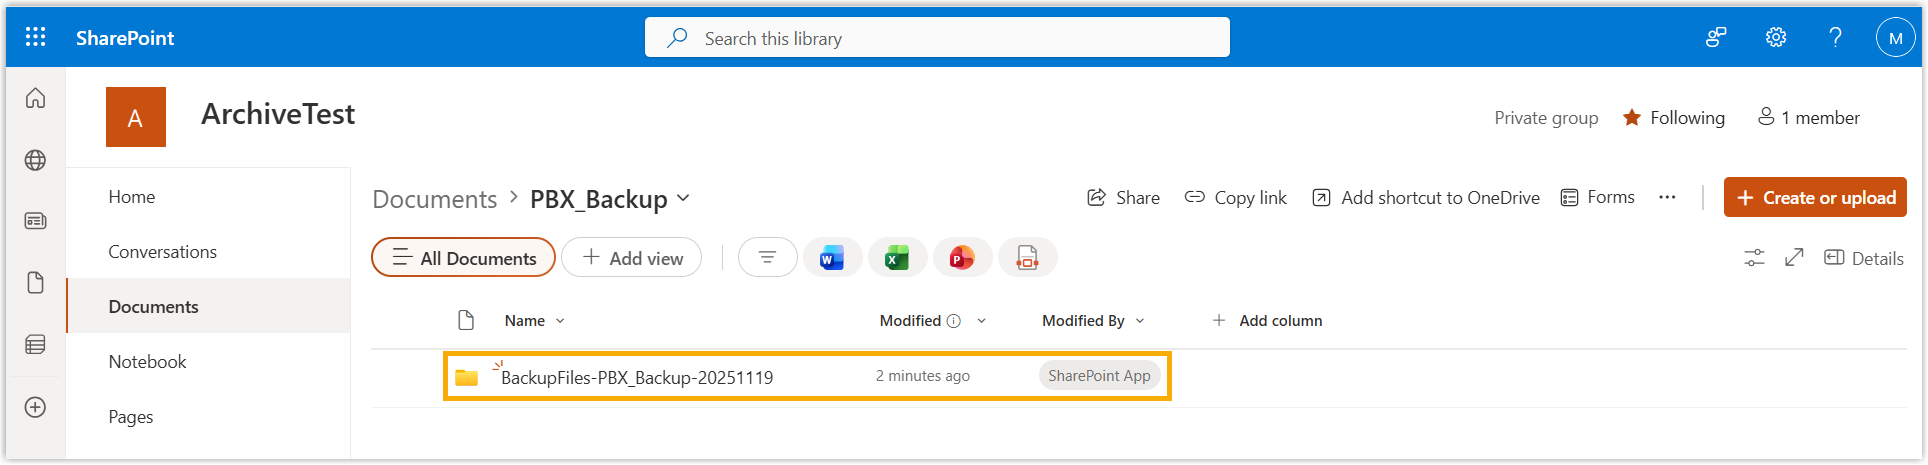
On Microsoft SharePoint: open the folder you created. If the expected files are listed, the archive succeeded.
Question about this page?
Ask the AI assistant. It starts from this page, then searches the rest of the docs.
Ask Cloud Voice AI
Answers are AI-generated from the docs and may contain mistakes. Verify with the linked pages.