
Receive Faxes by Email
Cloud Voice can turn incoming faxes into email. With Fax to Email enabled, the system converts each received fax to a PDF (Portable Document Format, the standard file type for documents) and delivers it straight to an extension user’s mailbox. This means a user never has to stand at a physical fax machine: the fax lands in their inbox like any other message. This page walks through the configuration for both dedicated and shared fax lines.
Before you begin
Section titled “Before you begin”- Confirm that the system email is working. Without a functioning mail server, Cloud Voice has no way to send received faxes on to a user. See Email Server Overview.
- Make sure the extension that should receive the faxes has a valid email address assigned to it.
- Optional: adjust the wording of the fax notification message. See Customize Email Templates.
Configure Fax to Email
Section titled “Configure Fax to Email”Before you choose a path below, work out how the fax number reaches your system:
- Dedicated line: a phone line or number used only for faxing. Every call on it is treated as a fax.
- Shared line: a line that carries both voice calls and faxes. Cloud Voice has to listen to each call and decide whether it is a fax.
-
Sign in to the Cloud Voice management portal and open Call Control > Inbound Route. Open the inbound route that handles your incoming faxes for editing.
-
If faxes arrive over a line reserved solely for faxing (a dedicated line), configure the Default Destination section:
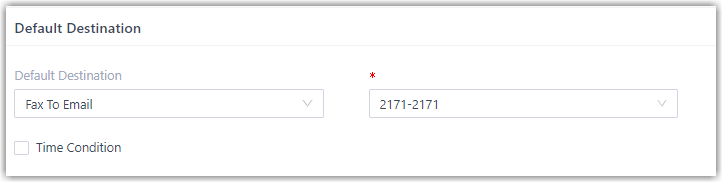
a. In the Default Destination drop-down list, choose Fax To Email.
b. Pick the extension user who should receive the faxes.
-
If faxes share a line with voice calls (a shared line), use fax detection instead:
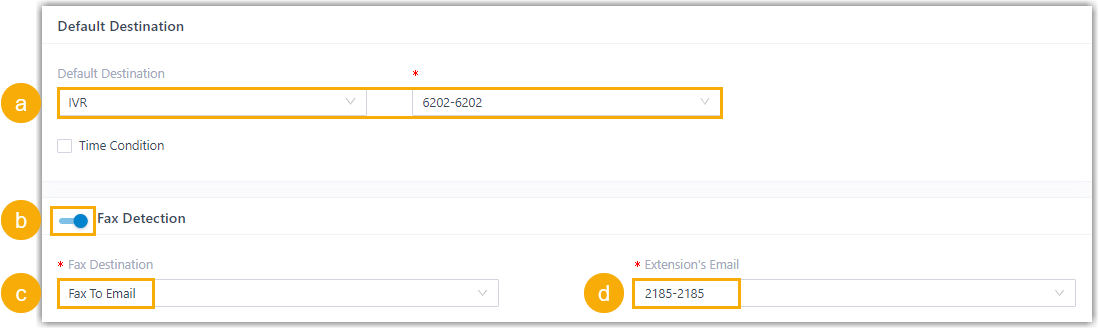
a. In the Default Destination drop-down list, choose IVR (Interactive Voice Response, the automated menu that answers the call), then select the IVR you want to use.
b. Enable the Fax Detection switch.
c. In the Fax Destination drop-down list, choose Fax To Email.
d. In the Extension’s Email drop-down list, pick the extension user who should receive the faxes.
-
Click Save, then Apply.
Result
Section titled “Result”From now on, whenever a fax comes in, Cloud Voice converts it and forwards it to the selected user’s email address as a PDF attachment.
Question about this page?
Ask the AI assistant. It starts from this page, then searches the rest of the docs.
Ask Cloud Voice AI
Answers are AI-generated from the docs and may contain mistakes. Verify with the linked pages.