
Manage Two-Factor Authentication for the Administrator Account
Two-factor authentication (2FA) adds a second verification step at login, on top of the username and password. Once it is enabled for the administrator account, you can adjust how it works over time. This page covers removing a device you no longer trust, switching to a different verification method, and turning the feature off, either for your own account or for an extension user who has been locked out.
Each task below starts from the same place. Log in to the Cloud Voice Dashboard at https://portal.voice.izt.cloud and click Login to open your phone system’s management portal with full administrator access. Then click your account name in the top-right corner, and open Change Password & Security > Security Settings.
Remove a trusted device
Section titled “Remove a trusted device”A trusted device is one you have marked so it skips the second verification step at login. If you lose one, or simply want to revoke it, take it off the list so it can no longer be used.
-
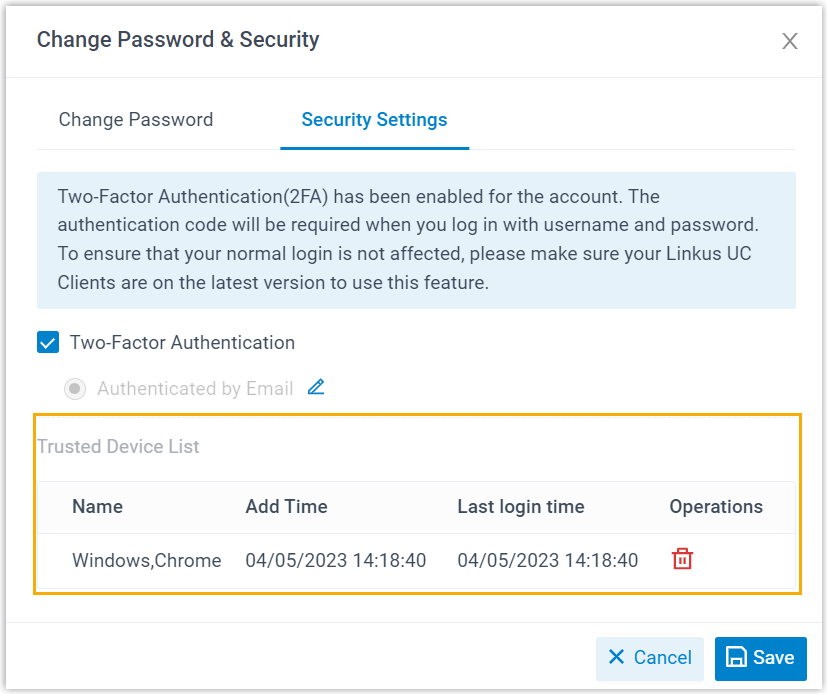
Go to Change Password & Security > Security Settings. Your trusted devices appear under Trusted Device List.
-
Click the delete icon
 next to the device you want to revoke.
 -
Confirm by clicking OK in the dialog.
Change the two-factor authentication method
Section titled “Change the two-factor authentication method”You can switch to a different verification method whenever your needs change. The available methods include an authenticator app (which generates a rotating code) and email codes.
- Go to Change Password & Security > Security Settings.
- Click the edit icon
 next to the current method.
 - Choose the method you want, then fill in the settings it requires.
Disable two-factor authentication
Section titled “Disable two-factor authentication”For your own account
Section titled “For your own account”You can turn off two-factor authentication for the administrator account at any time.
- Go to Change Password & Security > Security Settings.
- Clear the Two-Factor Authentication checkbox.
- When the Password window appears, enter your account password and click Confirm to verify the change.
- Back on the Security Settings tab, click Save.
An “Edited successfully.” message confirms that two-factor authentication is now off.
For an extension user
Section titled “For an extension user”If an extension user can no longer complete their second verification step, for example they lost their authenticator device or can no longer receive codes by email, you can disable two-factor authentication on their account so they can sign in with just a username and password.
- Log in to the Cloud Voice Dashboard at https://portal.voice.izt.cloud and click Login to open your phone system’s management portal, then go to Extension and Trunk > Extension.
- Click the edit icon next to the extension, then open the Security tab.
- Scroll to the Login Security section and clear the Two-Factor Authentication checkbox.
- When the Password window appears, enter your account password and click Confirm to verify the change.
- Click Save.
Two-factor authentication is now disabled for that extension account.
Question about this page?
Ask the AI assistant. It starts from this page, then searches the rest of the docs.
Ask Cloud Voice AI
Answers are AI-generated from the docs and may contain mistakes. Verify with the linked pages.