
Manage AI Receptionist Skills
An AI receptionist is assembled from a set of independent skills, each governing a different part of how it handles a call. Because every skill can be switched on or off on its own, you can tailor a receptionist to do exactly what a given number or workflow needs. This page describes each available skill and how to configure it.
Supported skills
Section titled “Supported skills”| Skill | What it does |
|---|---|
| Greeting | Plays a fixed or time-based message as soon as the receptionist answers. Leave it off and the receptionist waits for the caller to speak first. See Configure greetings. |
| Knowledge Base | Gives the receptionist access to FAQs, documents, and other content you’ve uploaded so it can answer caller questions accurately. You can remove content from a receptionist when it’s no longer relevant. See Assign or unassign a knowledge base. |
| Dial By Name | Lets the receptionist recognize an extension user’s name spoken by the caller and transfer the call to that extension. See Enable dial by name. |
| Intent-Based Transfer | Routes calls by what the caller wants. The receptionist interprets the conversation and forwards the call to the destination that matches. See Set up intent-based transfer. |
| Information Collection | Extracts specific details from the conversation and hands them to a human agent when the call transfers. See Configure information collection. |
| Tools | Connects the receptionist to external systems so it can fetch live data or perform actions mid-call. See Assign or unassign tools. |
Open a skill card
Section titled “Open a skill card”Every skill is reached the same way:
- In the Cloud Voice portal, go to AI > AI Receptionist.
- Click the receptionist you want to edit. Its details page opens.
- On the Skill tab, click the card for the skill you want to configure.
The sections below pick up from the open skill card.
Configure greetings
Section titled “Configure greetings”The greeting is the first thing a caller hears when the receptionist answers. You can play the same message every time, or vary it by time of day and by holiday.
On the Greeting card, set up either a fixed greeting or time-based greetings.
Fixed greeting
Section titled “Fixed greeting”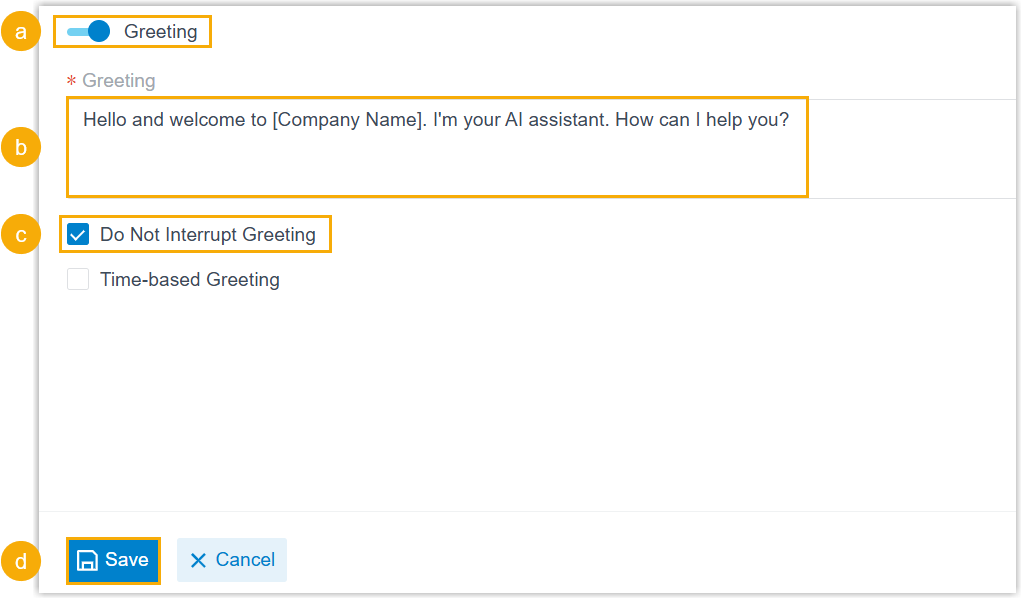
- Turn on the Greeting switch.
- In the Greeting field, enter the message in the receptionist’s primary language.
- Optional: Select Do Not Interrupt Greeting to stop callers from talking over the message.
- Click Save. The receptionist now plays this greeting whenever it answers a call.
Time-based greetings
Section titled “Time-based greetings”-
Turn on the Greeting switch.
-
Optional: Select Do Not Interrupt Greeting to stop callers from talking over the message.
-
Select Time-based Greeting.
-
In the Time Zone drop-down list, choose a time zone. The receptionist plays greetings according to the business hours and holidays configured for that time zone.
-
To vary the greeting by business hours, select Based on business hours and fill in the following fields in the receptionist’s primary language.

Setting Description Greeting for Business Hours Played when the receptionist answers during business hours and break hours. Greeting for Outside Business Hours Played when the receptionist answers outside business hours, break hours, and holidays. -
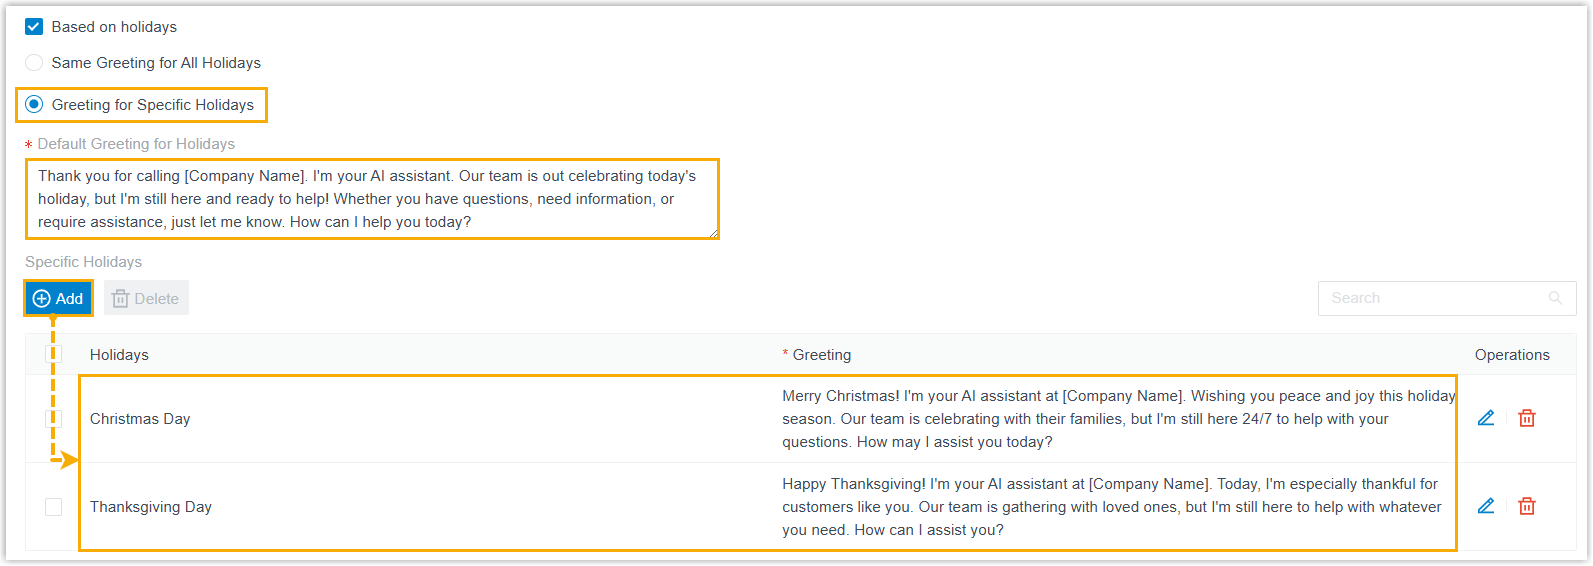
To vary the greeting by holiday, select Based on holidays, then choose one of the following options.
Option What to do Same Greeting for All Holidays Enter a message in the Greeting for Holidays field, in the receptionist’s primary language. The receptionist plays this message on every holiday. Greeting for Specific Holidays Enter a general message in the Default Greeting for Holidays field, then add per-holiday messages in the Specific Holidays section, all in the receptionist’s primary language. The receptionist plays the specific message on a matched holiday and the default message on any other holiday. 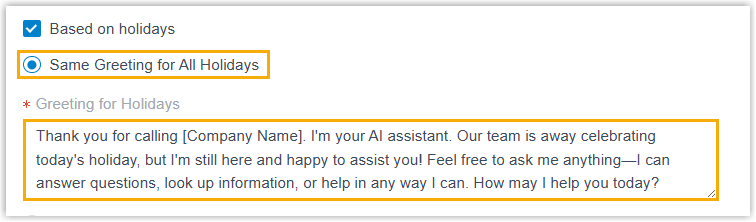
-
Click Save.
Assign or unassign a knowledge base
Section titled “Assign or unassign a knowledge base”A knowledge base lets the receptionist look up your content in real time and answer caller questions from it.
Prerequisite: Before you can assign a knowledge base, you must have added content to it.
On the Knowledge Base card, assign or unassign content.
Assign a knowledge base
Section titled “Assign a knowledge base”-
Turn on the Knowledge Base switch.
-
Click Add. A window lists every content entry in the knowledge base.
-
Search for and select the entries you want, then click Save.
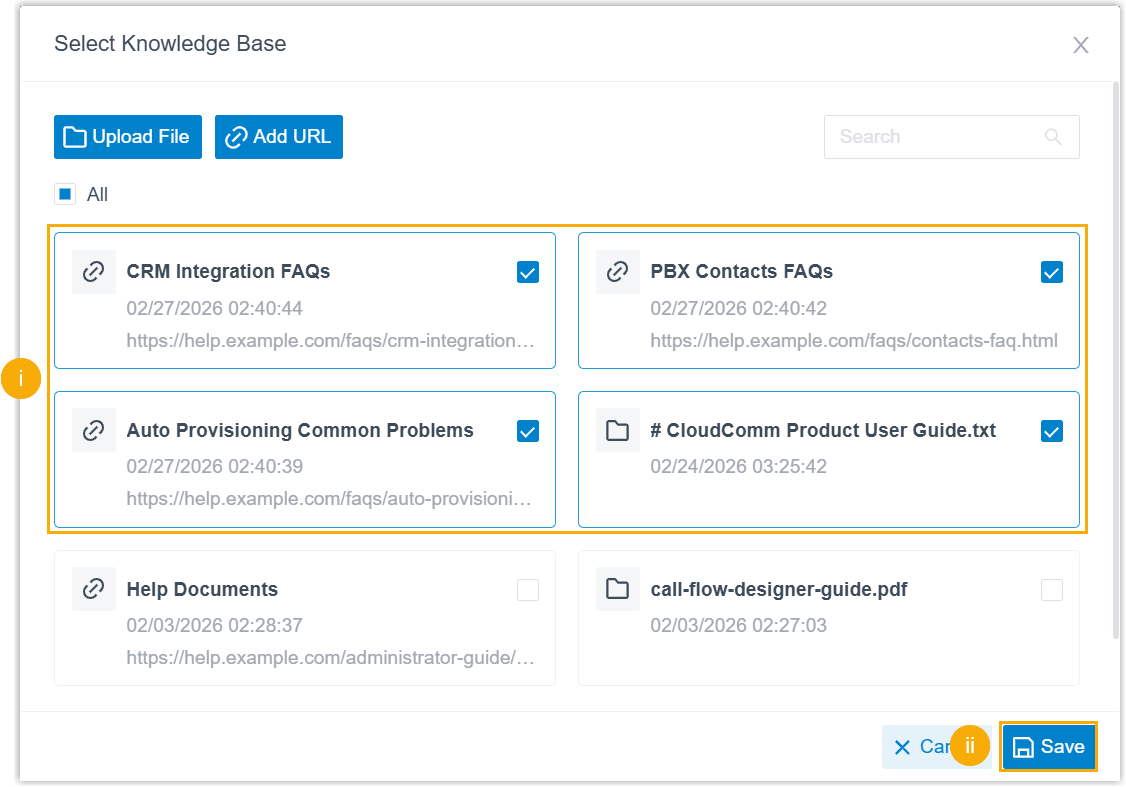
-
At the bottom of the page, click Save. The selected content is now assigned, and the receptionist draws on it when answering callers.
Unassign a knowledge base
Section titled “Unassign a knowledge base”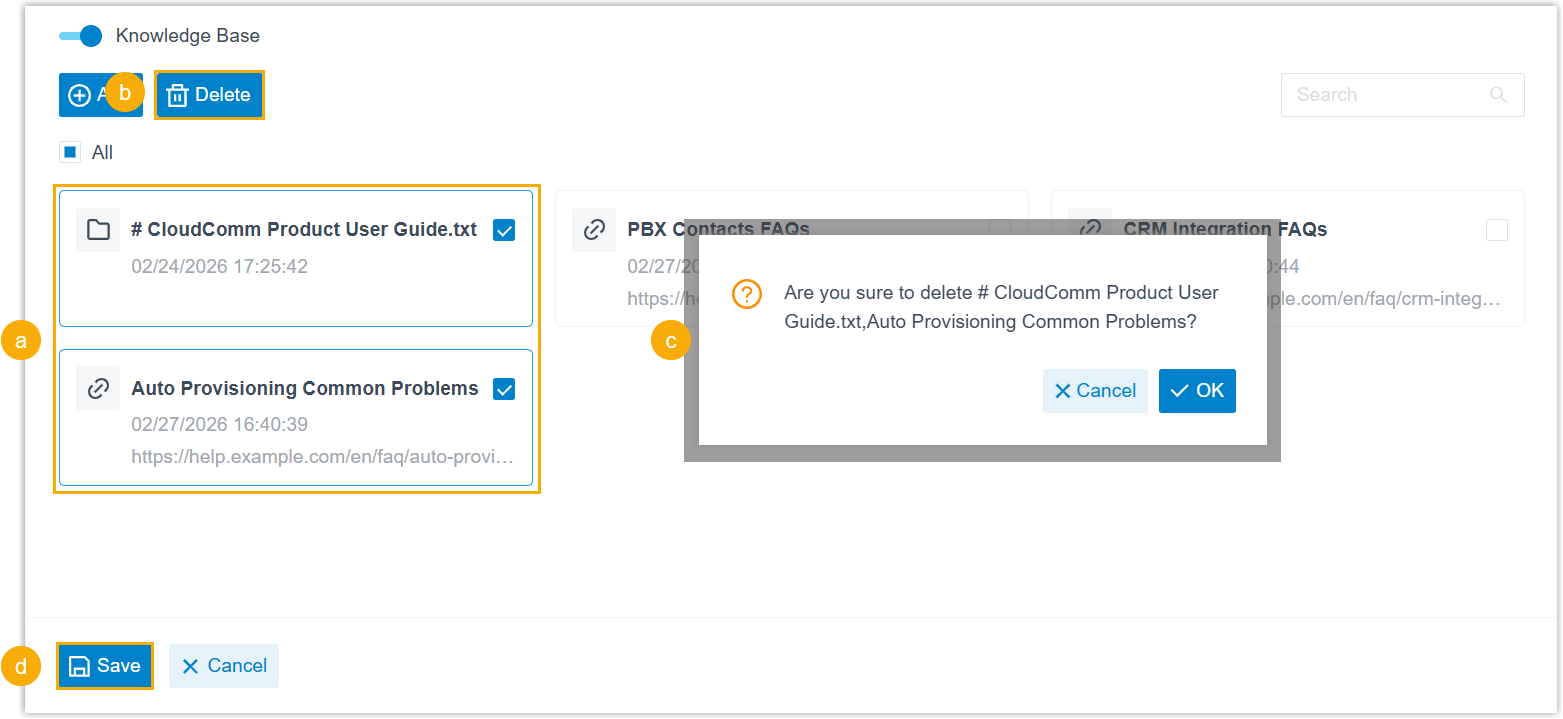
- In the receptionist’s knowledge base list, select the checkbox for each entry you no longer need.
- At the top of the list, click Delete.
- In the confirmation window, click OK.
- At the bottom of the page, click Save.
Enable dial by name
Section titled “Enable dial by name”With this skill on, a caller can say an extension user’s name and the receptionist transfers them to that extension.
On the Dial By Name card:
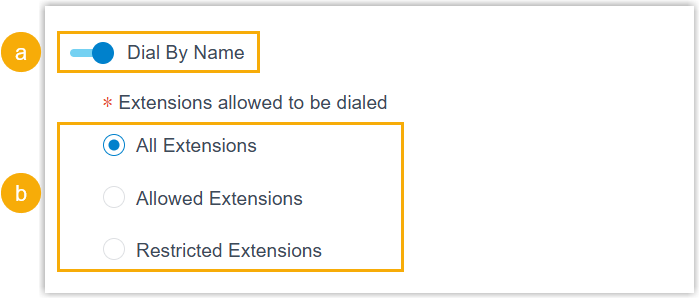
-
Turn on the Dial By Name switch.
-
In the Extensions allowed to be dialed section, define which extensions callers can reach.
Setting Description All Extensions Every extension can be dialed. Allowed Extensions Only the extensions you choose can be dialed. Move them from the Available box to the Selected box. Restricted Extensions The extensions you choose cannot be dialed; all others can. Move the blocked extensions from the Available box to the Selected box. -
Click Save.
The receptionist now recognizes a spoken extension name and connects the caller to the matching extension.
Set up intent-based transfer
Section titled “Set up intent-based transfer”Intent-based transfer routes calls by meaning rather than by menu key. The receptionist interprets what the caller says and forwards the call when a condition you’ve written is met.
A transfer rule can point to any of these destinations:
- Extension
- Inbound Queue
- Ring Group
- Conference
- Call Flow
- IVR (Interactive Voice Response, an automated phone menu)
- Group Voicemail
Prerequisite: Have the transfer destinations (extension, inbound queue, ring group, and so on) ready.
On the Intent-Based Transfer card:
-
Turn on the Intent-Based Transfer switch.
-
Click Add to create a transfer rule.
-
In the pop-up window, set up the rule:
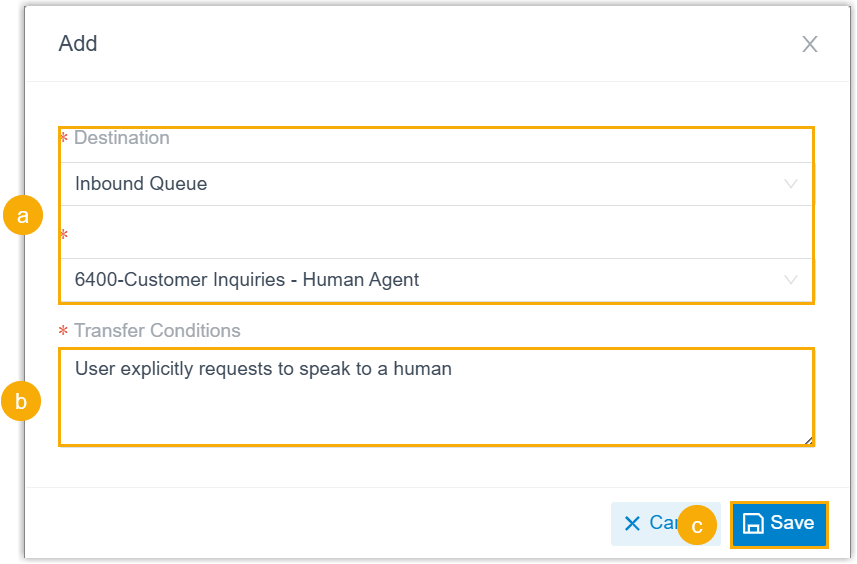
a. In the Destination drop-down list, pick a destination type, then choose the specific destination.
b. In the Transfer Conditions field, describe in plain language when the transfer should happen, for example,
User explicitly requests to speak to a humanorUser asks a question that the AI cannot answer.c. Click Save.
-
At the bottom of the page, click Save.
The receptionist now analyzes each caller’s speech and transfers the call whenever a rule’s condition is met.
Configure information collection
Section titled “Configure information collection”This skill has the receptionist pull specific details out of the conversation and pass them to a human agent when the call transfers, so the agent starts the conversation already informed.
On the Information Collection card:
-
Turn on the Information Collection switch.
-
Click Add to create a data collection rule.
-
In the pop-up window, define the rule:
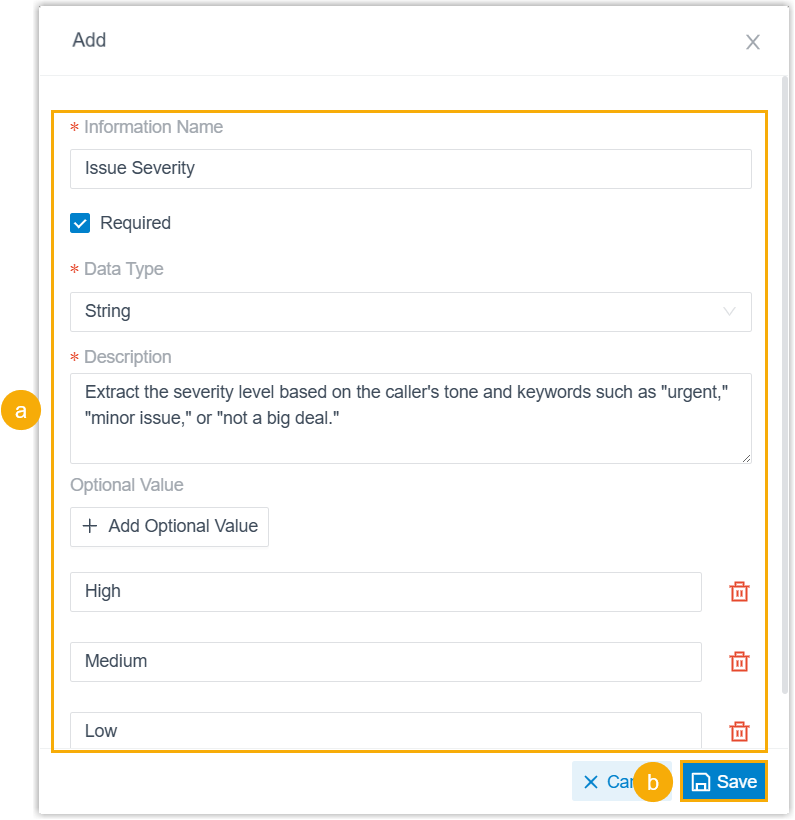
Setting Description Information Name The label for the detail you’re capturing, for example, Name, Email, or Phone Number. Required Whether the detail is mandatory. When on, the receptionist keeps prompting the caller until it captures the value. Data Type The format of the value, so it’s stored correctly:
String: text such as names, emails, and addresses; letters, numbers, and special characters allowed.
Boolean: yes/no values, such as subscription consent or terms acceptance.
Integer: whole numbers without decimals, such as quantity, age, or a rating.
Number: numeric values that may include decimals, such as an order total, discount rate, or weight.Description A plain-language instruction telling the receptionist how to capture the value. Examples: Ask the caller for their email address;Identify the order number when the caller says "My order number is XXX";Extract the severity level based on the caller's tone and keywords such as "urgent," "minor issue," or "not a big deal."Optional Value Optional. Click Add Optional Value to define preset values the receptionist can pick from when the detail matches one of them, for example, High,Medium, andLowfor an issue-severity field. Available only for the String data type.Then click Save.
-
At the bottom of the page, click Save.
The receptionist now captures the details you defined automatically as it speaks with callers.
What the agent sees
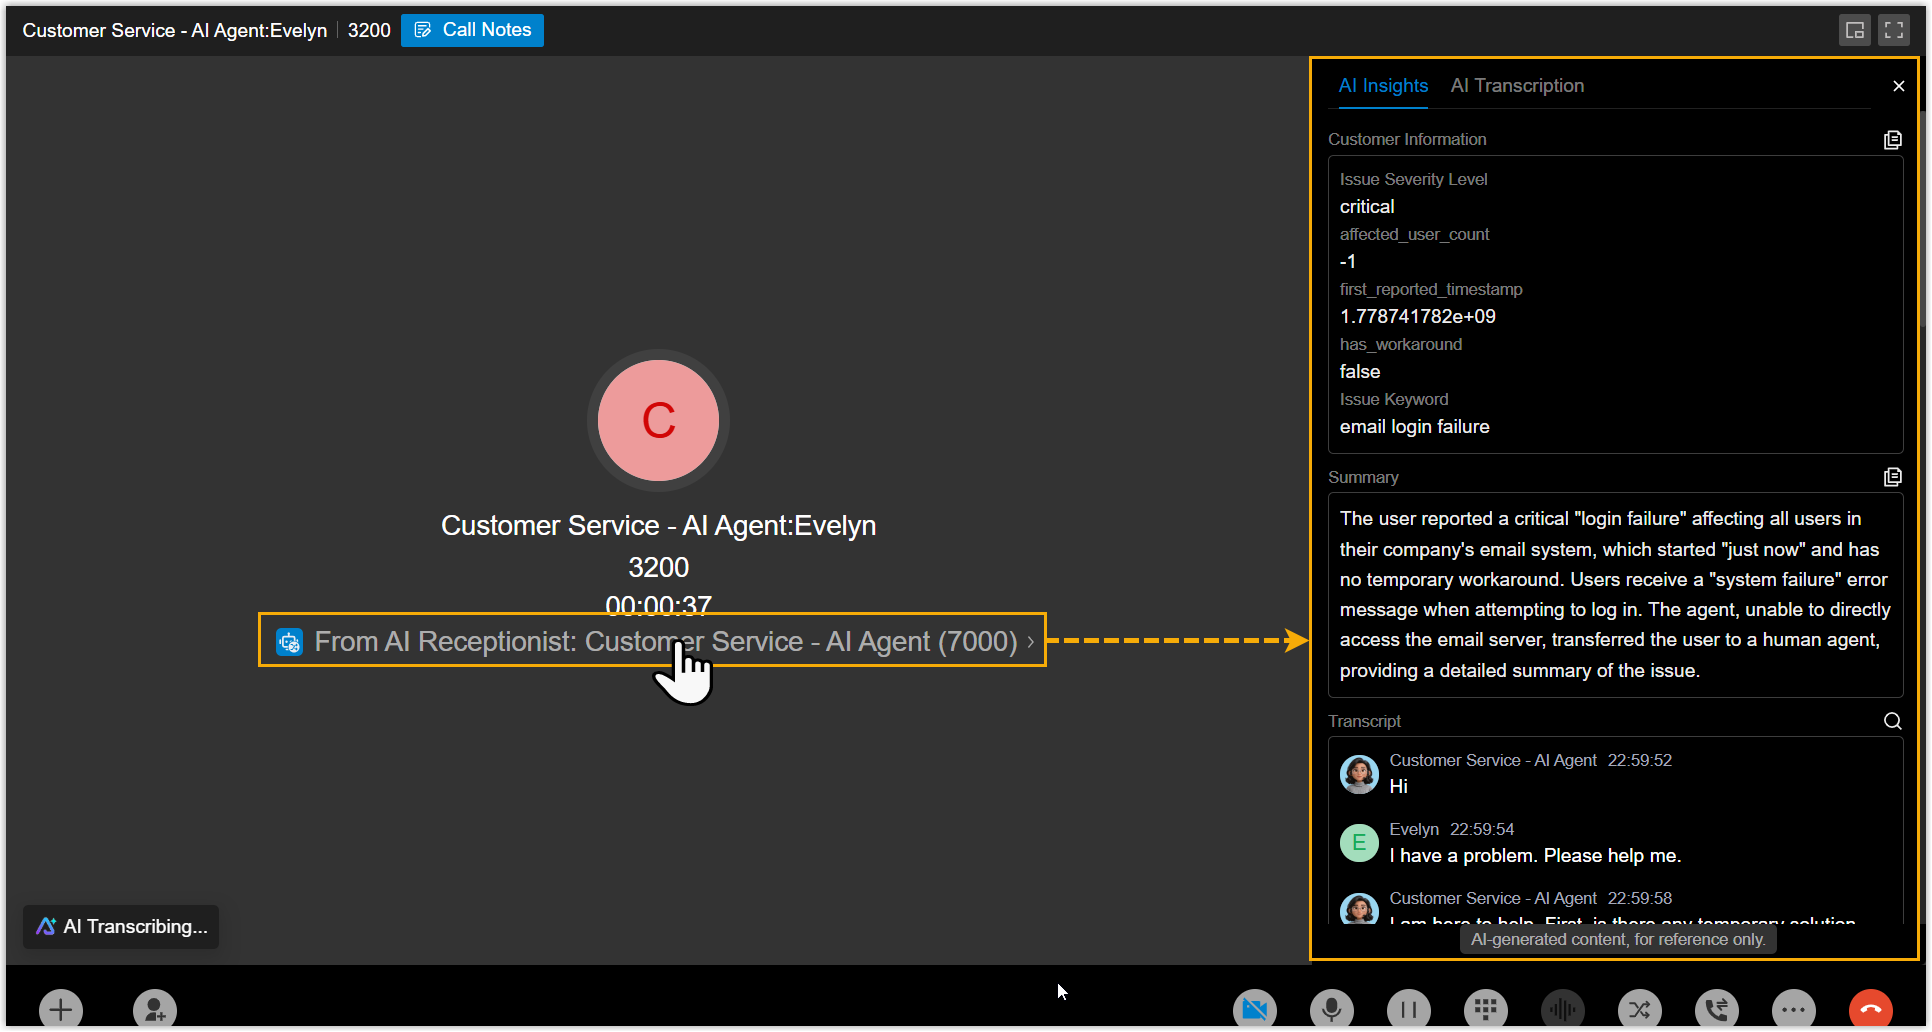
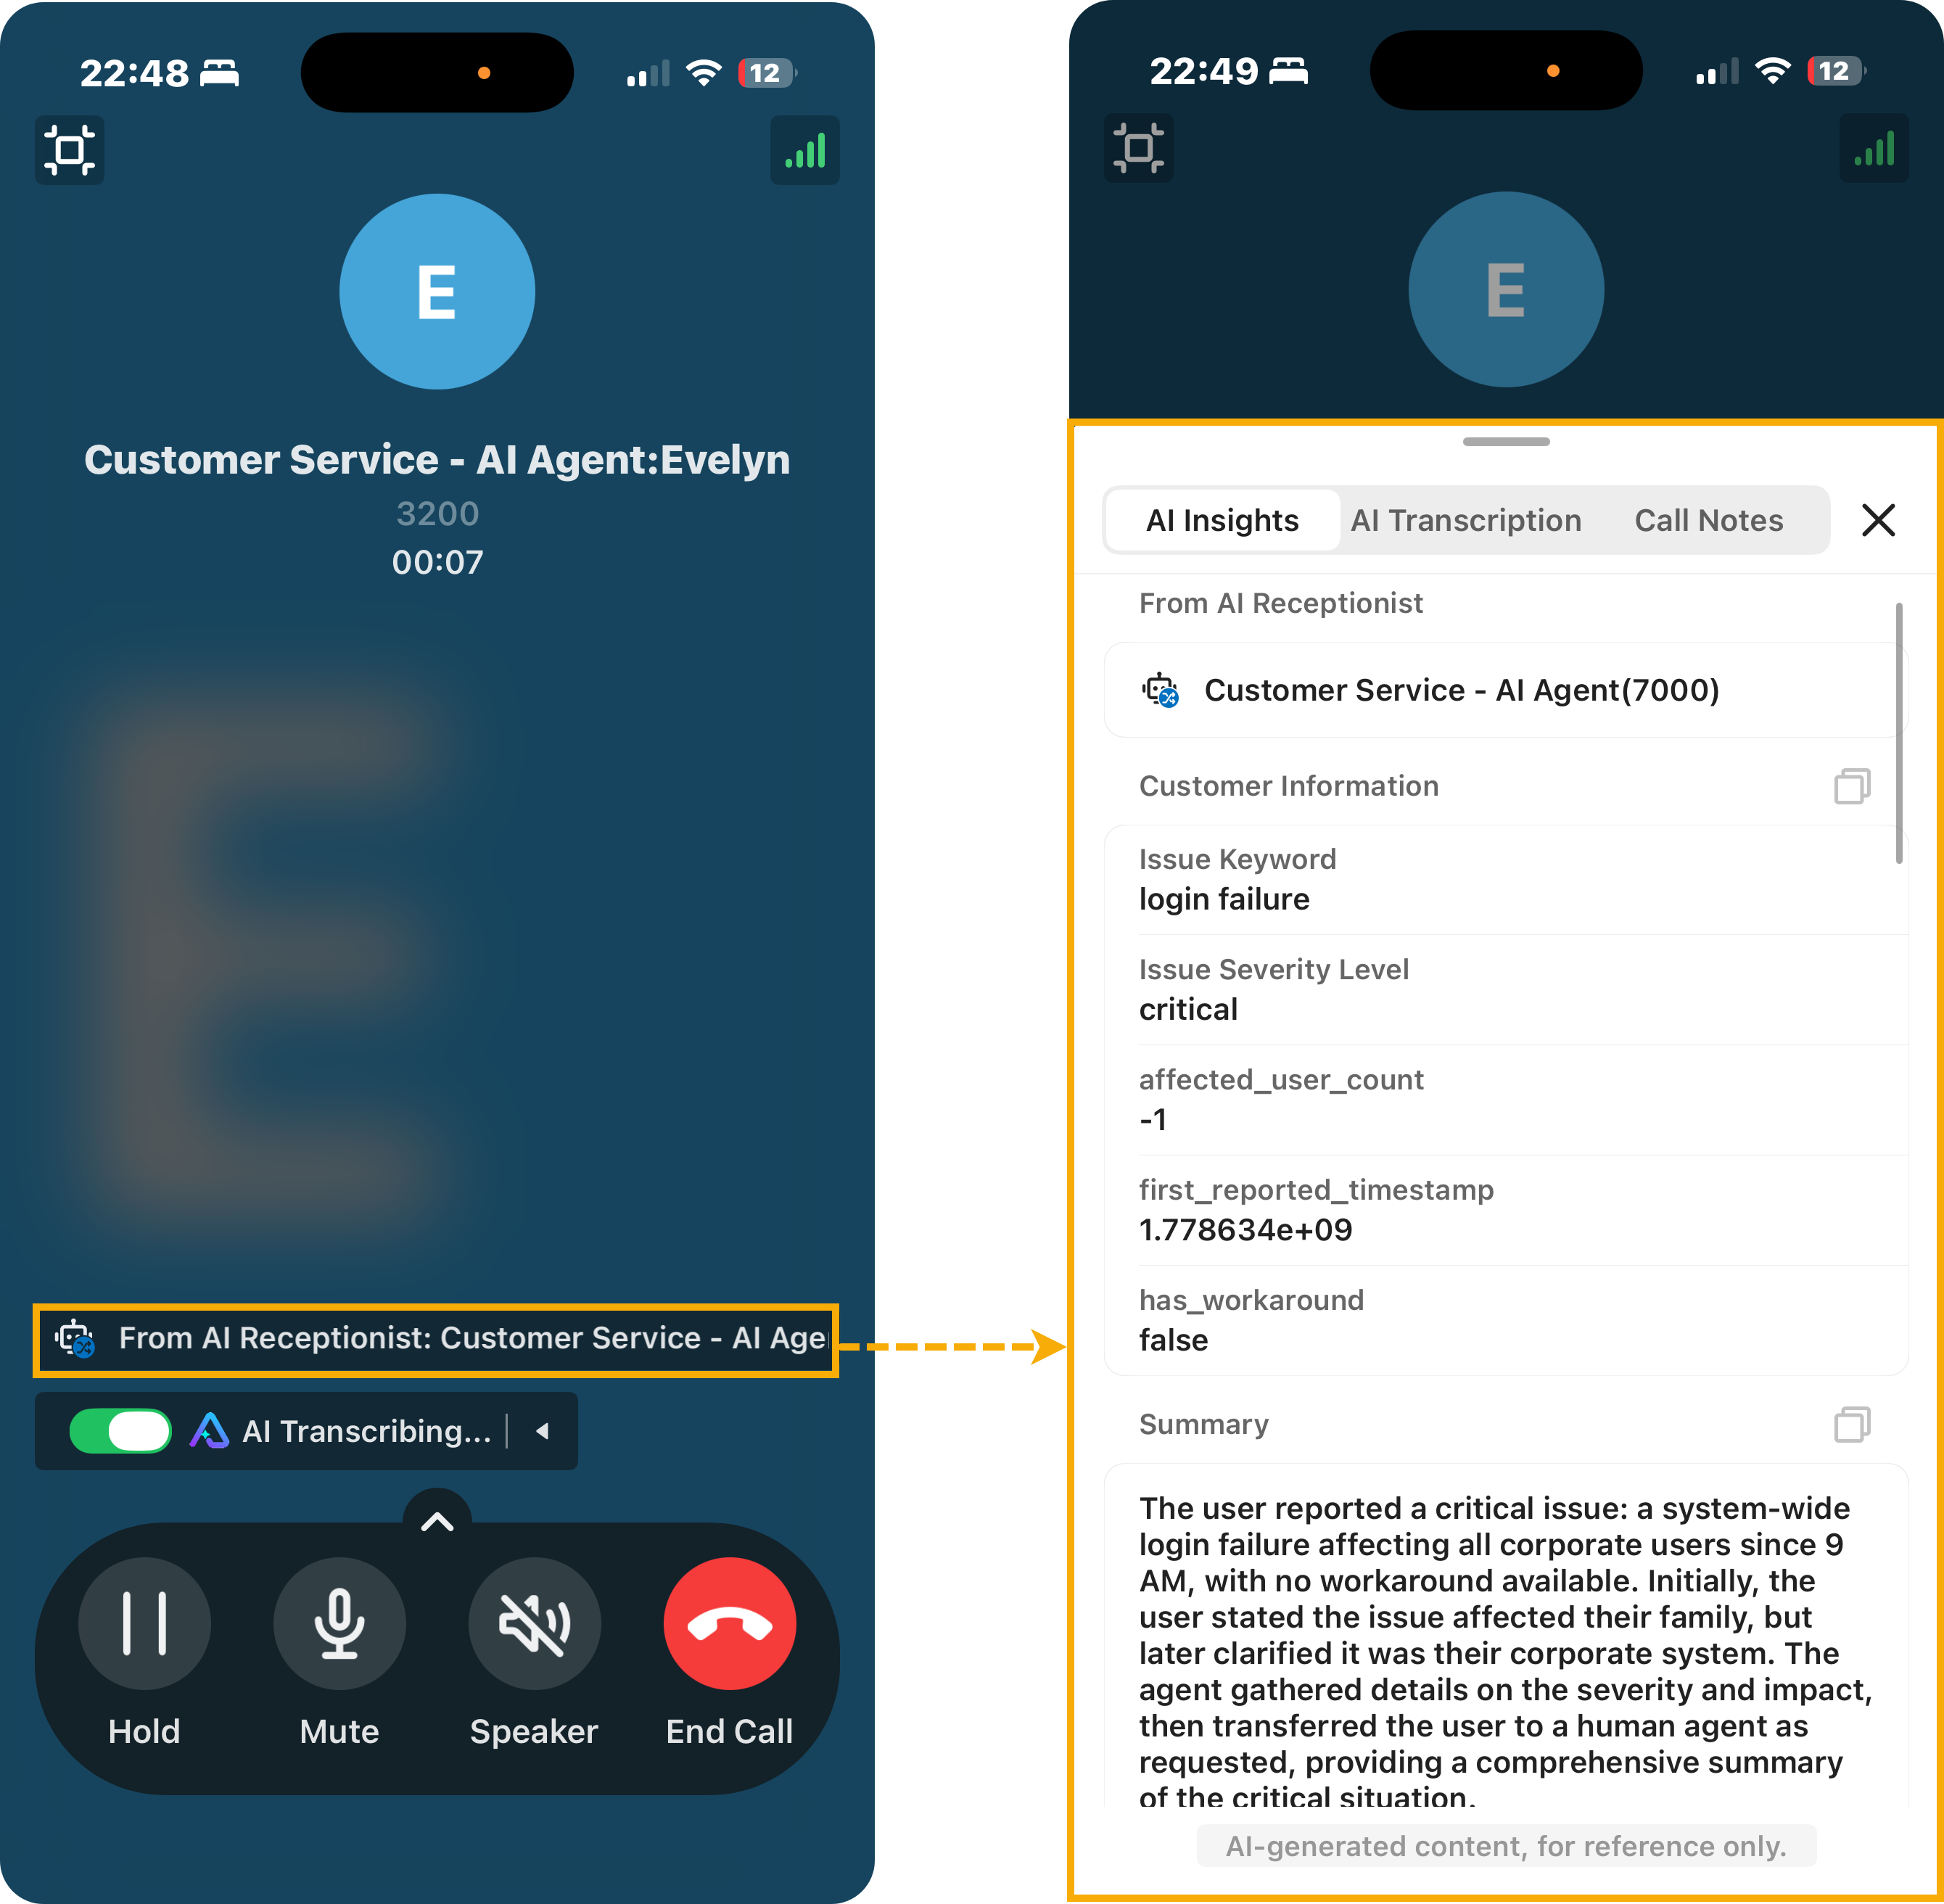
Section titled “What the agent sees”When the call transfers to a human agent, the agent who answers sees the collected details alongside the receptionist’s call transcript and summary in the Cloud Voice App, so they can help the caller more quickly.
| Cloud Voice App (Web/Desktop) | Cloud Voice App (Mobile) |
|---|---|
 |  |
Assign or unassign tools
Section titled “Assign or unassign tools”Tools let the receptionist reach external systems mid-call to look up live information or carry out an action on the caller’s behalf.
Prerequisite: Before you can assign tools, you must have added them to Cloud Voice.
On the Tools card, assign or unassign tools.
Assign tools
Section titled “Assign tools”-
Turn on the Tools switch.
-
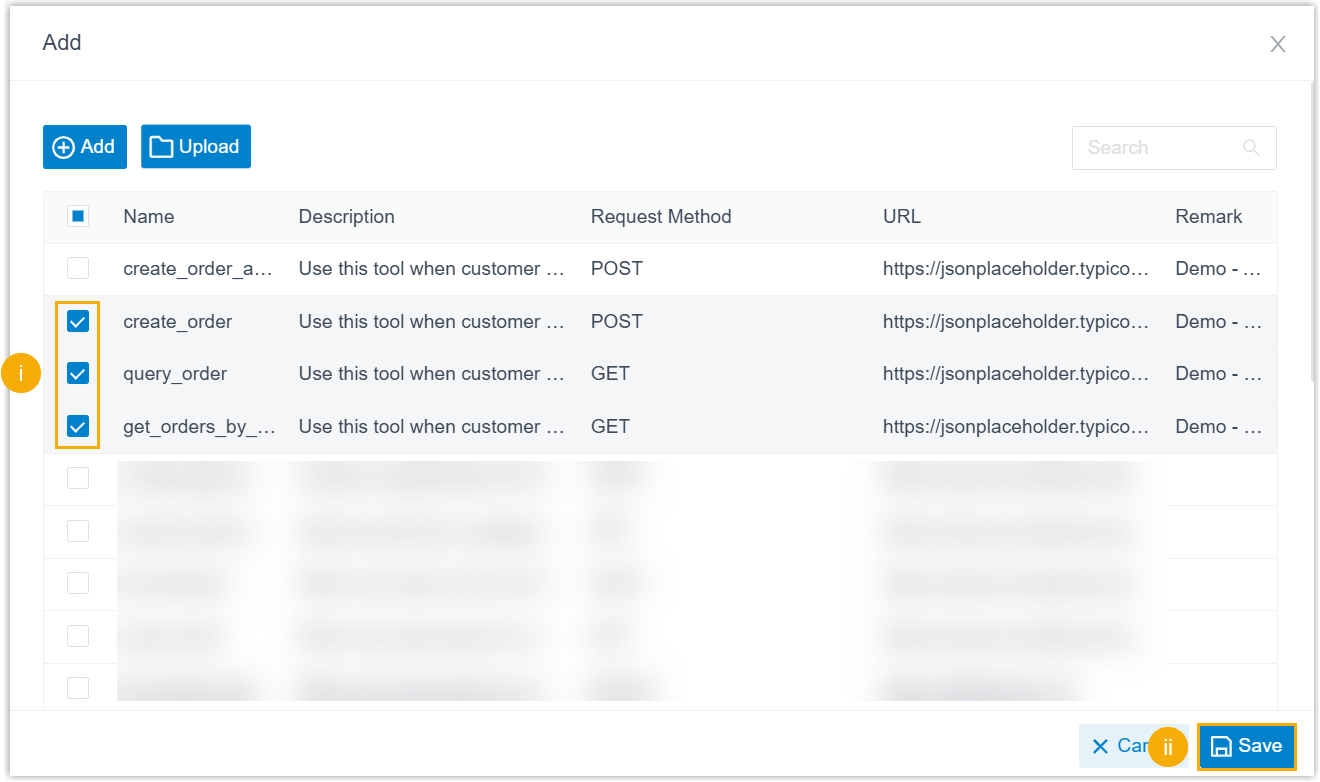
Click Add. A window lists every available tool.
-
Search for and select the tools you want, then click Save.
-
At the bottom of the page, click Save. The receptionist can now trigger the assigned tools on its own, based on what a caller asks for.
Unassign tools
Section titled “Unassign tools”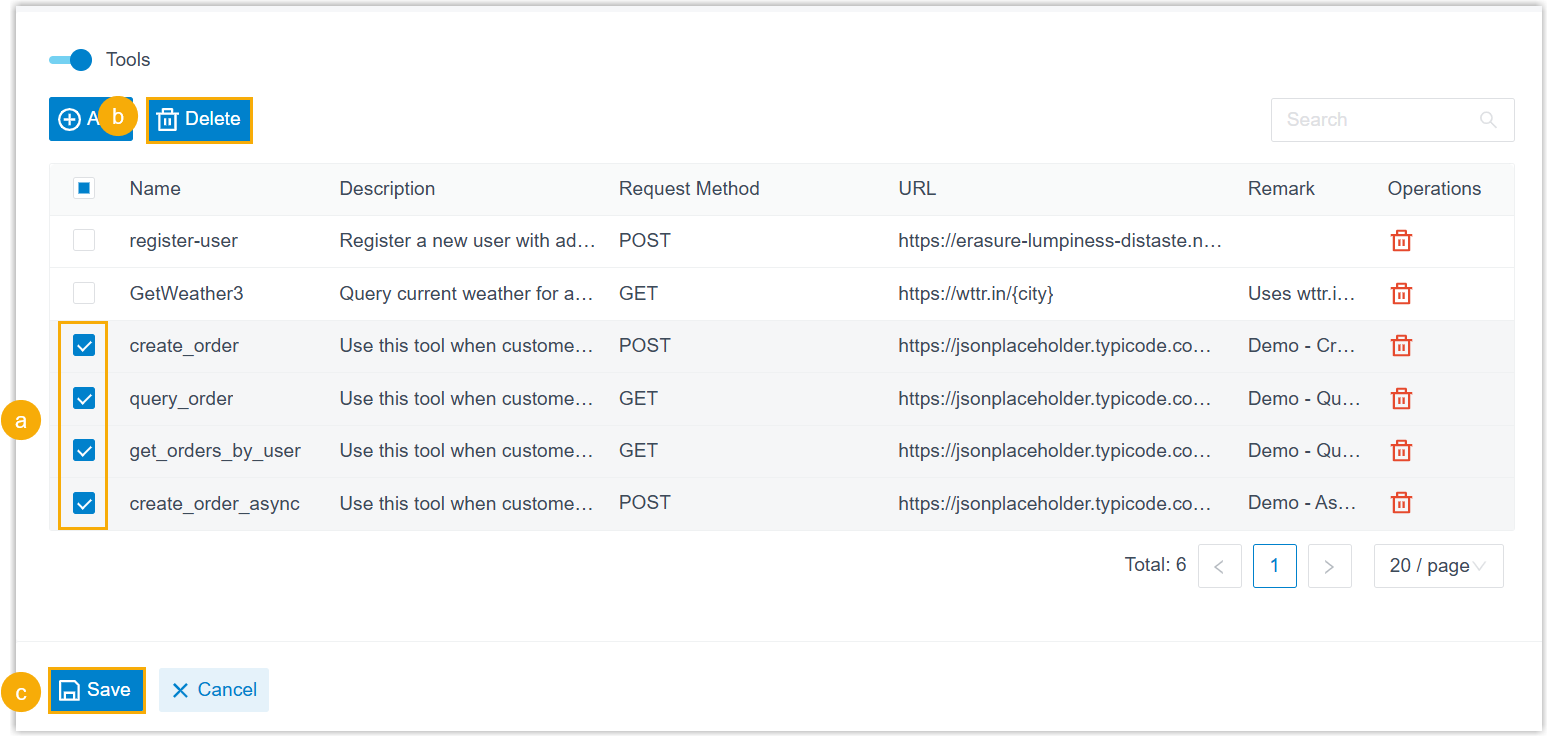
- In the receptionist’s tool list, select the checkbox for each tool you no longer need.
- At the top of the list, click Delete.
- At the bottom of the page, click Save.
Question about this page?
Ask the AI assistant. It starts from this page, then searches the rest of the docs.
Ask Cloud Voice AI
Answers are AI-generated from the docs and may contain mistakes. Verify with the linked pages.