
Provision Akuvox Intercom Device with Cloud Voice
Cloud Voice can provision Akuvox IP intercom hardware the same way it provisions desk phones. Assign an extension to a door phone and another to an indoor monitor, and Cloud Voice (the PBX, short for Private Branch Exchange) routes an entry call from the door phone straight to the monitor. Whoever answers can talk to the visitor and trigger the door release without leaving their desk.
The workflow below adds the intercom to Cloud Voice, then points it at the PBX using DHCP option 66 so it pulls its configuration automatically on boot.
Supported models and firmware
Section titled “Supported models and firmware”Confirm that your intercom hardware and the PBX are running compatible firmware before you begin.
| Device | Type | Minimum device firmware | Minimum PBX firmware |
|---|---|---|---|
| E16C V2.0 | Door phone | 216.30.10.85 | 84.21.0.66 |
| R20A | Door phone | 320.30.11.112 | 84.21.0.66 |
| S562W | Indoor monitor | 562.30.14.48 | 84.21.0.66 |
| S563W | Indoor monitor | 563.30.13.202 | 84.21.0.66 |
Before you start
Section titled “Before you start”- Factory-reset the Akuvox device if it has been used previously.
- Make sure the subnet where the intercom will live has exactly one DHCP (Dynamic Host Configuration Protocol) server running. A second DHCP server prevents the device from obtaining an IP address.
- Note the device’s vendor, model, and MAC (Media Access Control) address.
- Download the default provisioning template for your device model in Cloud Voice, under Auto Provisioning > Resource Repository > Default Templates.
- Create the SIP (Session Initiation Protocol) extension you plan to assign to the intercom.
Step 1. Add the intercom to Cloud Voice
Section titled “Step 1. Add the intercom to Cloud Voice”Registering the device in the PBX generates a configuration file keyed to its MAC address.
-
In the Cloud Voice portal, go to Auto Provisioning > Phones.
-
Click Add > Add.
-
Under IP Phone, fill in the device details.
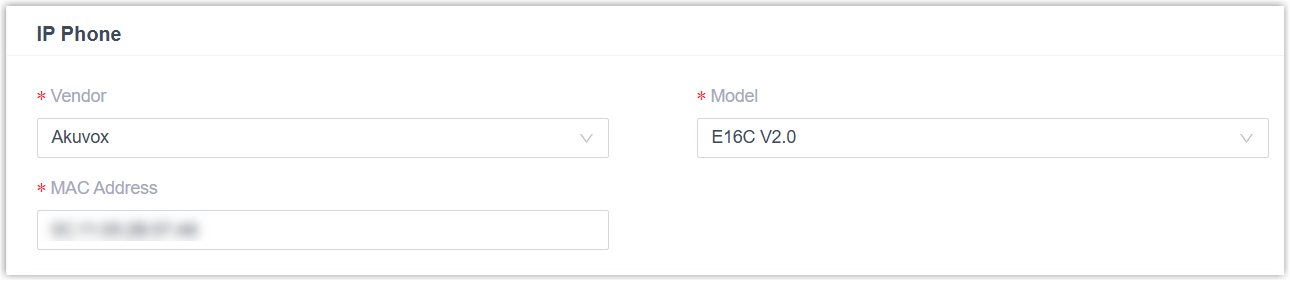
- Vendor: Select Akuvox.
- Model: Select your device model, E16C V2.0 in this example.
- MAC Address: Enter the intercom’s MAC address.
-
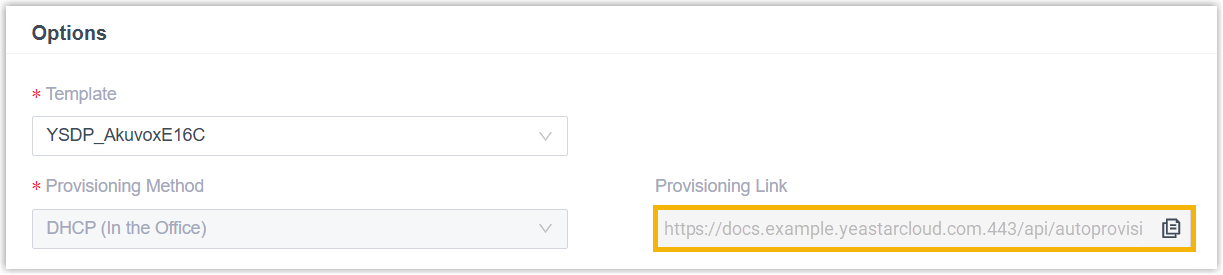
Under Options, pick a template from the Template drop-down list.

Cloud Voice fills in the Provisioning Link field automatically. This link points to where the device’s configuration file is stored, and you will need it in Step 2.
-
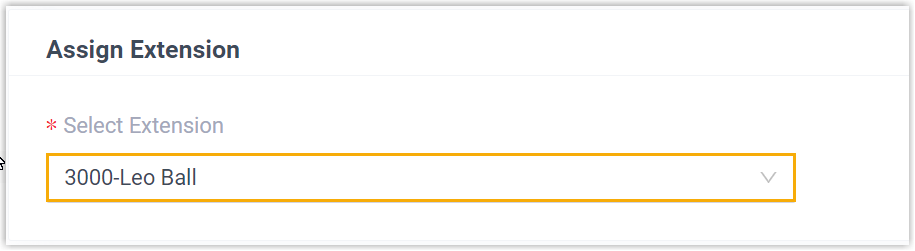
Under Assign Extension, assign an extension to the intercom.
-
Click Save.
Step 2. Set DHCP option 66 on the DHCP server
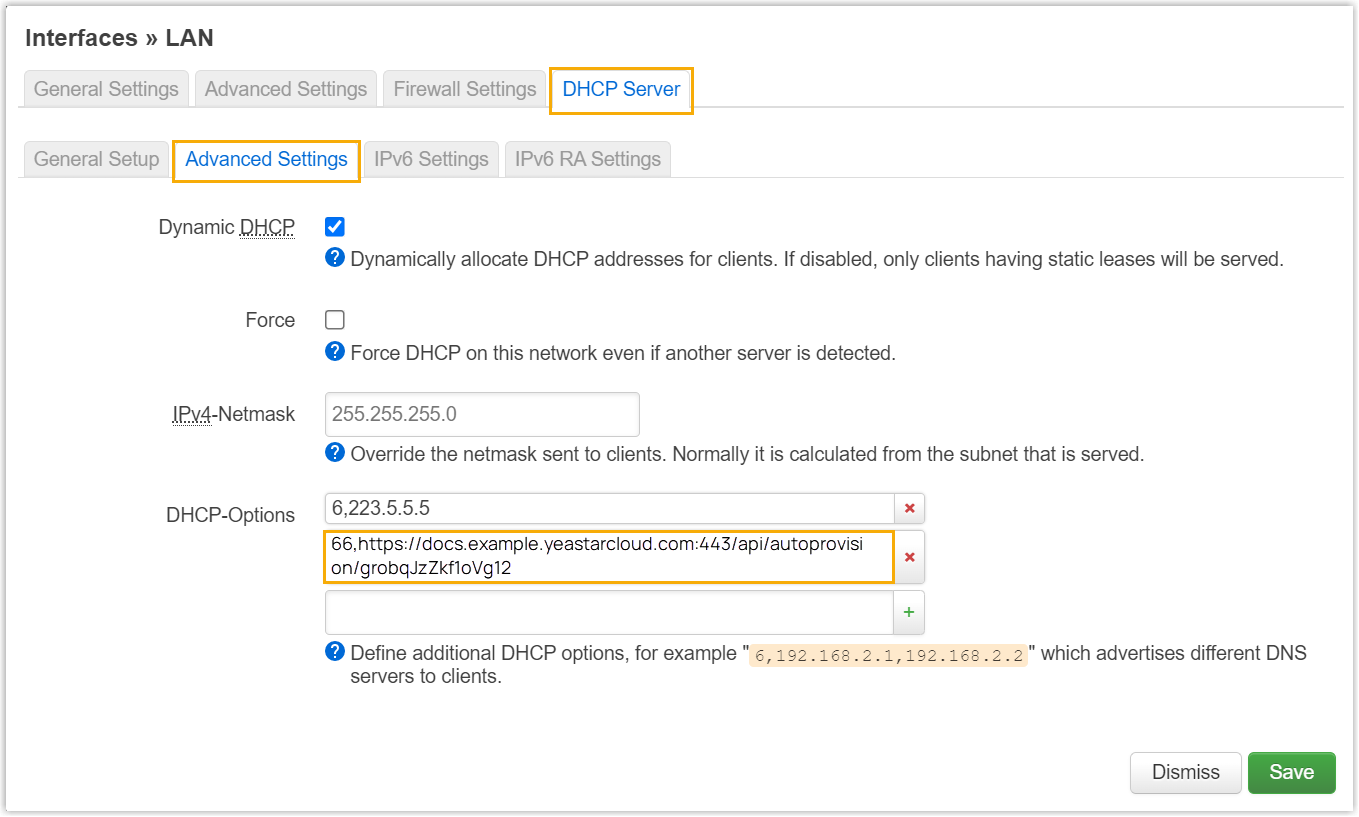
Section titled “Step 2. Set DHCP option 66 on the DHCP server”Hand the provisioning link to the DHCP server that serves the intercom’s subnet, using option 66.
-
In the Cloud Voice portal, open the device’s detail page and copy its provisioning link.
-
On the DHCP server, set option 66 to the provisioning link. The example below shows the setting on a router’s built-in DHCP server.
-
Reboot the intercom.
Result
Section titled “Result”- On boot, the intercom pulls an IP address from the DHCP server, reads the provisioning link from option 66, downloads its configuration from Cloud Voice, and applies it.
- The extension registers on the device. Confirm the registration status under Auto Provisioning > Phones in the Cloud Voice portal.

Question about this page?
Ask the AI assistant. It starts from this page, then searches the rest of the docs.
Ask Cloud Voice AI
Answers are AI-generated from the docs and may contain mistakes. Verify with the linked pages.