
Synchronize Microsoft Outlook Contacts to Cloud Voice
The Microsoft Entra ID (Azure Active Directory) integration can copy Outlook contacts into Cloud Voice as a one-way synchronization. Two kinds of contacts are supported: each user’s personal Outlook contacts and the contacts stored in Outlook shared mailboxes. Once the sync runs, users who were provisioned from Microsoft Entra ID can look up and call those contacts straight from the Cloud Voice App.
Prerequisites
Section titled “Prerequisites”- Cloud Voice is already connected to Microsoft Entra ID. Which procedure you follow depends on your firmware version:
- Version 84.22.0.138 or later: integrate Cloud Voice with Microsoft Entra ID.
- Versions earlier than 84.22.0.138: integrate Cloud Voice with Microsoft Entra ID using the legacy method.
- You have already synced users from Microsoft Entra ID to Cloud Voice.
Synchronize personal Outlook contacts to the Cloud Voice App
Section titled “Synchronize personal Outlook contacts to the Cloud Voice App”To pull in personal contacts, you choose which users are included on Cloud Voice, and each of those users shares their personal contacts folder with the authorization account, the account that authorized the Microsoft Entra ID integration, so Cloud Voice is allowed to read the contacts.
Step 1. Choose which users’ personal contacts to sync
Section titled “Step 1. Choose which users’ personal contacts to sync”-
Sign in to the Cloud Voice management portal and go to Integrations > Collaboration.
-
Find the Microsoft Outlook Contacts Synchronization section and turn the switch on.

-
Select the Contacts Synchronization checkbox.
-
Open the User Range for Contacts Synchronization drop-down list and pick a range.
Option What it does All Users Syncs every user’s personal contacts into their own Cloud Voice App Contacts directory. Users in Specific Group Syncs the personal contacts of users in the group(s) you name. Pick the groups from the Group drop-down list. Specific Users Syncs the personal contacts of the individual users you select. Click Select All Synced Users to quickly add every Microsoft Entra ID user already synced to Cloud Voice. 

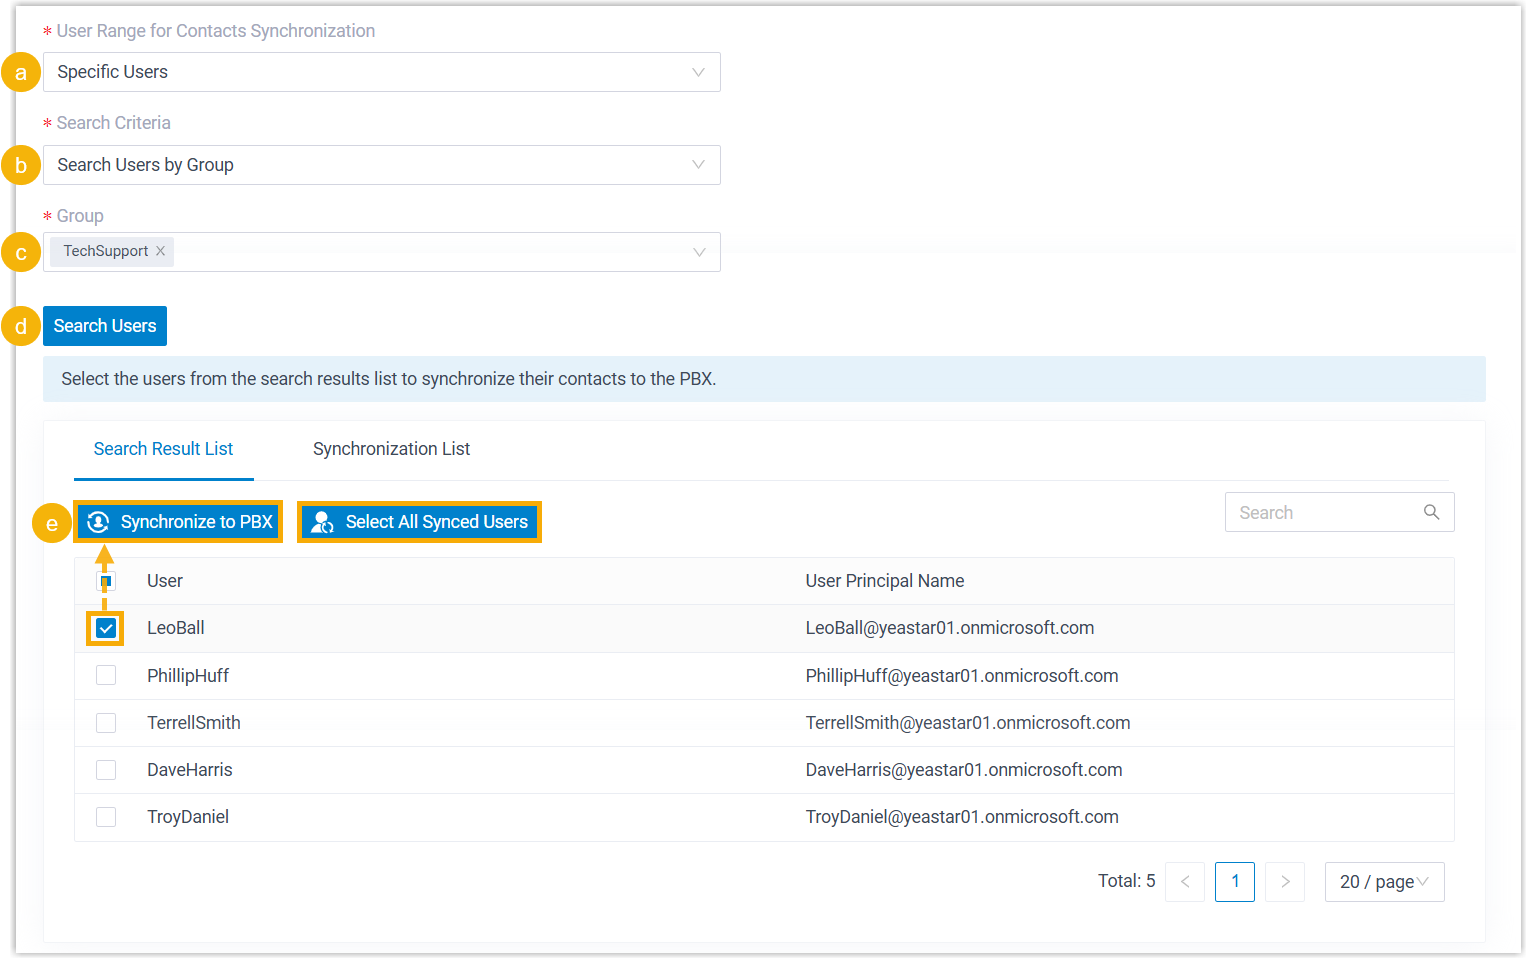
-
Click Save.
Step 2. Share the personal contacts folder in the Outlook desktop client
Section titled “Step 2. Share the personal contacts folder in the Outlook desktop client”The steps below show how one Microsoft Entra ID user shares their personal Outlook contacts folder from the Outlook desktop client. Every user you included in the range in Step 1 must complete this on their own account. Any selected user who skips it will not have their personal contacts synced.
-
Sign in to the Outlook desktop client and open the
 People view.
 -
Under My Contacts, right-click the personal contacts folder and choose Properties….
-
In the dialog that opens, find and add the authorization account (the account that authorized the Microsoft Entra ID integration).
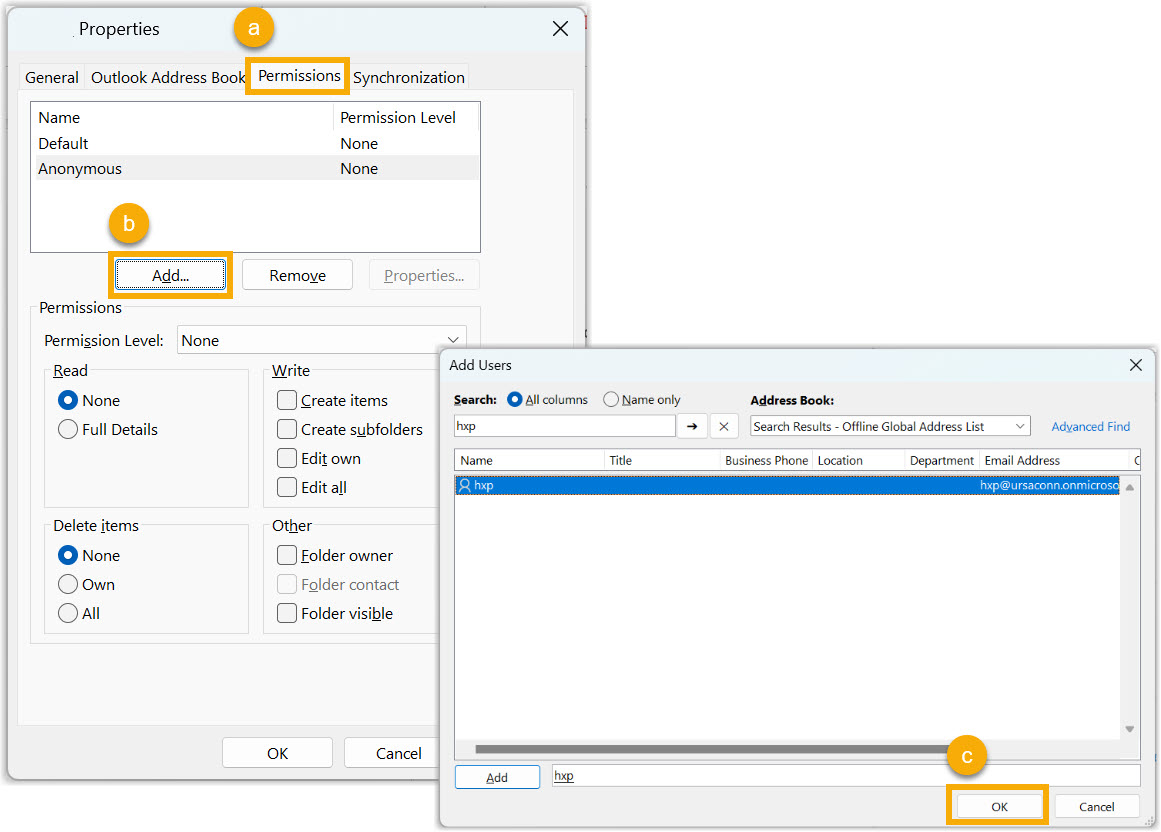
- Open the Permissions tab.
- Click Add and search for the authorization account.
- Double-click the authorization account, then click OK.
-
Give the authorization account read access to the contacts in the folder.
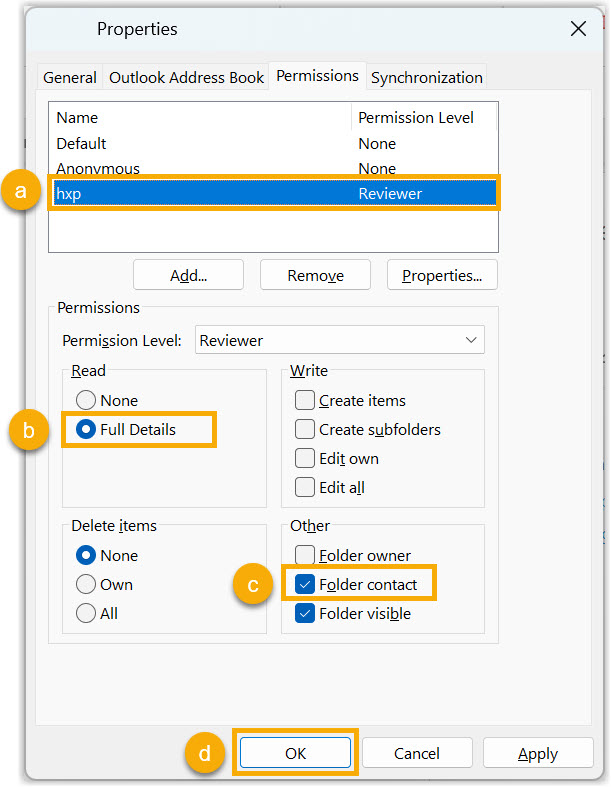
- In the list of users at the top, select the authorization account.
- Under Read, choose Full Details.
- Under Other, select Folder contact.
- Click OK.
Result
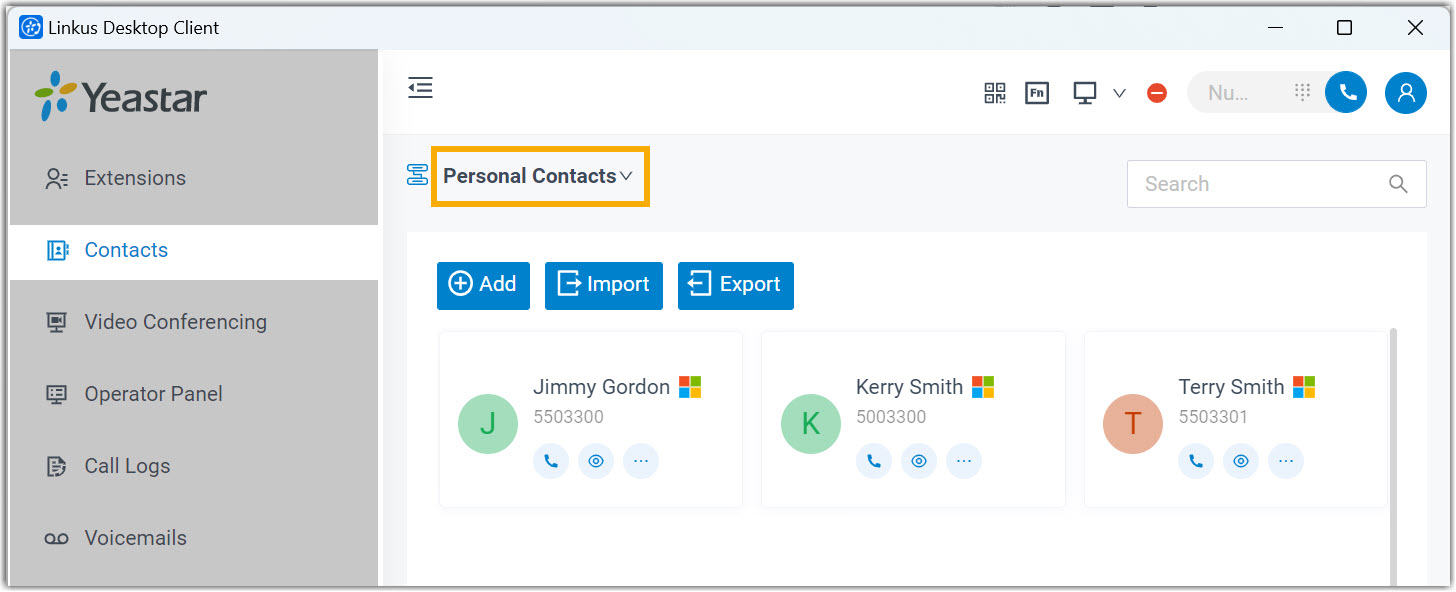
Section titled “Result”Each selected user’s personal Outlook contacts now appear in their Cloud Voice App Contacts directory, tagged with a  label to show where they came from. These synced contacts are read-only, they can’t be edited or deleted from the Cloud Voice App.
Synchronize Outlook shared mailbox contacts to Cloud Voice phonebooks
Section titled “Synchronize Outlook shared mailbox contacts to Cloud Voice phonebooks”To bring in contacts from shared mailboxes, configure shared-contacts syncing in Cloud Voice, then add the authorization account as a member of each shared mailbox in the Microsoft 365 admin center. That membership is what lets Cloud Voice read the contacts inside those mailboxes.
Step 1. Set up shared-mailbox contact syncing in Cloud Voice
Section titled “Step 1. Set up shared-mailbox contact syncing in Cloud Voice”-
Sign in to the Cloud Voice management portal and go to Integrations > Collaboration.
-
Find the Microsoft Outlook Contacts Synchronization section and turn the switch on.
-
Select the Shared Mailbox Contacts Synchronization checkbox.
-
Open the Shared Mailbox Contacts Synchronization drop-down list and pick a range.
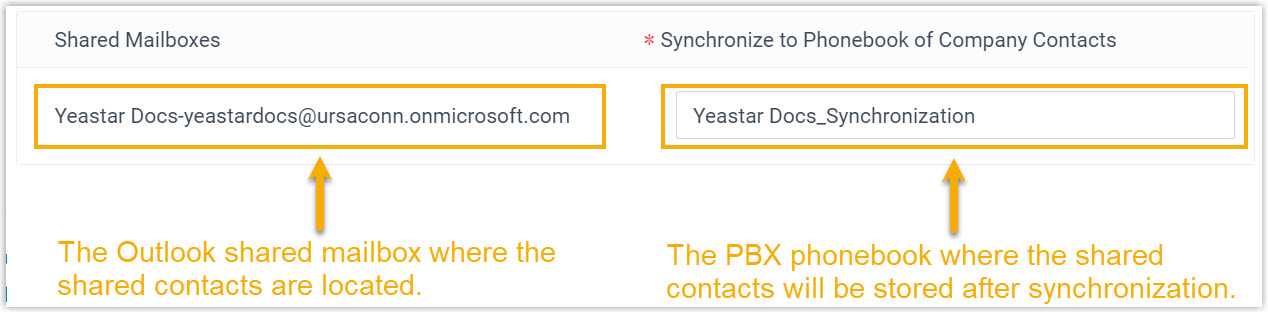
Option What it does Contacts in All Shared Mailboxes Syncs contacts from every Outlook shared mailbox into Cloud Voice phonebooks. Contacts in Specific Shared Mailboxes Syncs contacts from only the shared mailboxes you choose in the Shared Mailboxes drop-down list. -
Enter the phonebook name that the shared contacts should sync into.
-
Click Save.
Step 2. Add the authorization account to the shared mailboxes in Microsoft 365
Section titled “Step 2. Add the authorization account to the shared mailboxes in Microsoft 365”- Sign in to the Microsoft 365 admin center.
- In the left navigation, open Teams & groups and select Shared mailboxes.
- Click the shared mailbox you want, then:
- In the Members section, click Edit.
- Click Add members and search for the authorization account (the account that authorized the Microsoft Entra ID integration).
- Select the authorization account and click Add.
- Repeat step 3 for every shared mailbox you want to sync.
Result
Section titled “Result”After the sync runs:
-
The shared mailboxes and their contacts appear in a Cloud Voice phonebook, tagged with a
label. The synced phonebook is read-only and can’t be edited or deleted in Cloud Voice.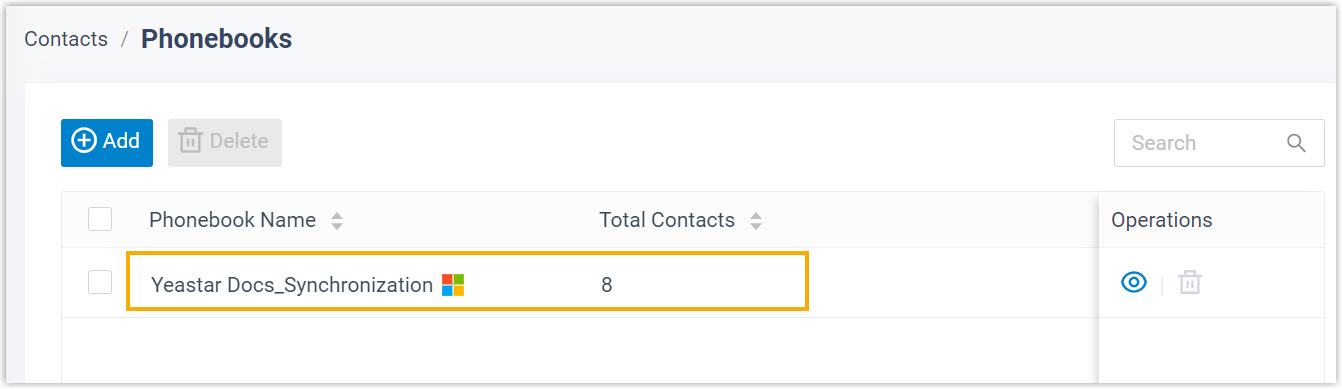
-
By default, the synced phonebook is hidden from users. To let users see the phonebook and its contacts, go to Extension and Trunk > Client Permission > Contact Visibility and grant access.
Question about this page?
Ask the AI assistant. It starts from this page, then searches the rest of the docs.
Ask Cloud Voice AI
Answers are AI-generated from the docs and may contain mistakes. Verify with the linked pages.