
Set up an SMS Channel for VoiceMeUp
A VoiceMeUp SMS (Short Message Service) channel lets your agents exchange text messages and MMS (Multimedia Messaging Service, messages with images or other files) with customers without leaving the Cloud Voice App. This page covers the end-to-end setup: generating a webhook on your phone system, wiring up a number and account in VoiceMeUp, and routing inbound messages to the right agent or queue.
Requirements
Section titled “Requirements”Before you begin, confirm that your Cloud Voice PBX (Private Branch Exchange, the phone system that manages your calls and messages) meets the following conditions.
- Firmware: Version 84.23.0.24 or later.
- Domain name: The PBX domain name must not include underscore characters. Because of a limitation on the provider side, an underscore causes the messaging channel to fail authentication or to stop receiving messages.
- Domain certificate: A valid domain certificate must be installed.
Supported message types and limits
Section titled “Supported message types and limits”The channel carries both SMS text messages and MMS multimedia messages. VoiceMeUp determines which MMS file types you can send.
Channel limits:
- Maximum file size: 100 MB
- File retention period: 72 hours
How the setup works
Section titled “How the setup works”The process has three stages:
- Generate a webhook URL on your Cloud Voice PBX.
- Set up the messaging feature in VoiceMeUp.
- Create the SMS channel in Cloud Voice and connect it with your VoiceMeUp account and number.
Step 1. Obtain a webhook URL on the PBX
Section titled “Step 1. Obtain a webhook URL on the PBX”You will need this webhook URL when you configure a number for SMS in VoiceMeUp.
- Log in to the PBX web portal and go to Messaging > Message Channel.
- Click Add and choose SMS.
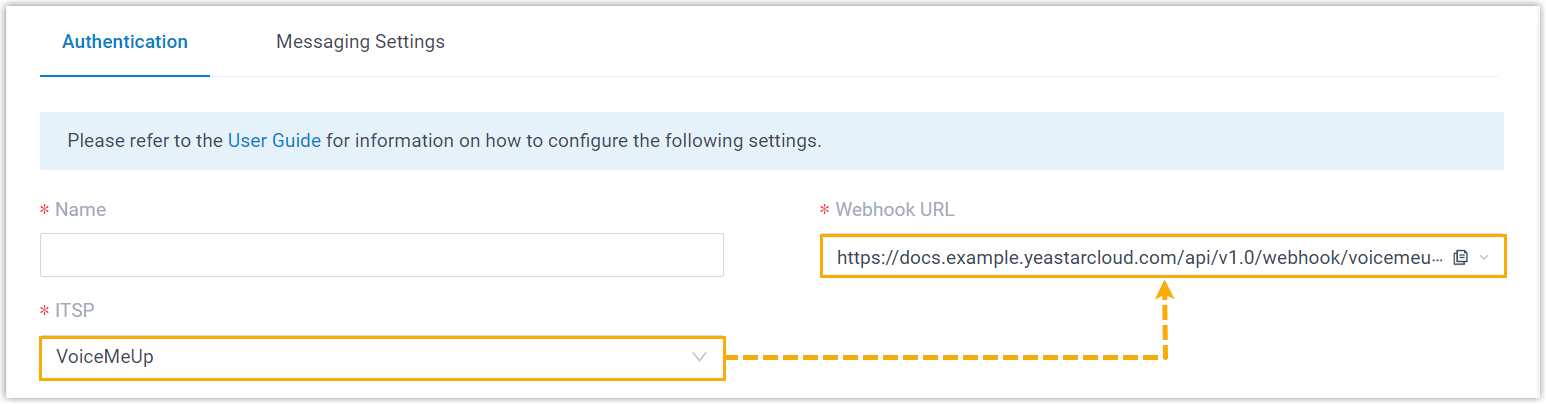
- In the ITSP (Internet Telephony Service Provider) drop-down list, select VoiceMeUp, then copy the Webhook URL.
Step 2. Configure the messaging feature on VoiceMeUp
Section titled “Step 2. Configure the messaging feature on VoiceMeUp”Log in to the VoiceMeUp customer portal and complete the following.
-
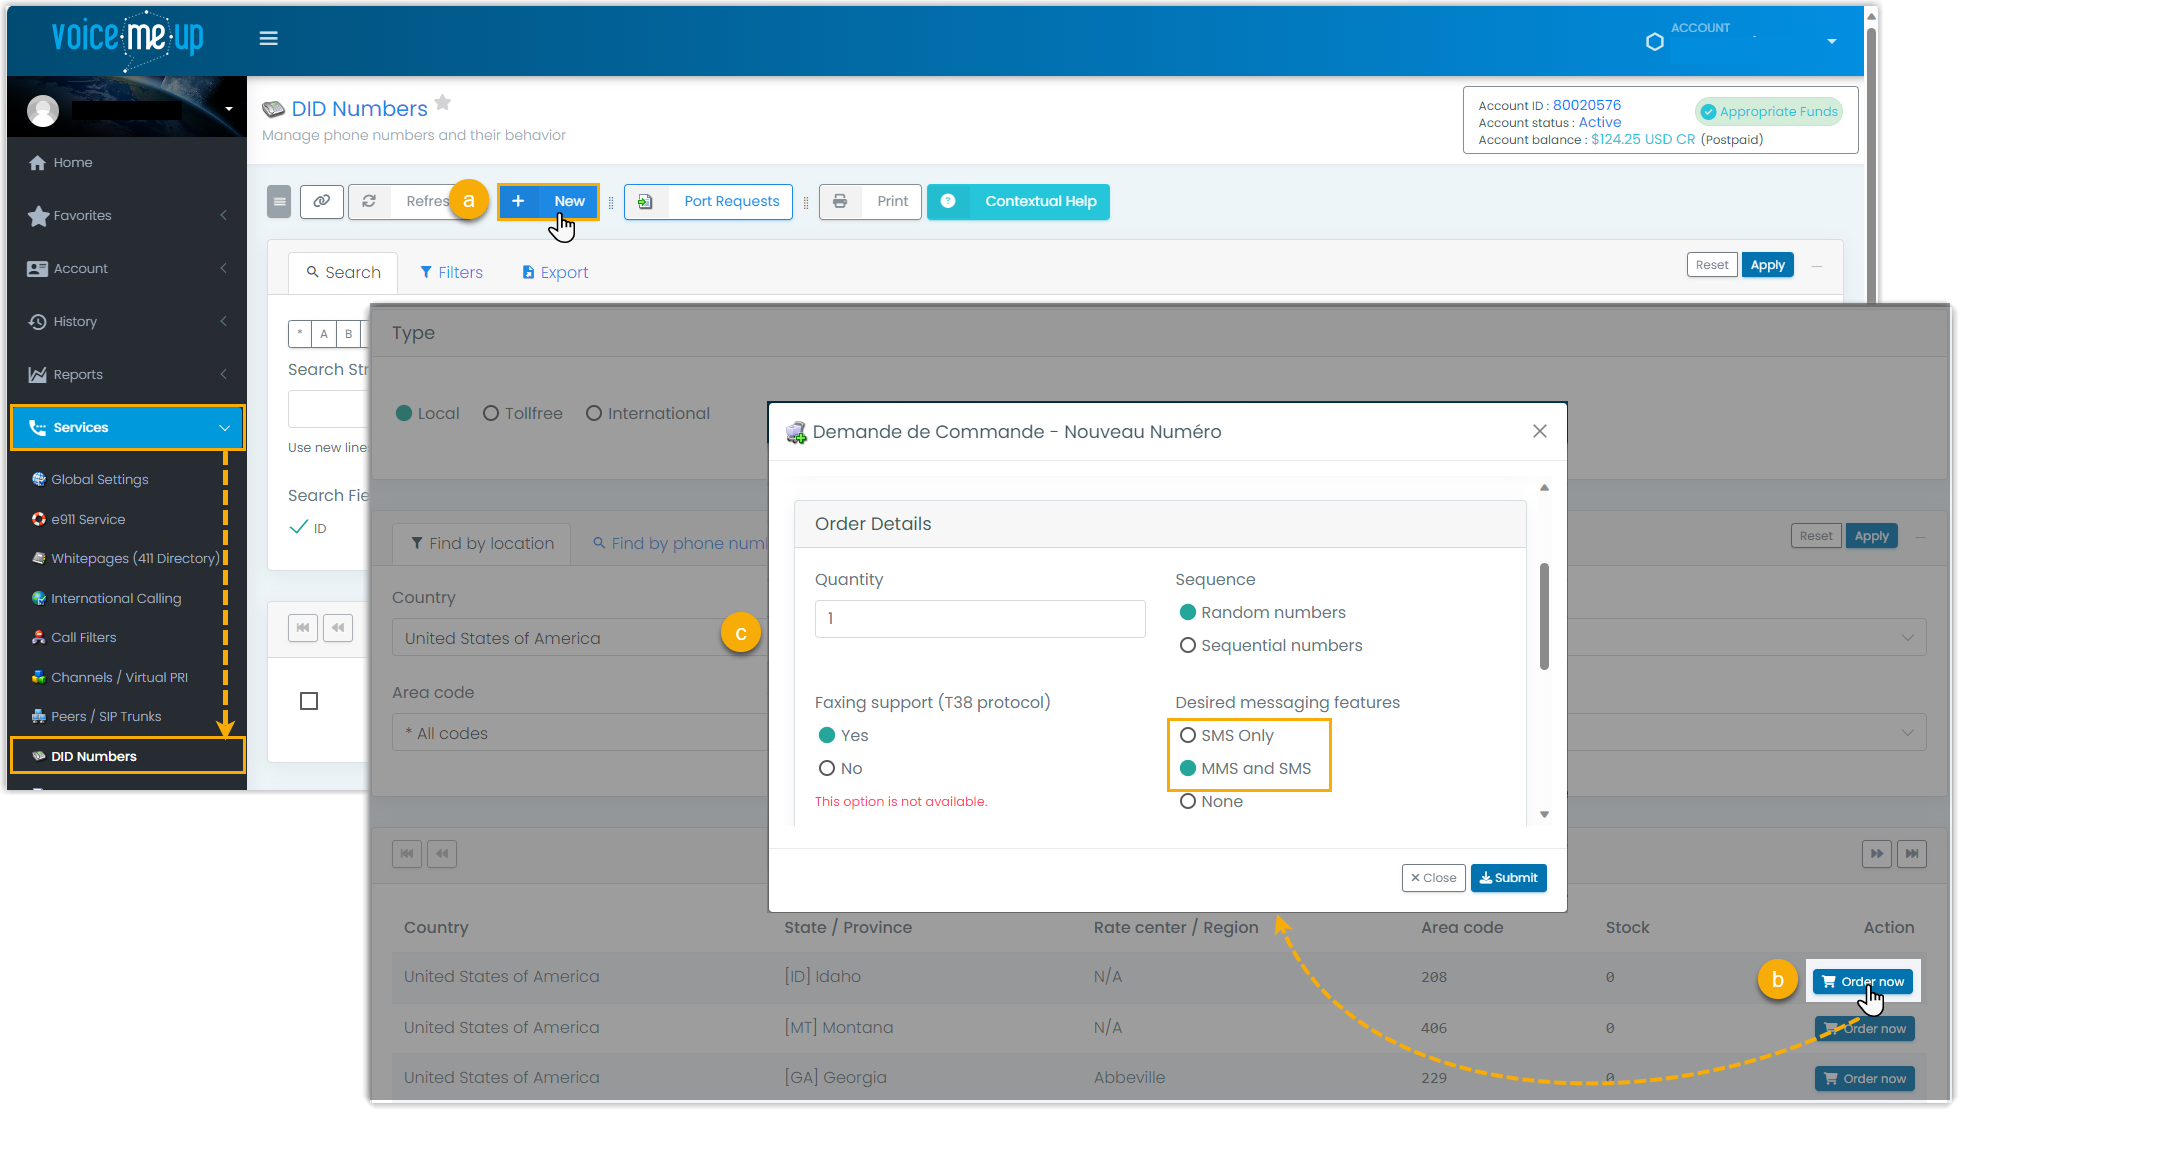
Purchase a DID (Direct Inward Dialing) number that includes the SMS feature. A DID is a phone number that routes calls and messages straight to a specific destination on your phone system.
-
Configure the messaging webhook for the DID number.
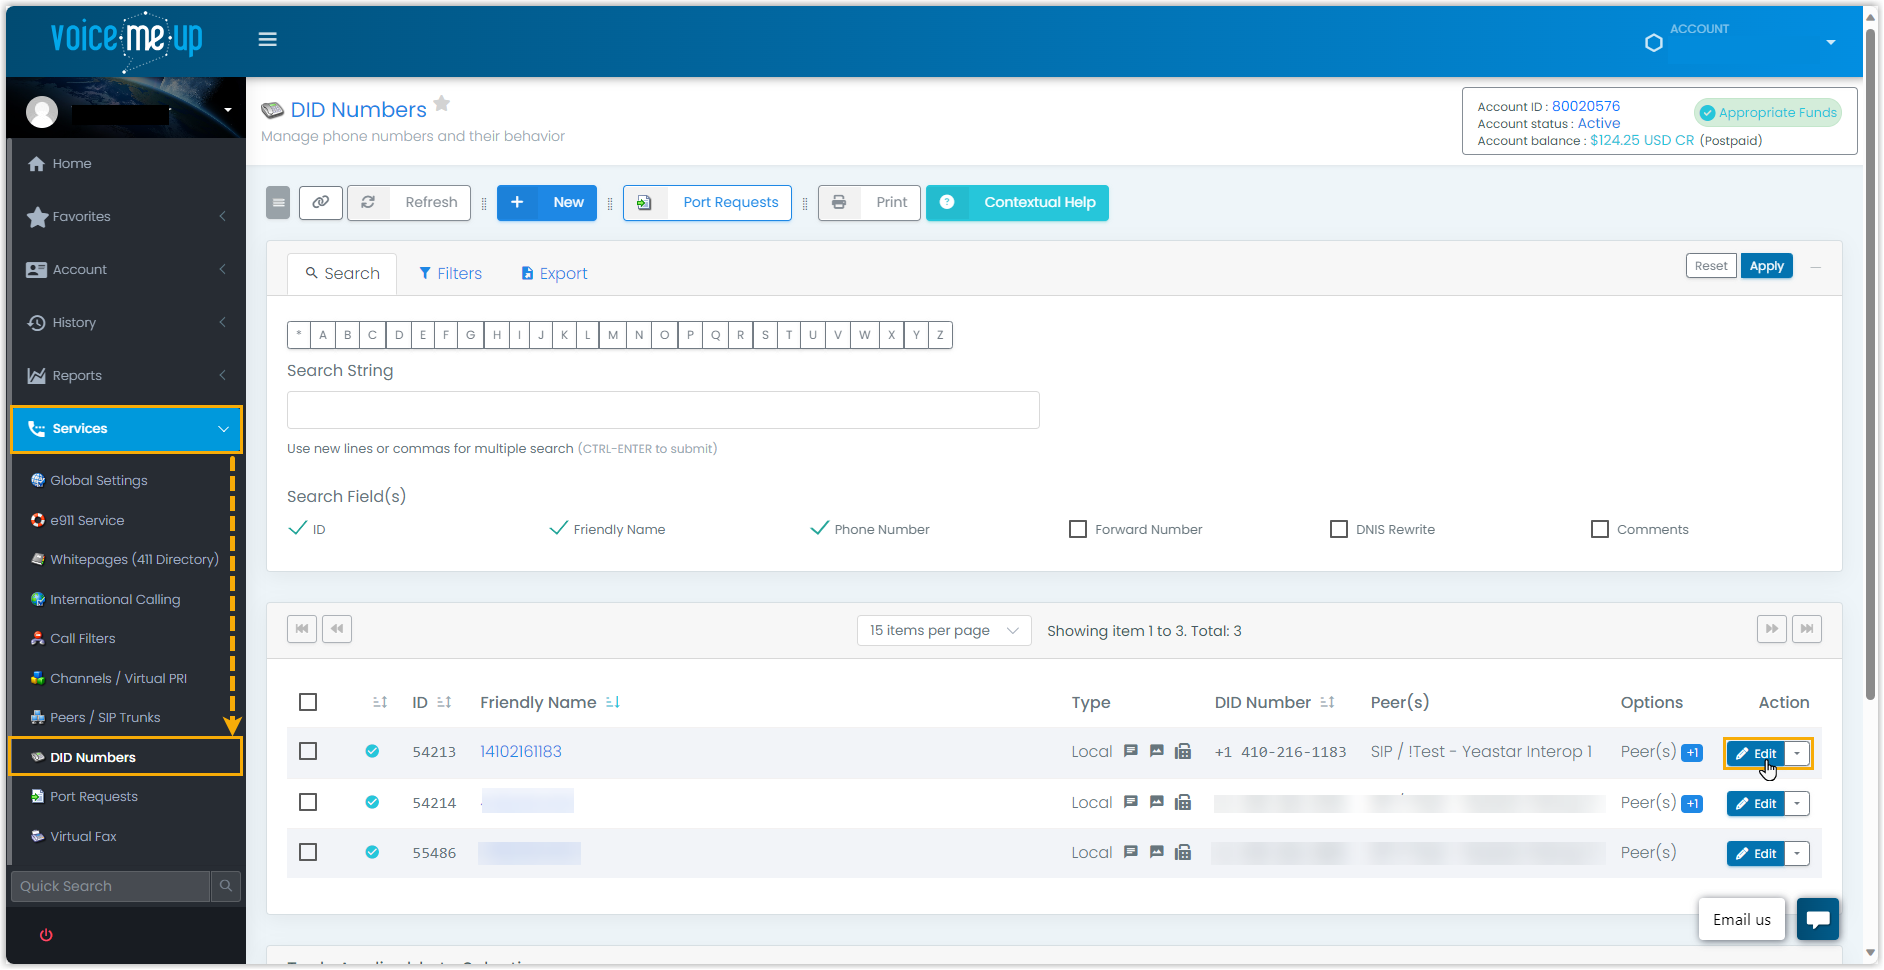
a. Open the edit page for the DID you want to use.
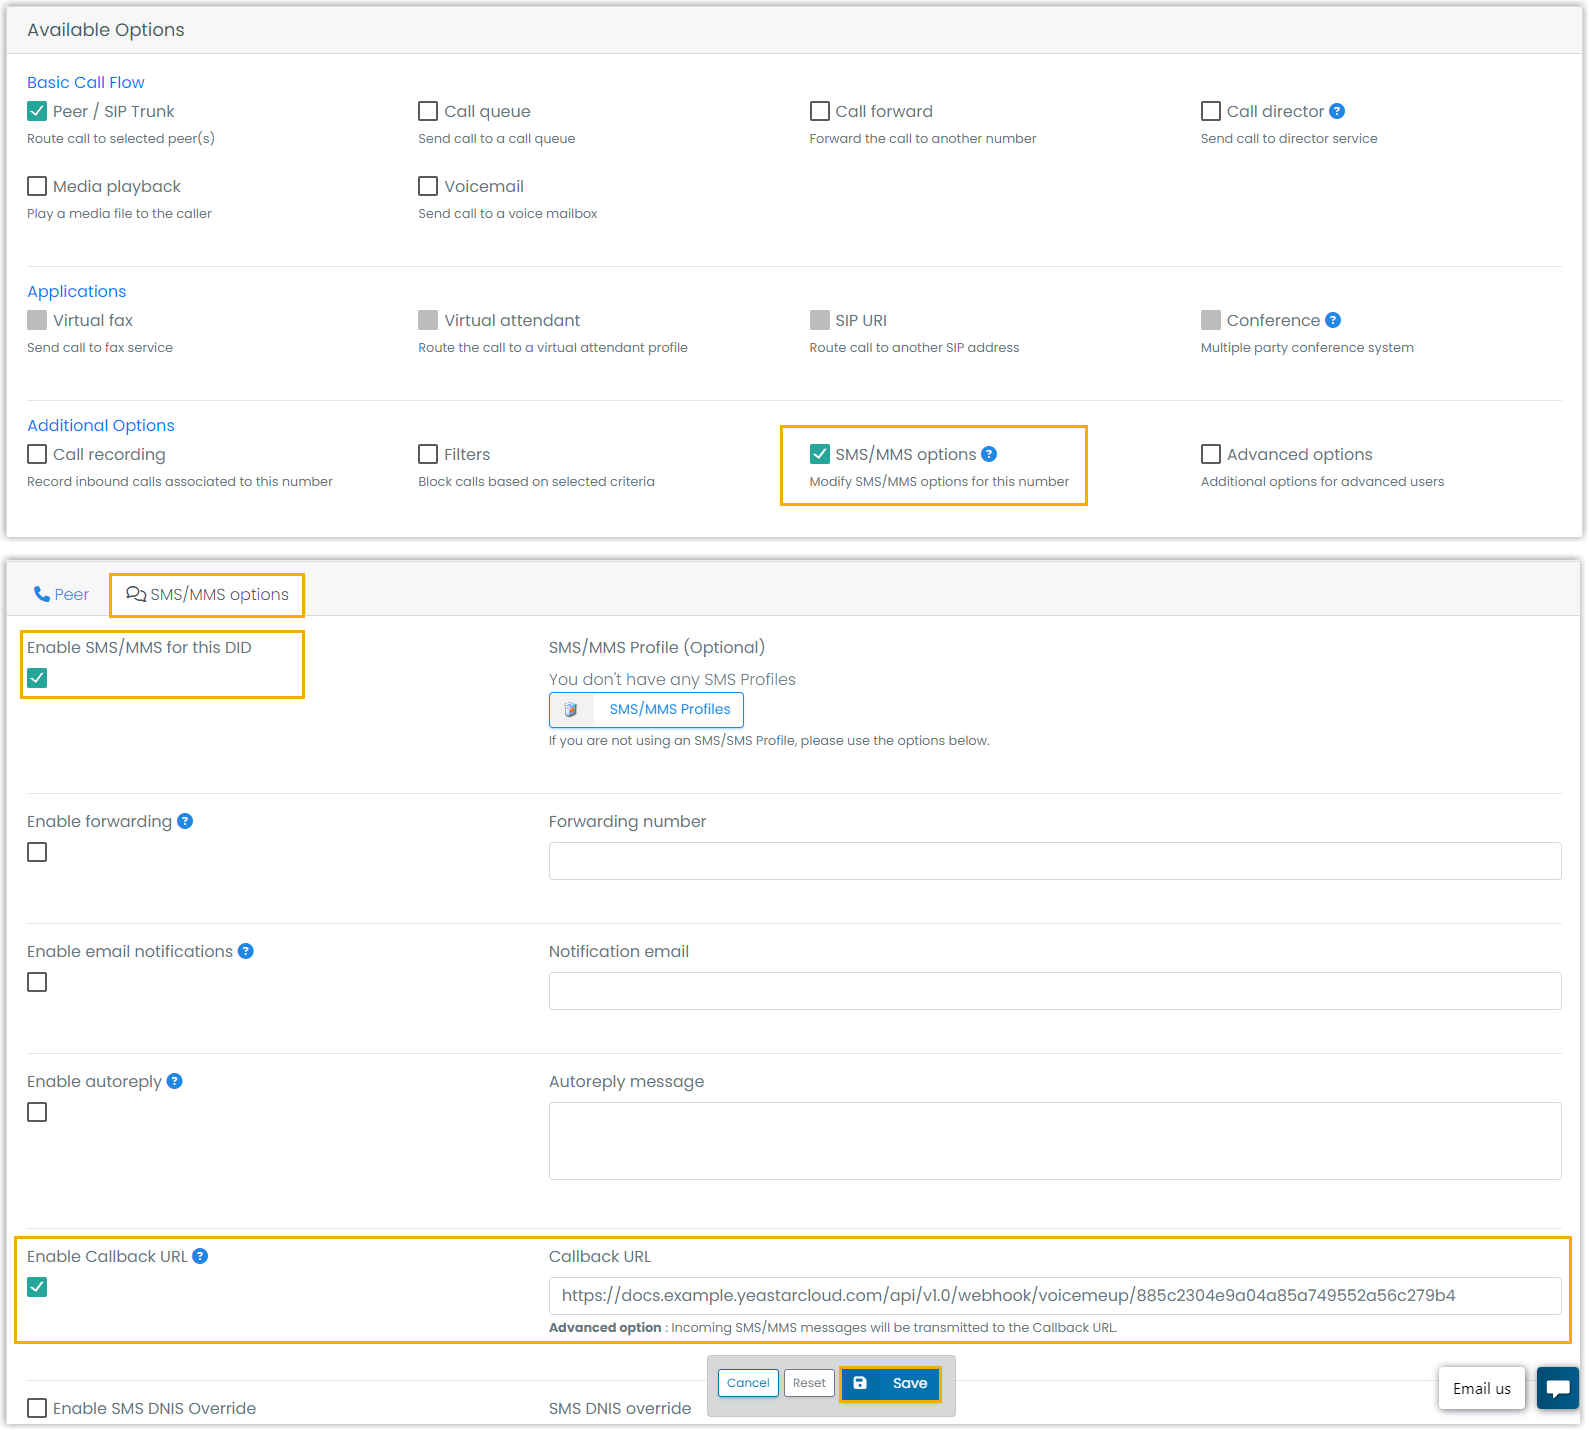
b. Enable SMS/MMS for the DID, and set the Callback URL to the PBX webhook URL you copied in Step 1.
-
Create a user account for the integration with the PBX.
a. Add a new user account.
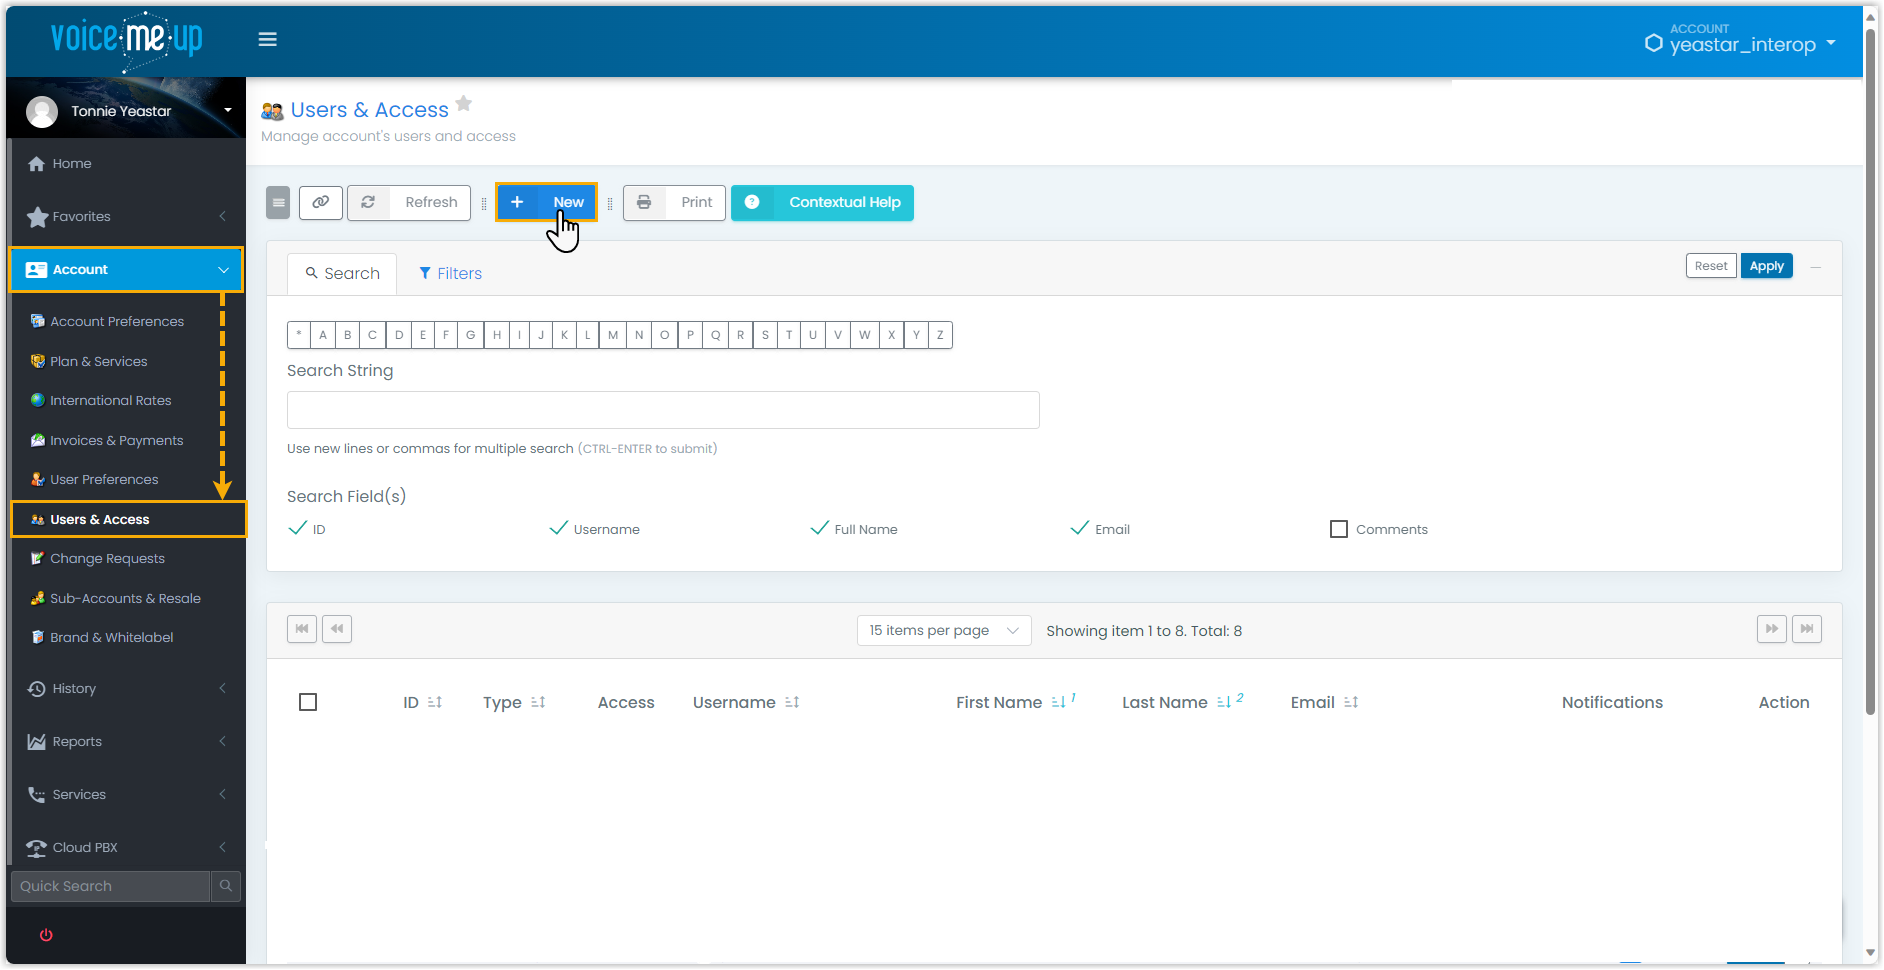
b. Fill in the account information and enable API (Application Programming Interface) access for the account.
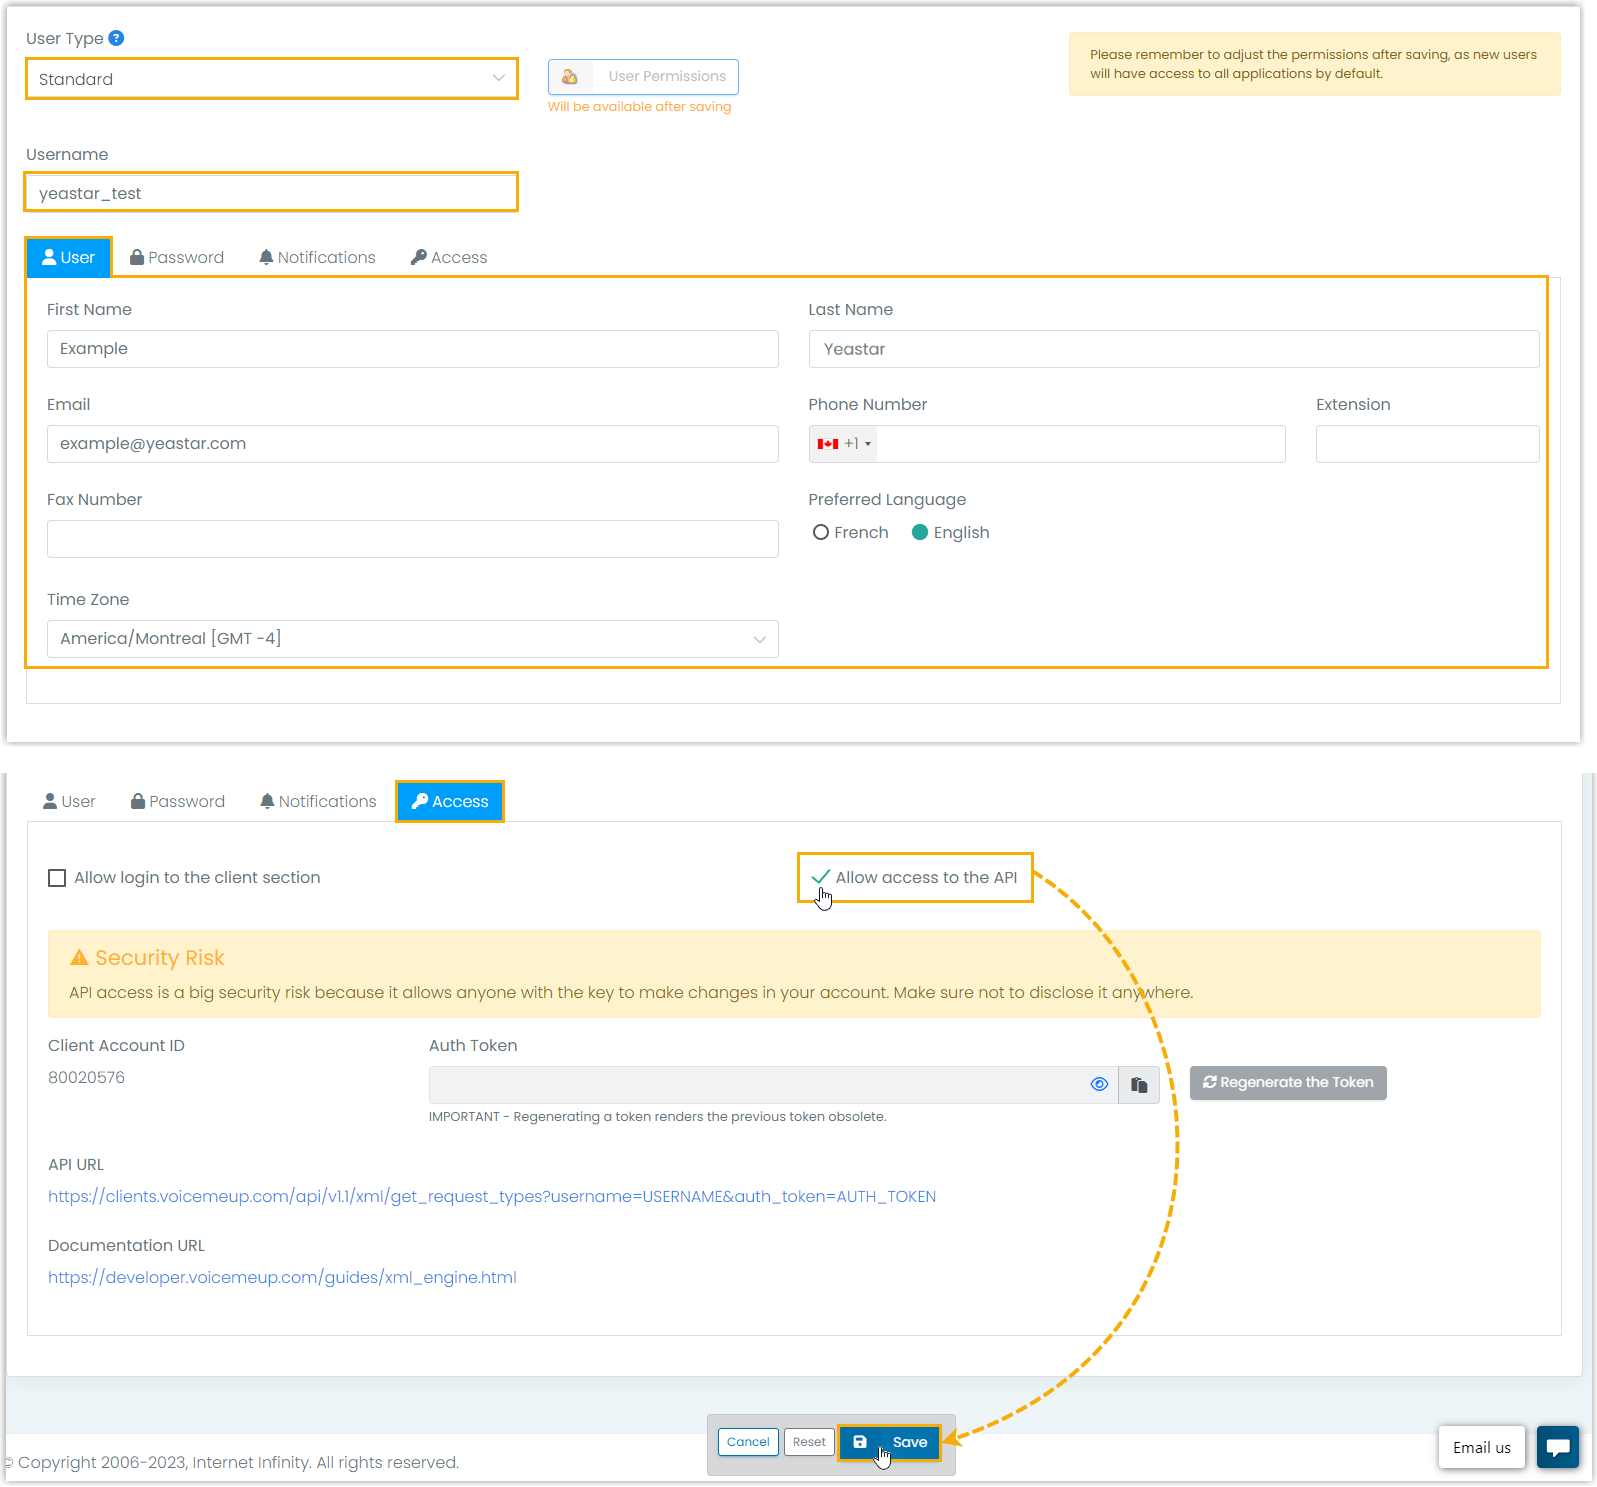
After you save, the account is created and you are returned to the user account list.
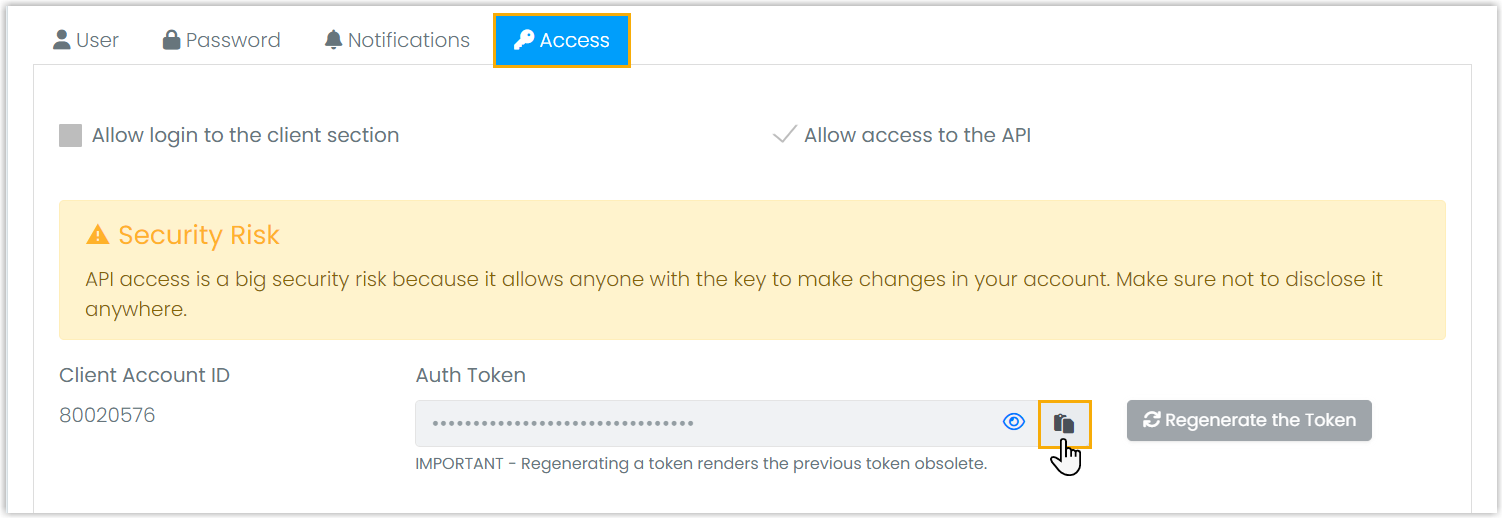
c. Open the account’s details page and copy its Auth Token for the integration.
Step 3. Create and configure the SMS channel on the PBX
Section titled “Step 3. Create and configure the SMS channel on the PBX”Create the channel and connect it with the account credentials and number you obtained from VoiceMeUp.
-
Log in to the PBX web portal and go to Messaging > Message Channel.
-
Click Add and choose SMS.
-
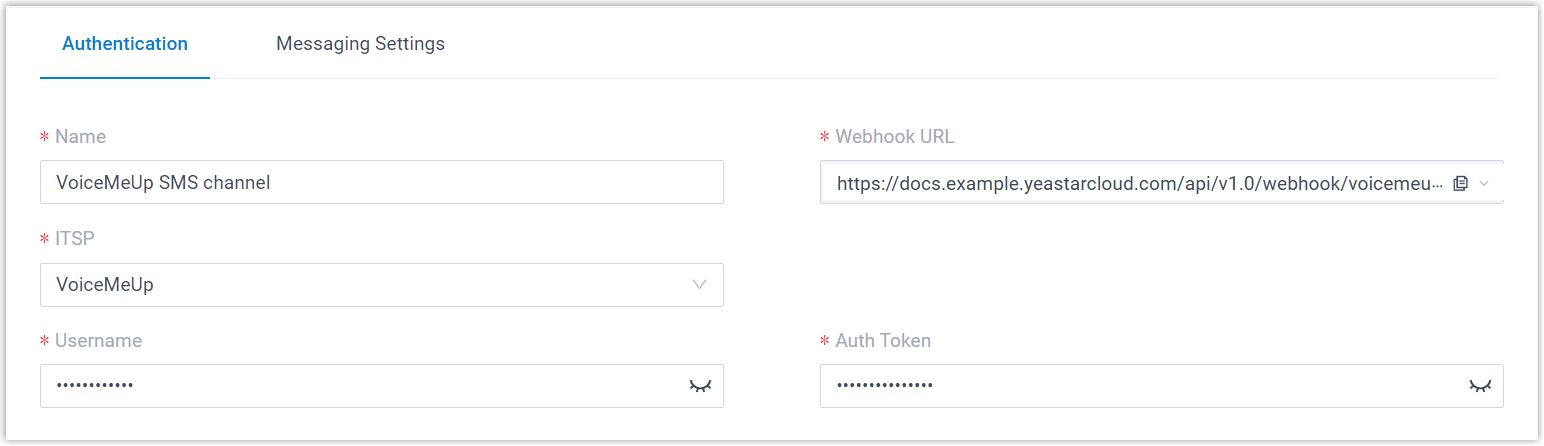
On the Authentication tab, enter your VoiceMeUp details:
- Name: A label that helps you recognize the channel.
- ITSP: Select VoiceMeUp.
- Username: Paste the username of the VoiceMeUp account you created in Step 2.
- Auth Token: Paste the auth token you copied from that account.
-
On the Messaging Settings tab, configure the channel.
a. In Message Sending Rate, set how many messages the PBX may send per second.
b. Configure the session settings as needed:
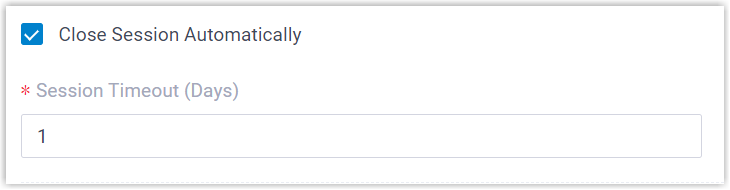
- Close Session Automatically: Select this to have the system close sessions that have been inactive for a set period, then enter the number of days in Session Timeout (Days).
- Allow the Creation of Duplicate Active Sessions: Select this to permit a new session even when an active session already exists between the same sender and receiver. When enabled, if an agent starts a session in the Cloud Voice App and a matching active session already exists on the channel, the app prompts them to confirm. If they continue, the original session leaves the previous handler’s list and is taken over by the new agent, along with the full chat history.
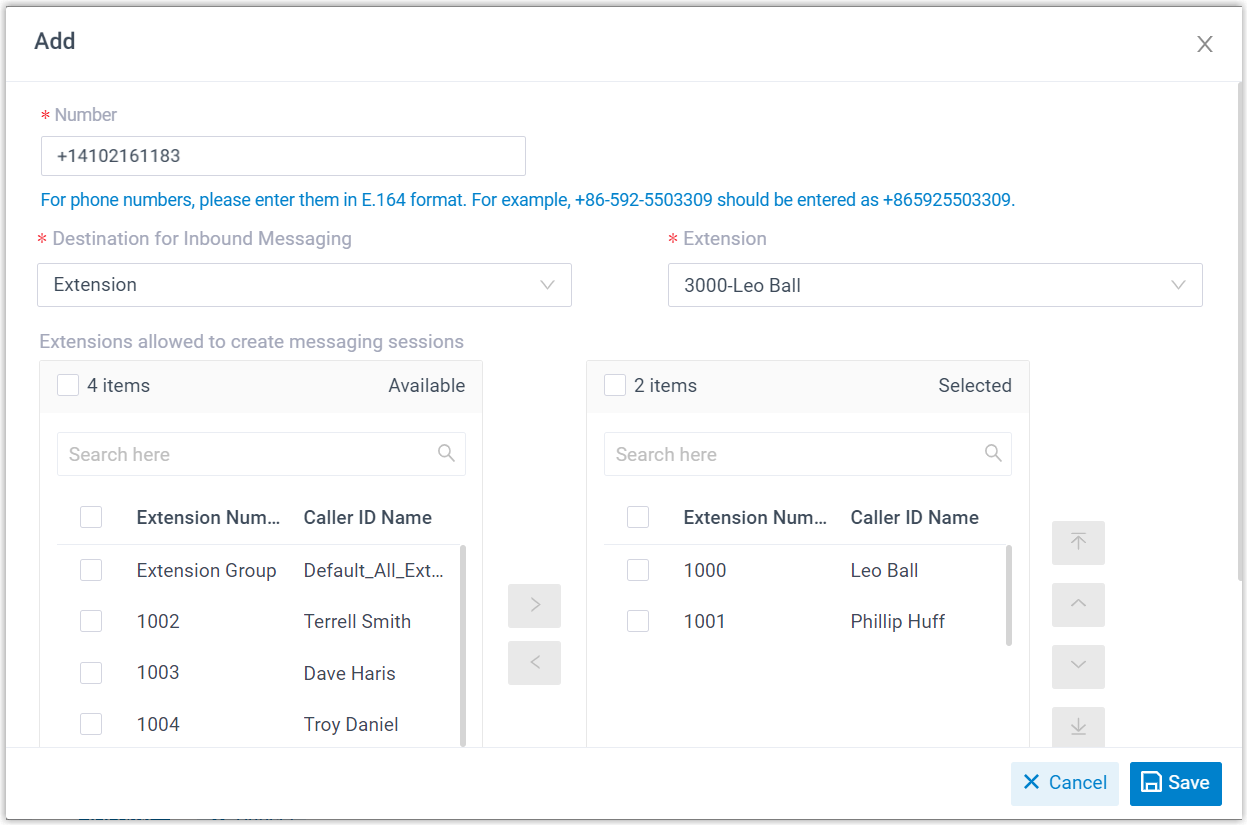
c. In the Number section, click Add to create a message routing rule.
-
Number: Enter your purchased number or specify an Alphanumeric Sender ID.
-
Destination for Inbound Messaging: Choose where inbound messages from this number go.
- Extension: Pick an extension from the Extension drop-down list. Only that extension user receives inbound messages from the number.
- Message Queue: Pick a queue from the Message Queue drop-down list. Every agent in the queue is notified of new inbound sessions, but once an agent picks up a session, only that agent receives and can reply to the follow-up messages in it.
- Third-Party Message Analytics Platform (Transmitted via API): Forward inbound messages to a third-party analytics platform over the API for advanced processing. This requires your PBX to already be integrated with the analytics platform through the Cloud Voice API; once selected, the PBX transmits inbound messages to it automatically. You can monitor the API event (30031) New Message Notification to be alerted when a new message arrives, and the PBX also provides a full Message API suite for advanced message interactions with the integrated platform.
-
Extensions allowed to create messaging sessions: Select which extensions may start a new messaging session with customers.
d. Click Save.
-
Click Save.
Result
Section titled “Result”-
The channel is created and appears in the Message Channel list with a green Status indicator, confirming the connection is active.

-
The PBX tracks the number of messages sent and received on the channel. The Total column shows all outbound messages, including both successful and failed sends.

What to do next
Section titled “What to do next”Send a text message to the configured number and confirm that the assigned agent receives it in the Cloud Voice App.
Question about this page?
Ask the AI assistant. It starts from this page, then searches the rest of the docs.
Ask Cloud Voice AI
Answers are AI-generated from the docs and may contain mistakes. Verify with the linked pages.