
Set up an SMS Channel for Aspsms
An Aspsms SMS channel lets your team hold two-way text conversations with customers straight from the Cloud Voice App. Once the channel is live, inbound messages are routed to the extension or queue you choose, and agents can reply without leaving their client. This page walks you through obtaining a webhook, wiring up your number on Aspsms, and creating the matching channel in Cloud Voice.
Requirements
Section titled “Requirements”Before you begin, confirm your Cloud Voice system meets the following:
- Firmware: Version 84.23.0.24 or later.
- Domain name: The domain must not contain any underscore (
_) characters. Aspsms rejects such hosts, which causes authentication to fail or messages not to arrive. - Domain certificate: A valid certificate must be installed on the system.
Restriction
Section titled “Restriction”The Aspsms channel handles text messages only.
Prerequisites
Section titled “Prerequisites”You need an Aspsms account with one or more phone numbers purchased specifically for two-way SMS.
Step 1. Get a webhook URL from Cloud Voice
Section titled “Step 1. Get a webhook URL from Cloud Voice”Cloud Voice generates the webhook URL that Aspsms uses to forward incoming messages. Grab it first, because you will paste it into the Aspsms portal in the next step.
- Sign in to the Cloud Voice management portal and go to Messaging > Message Channel.
- Click Add and choose SMS.
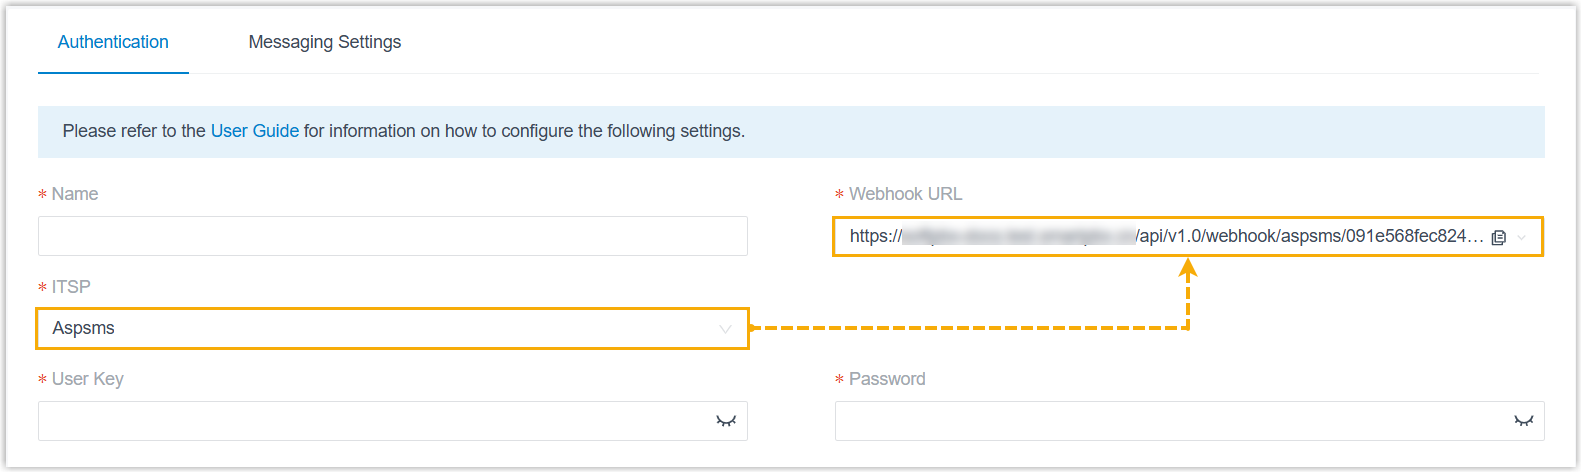
- From the ITSP (Internet Telephony Service Provider) drop-down, select Aspsms, then copy the Webhook URL.
Step 2. Configure the number for SMS on Aspsms
Section titled “Step 2. Configure the number for SMS on Aspsms”Point your Aspsms number at the Cloud Voice webhook and collect the API credentials the channel will need.
-
Sign in to the Aspsms portal.
-
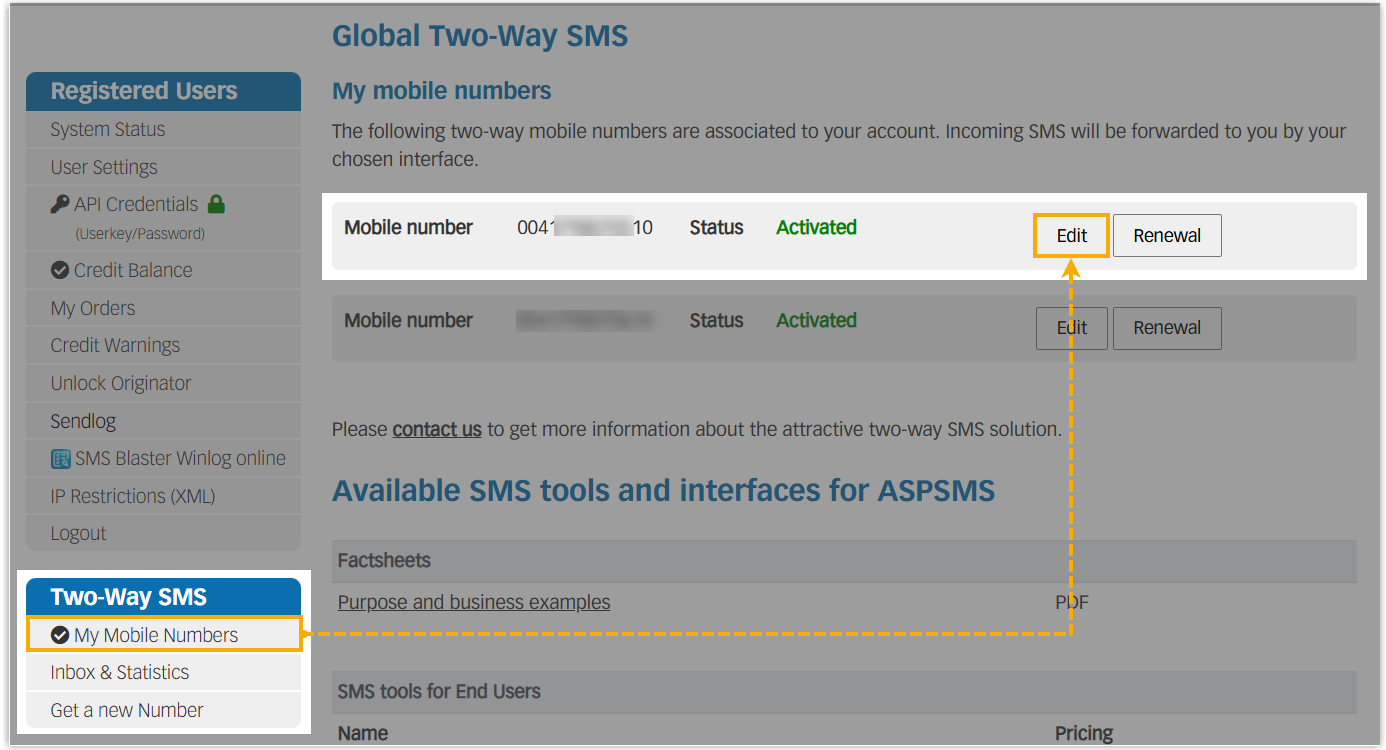
In the left navigation bar, go to Two-Way SMS > My Mobile Numbers, then click Edit next to the number you want to use.
-
Scroll to the Forward SMS as HTTP raw data section and fill in the callback settings with your Cloud Voice webhook URL so that incoming messages are delivered to your system.
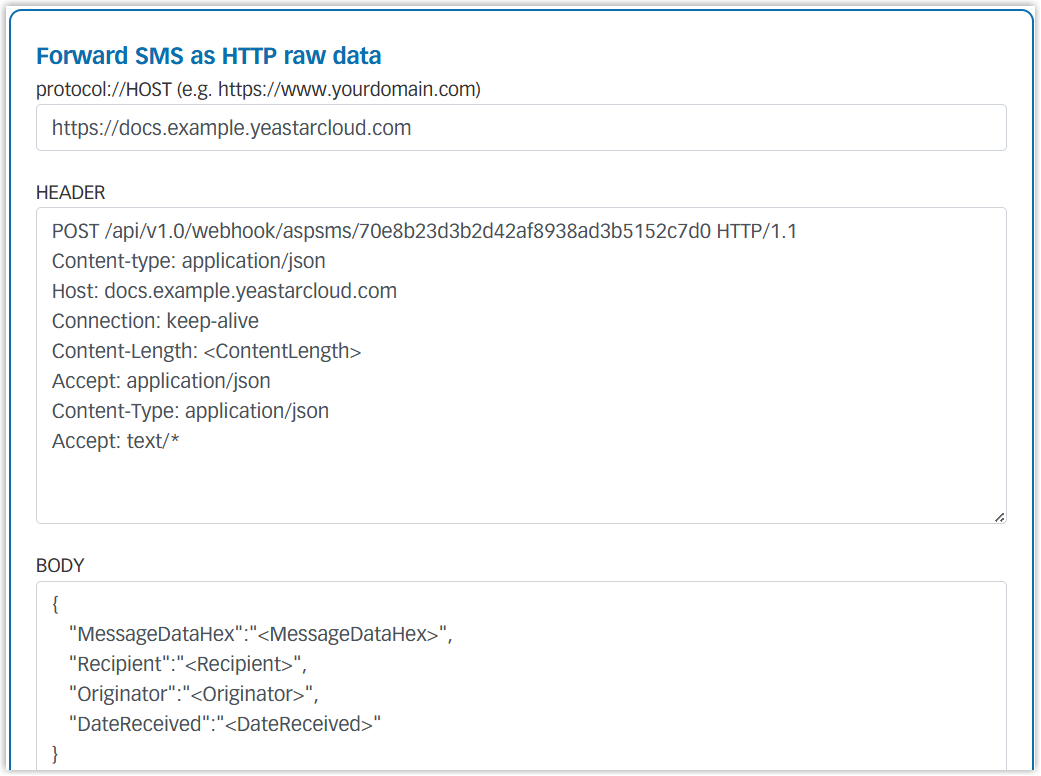
a. In the protocol://HOST field, enter the protocol and domain taken from your webhook URL, for example
https://docs.example.yeastarcloud.com.b. In the HEADER field, enter the request template below, replacing the variables with your own webhook details:
POST {{Webhook Path}} HTTP/1.1Content-type: application/jsonHost: {{PBX domain}}Connection: keep-aliveContent-Length: <ContentLength>Accept: application/jsonContent-Type: application/jsonAccept: text/*{{Webhook Path}}: the path portion of your webhook URL. If the full URL ishttps://docs.example.yeastarcloud.com/api/v1.0/webhook/aspsms/091e568fec824f52bb9e83abe68f7693, the path is/api/v1.0/webhook/aspsms/091e568fec824f52bb9e83abe68f7693.{{PBX domain}}: the domain from your webhook URL, without thehttps://prefix.
c. In the BODY field, paste the following:
{"MessageDataHex":"<MessageDataHex>","Recipient":"<Recipient>","Originator":"<Originator>","DateReceived":"<DateReceived>"}d. Click Save.
-
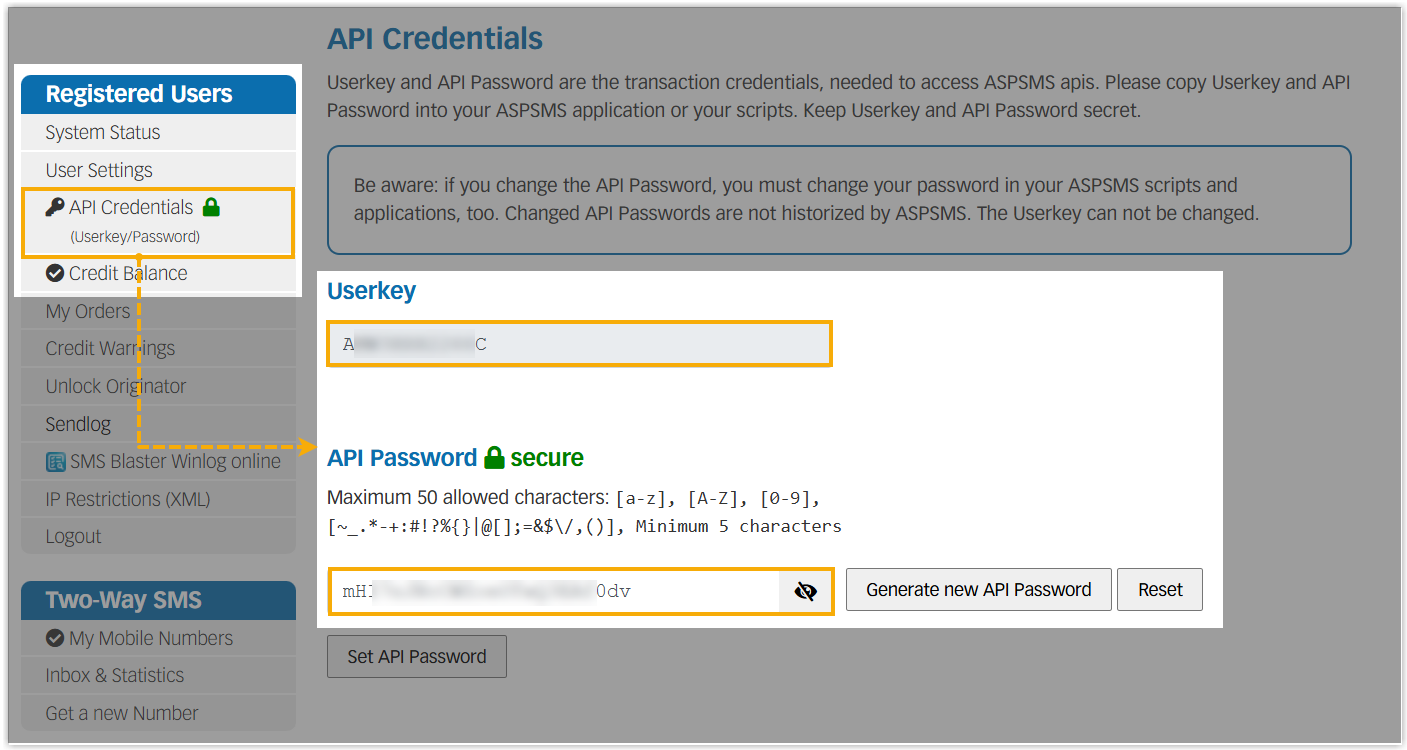
Collect the API credentials for the integration.
a. Go to Registered Users > API Credentials.
b. Record the Userkey and API Password for the next step.
Step 3. Create and configure the SMS channel in Cloud Voice
Section titled “Step 3. Create and configure the SMS channel in Cloud Voice”Now build the channel in Cloud Voice using the credentials and number from Aspsms.
-
Sign in to the Cloud Voice management portal and go to Messaging > Message Channel.
-
Click Add and choose SMS.
-
On the Authentication tab, enter your Aspsms details.
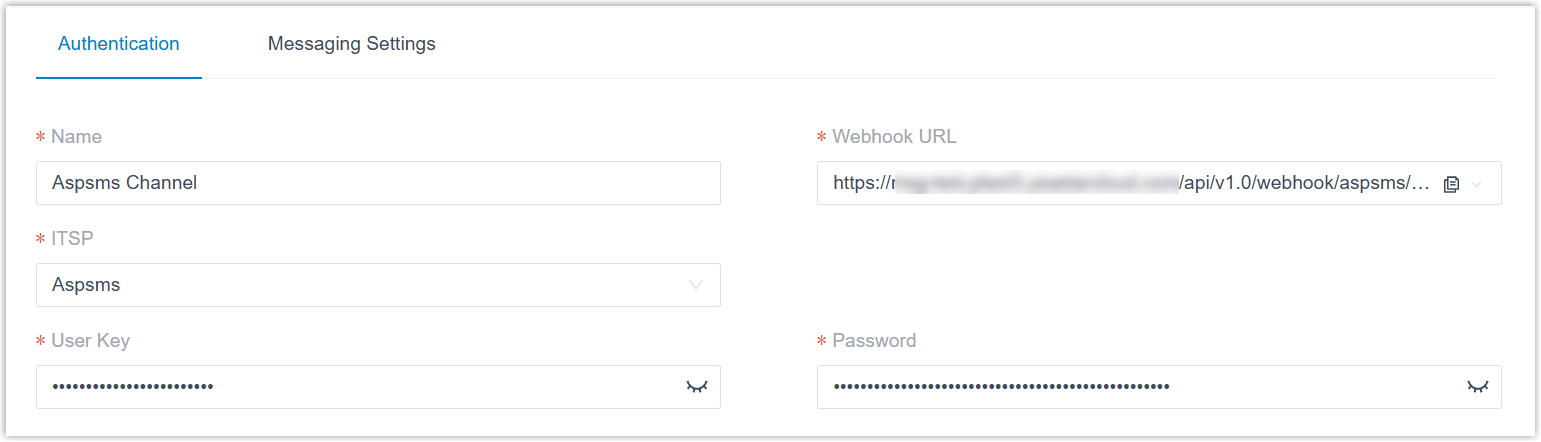
- Name: A label that helps you recognize the channel.
- ITSP: Select Aspsms.
- User Key: Paste the Userkey you recorded from Aspsms.
- Password: Paste the API password you recorded from Aspsms.
-
On the Messaging Settings tab, configure the channel.
a. In the Message Sending Rate field, set how many messages the system may send per second.
b. Adjust the session settings to suit your workflow.
Setting Description Close Session Automatically Select the checkbox to end sessions after a period of inactivity, then enter the number of days in the Session Timeout (Days) field. Allow the Creation of Duplicate Active Sessions Select the checkbox to permit a new session even when an active session with the same sender and receiver already exists. With this on, when an agent starts such a session in the Cloud Voice App, a prompt appears. If the agent continues, the existing session is removed from the previous handler’s list and reassigned to the new agent, along with the full chat history. 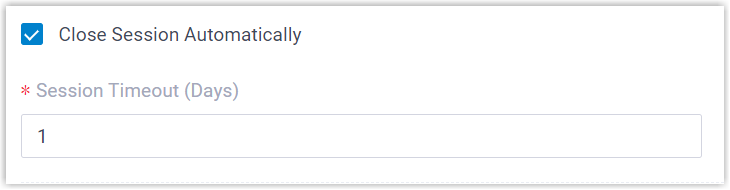
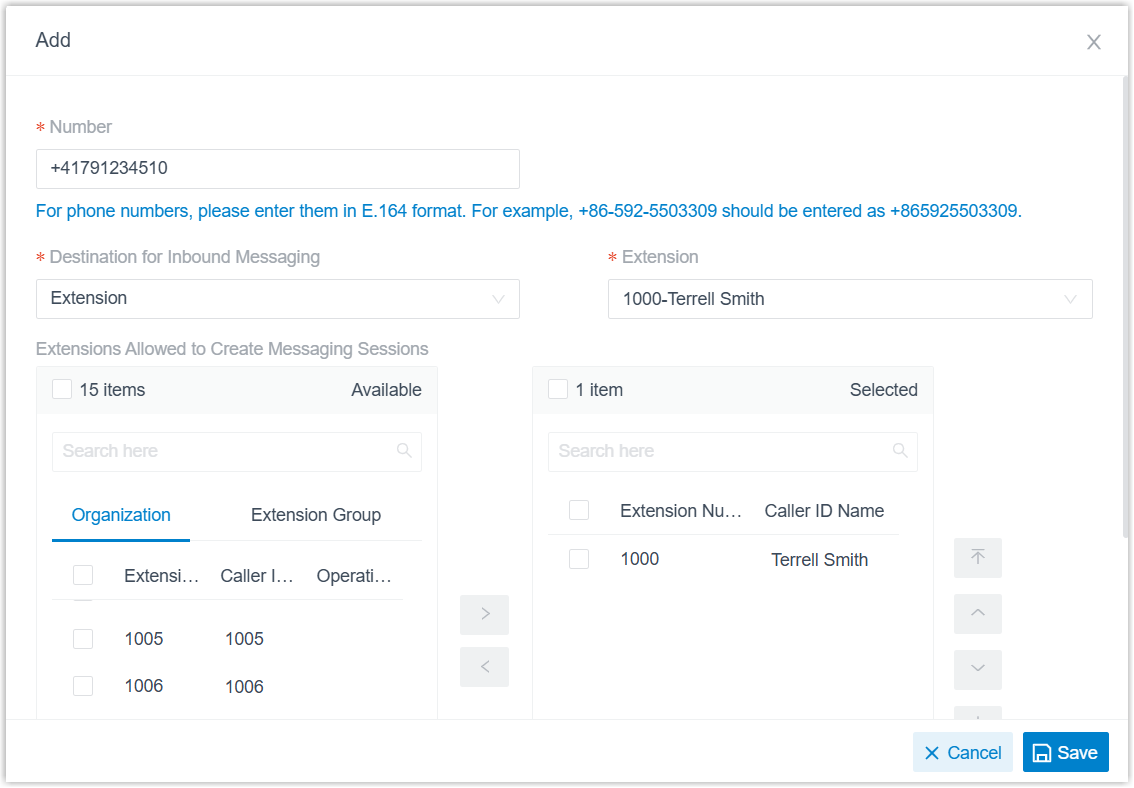
c. In the Number section, click Add to create a message routing rule.
-
Number: Enter the number you purchased.
-
Destination for Inbound Messaging: Choose where incoming messages from this number are delivered.
Option Description Extension Choose an extension from the Extension drop-down. Only that user receives inbound messages from the number. Message Queue Choose a queue from the Message Queue drop-down. Every agent in the queue sees new inbound sessions, but once an agent picks up a session, only that agent receives and answers the follow-up messages in it. Third-Party Message Analytics Platform (Transmitted via API) Inbound messages are forwarded automatically to an external analytics platform over the API for further processing. This requires your system to already be integrated with that platform via the API; incoming messages are then transmitted to it, and you can track them through the New Message Notification API event (event 30031) and the messaging API set. -
Extensions allowed to create messaging sessions: Select the extensions permitted to start a message conversation with a customer.
d. Click Save.
-
-
Click Save.
Result
Section titled “Result”-
The channel is created and appears in the message channel list with a Status of
 .
.
-
Cloud Voice tracks the number of messages sent and received on the channel. The Total column counts all outbound messages, both delivered and failed.

What to do next
Section titled “What to do next”Send a test text message to the number and confirm that the assigned agent receives it in the Cloud Voice App.
Question about this page?
Ask the AI assistant. It starts from this page, then searches the rest of the docs.
Ask Cloud Voice AI
Answers are AI-generated from the docs and may contain mistakes. Verify with the linked pages.