
Set up a WhatsApp Channel
A WhatsApp channel links your WhatsApp Business phone number to Cloud Voice, letting agents handle customer WhatsApp conversations directly in the Cloud Voice App instead of a separate WhatsApp client. This page walks you through creating the required Meta app, collecting the credentials Cloud Voice needs, and connecting the channel end to end.
Requirements
Section titled “Requirements”Confirm that both sides of the integration are ready before you begin.
Cloud Voice PBX
Section titled “Cloud Voice PBX”Your Cloud Voice PBX (private branch exchange: the hosted phone system that routes your calls and messages) must meet the following requirements.
- Firmware: Version
84.23.0.24or later. - Domain name: The PBX domain name must not contain underscore (
_) characters. Because of a restriction on the third-party platform, an underscore causes the messaging channel to fail authentication or stop receiving messages. - Domain certificate: A valid domain certificate must be installed on the PBX.
-
Product: WhatsApp Business Platform.
-
Accounts:
-
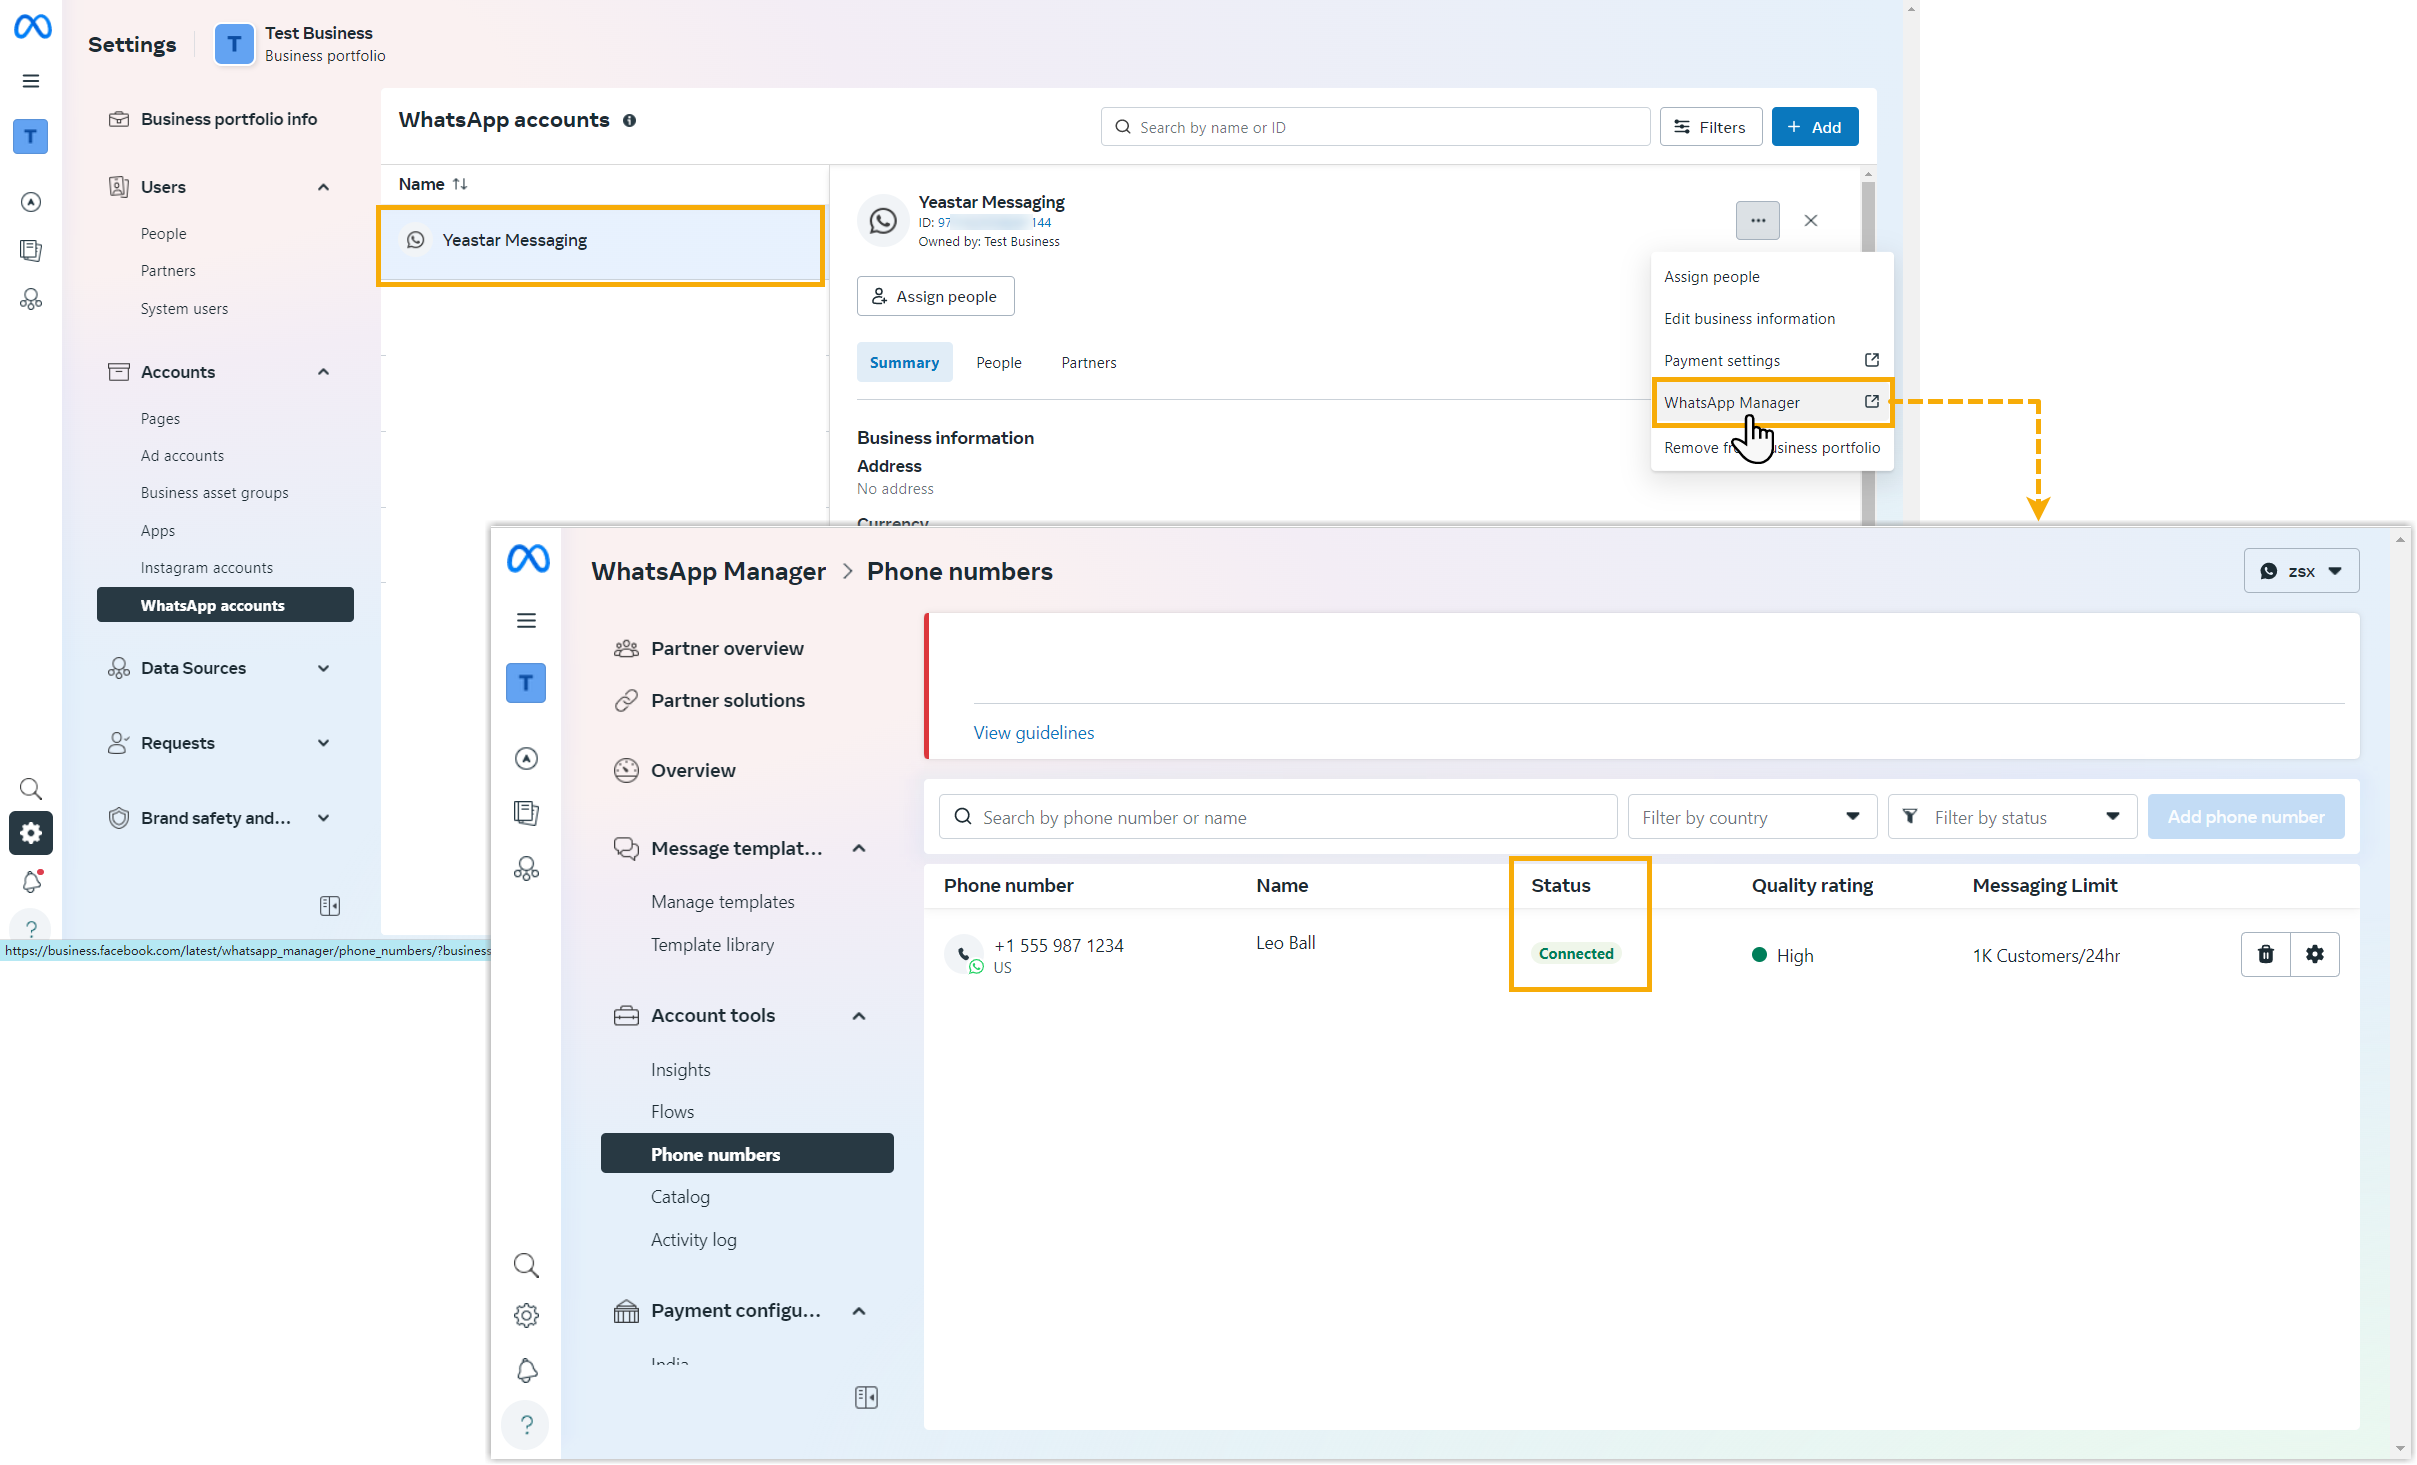
Phone number: A phone number that is valid and available for messaging. You can check a number’s status on the Meta Business Suite portal under Account > WhatsApp accounts > WhatsApp Manager > Account tools > Phone numbers.
Limitations
Section titled “Limitations”Keep the following constraints of the WhatsApp messaging channel in mind.
| Item | Description |
|---|---|
| Message type | Text messages and multimedia messages are supported. WhatsApp determines which multimedia types are allowed; see WhatsApp supported media types. |
| Messaging mechanism | Agents can receive and reply to inbound messages, and can also start a conversation proactively using a WhatsApp message template. |
| Message sending rate | Up to 80 messages per second. |
| File size | Up to 100 MB per file. |
| File retention period | Files are retained for 72 hours. |
Integration workflow
Section titled “Integration workflow”Setting up a WhatsApp channel takes four steps:
- Create a Meta app on the Meta for Developers portal.
- Collect credentials on the Meta Business Suite portal.
- Create and configure the channel on Cloud Voice.
- Configure the webhook in the Meta app.
Step 1. Create a Meta app
Section titled “Step 1. Create a Meta app”Create a Business-type Meta app, attach your WhatsApp phone number, and record the phone number ID and app secret. You will enter both values on Cloud Voice later.
-
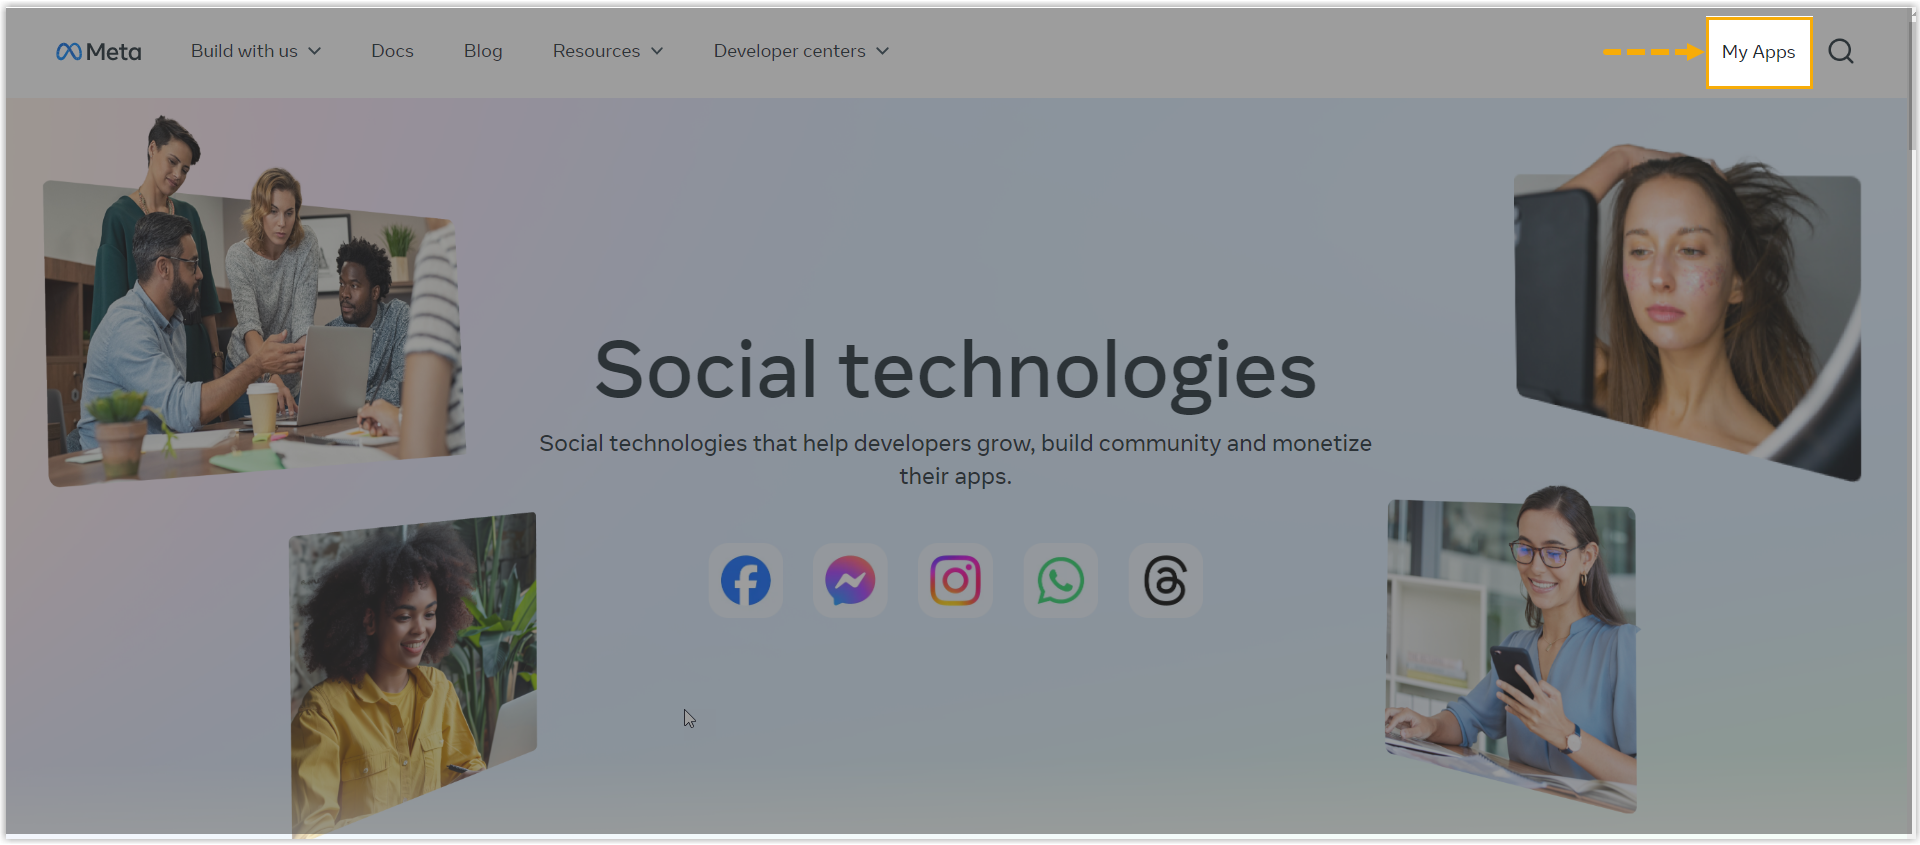
Sign in to the Meta for Developers portal with your Meta Developer account and open My Apps from the top menu.
-
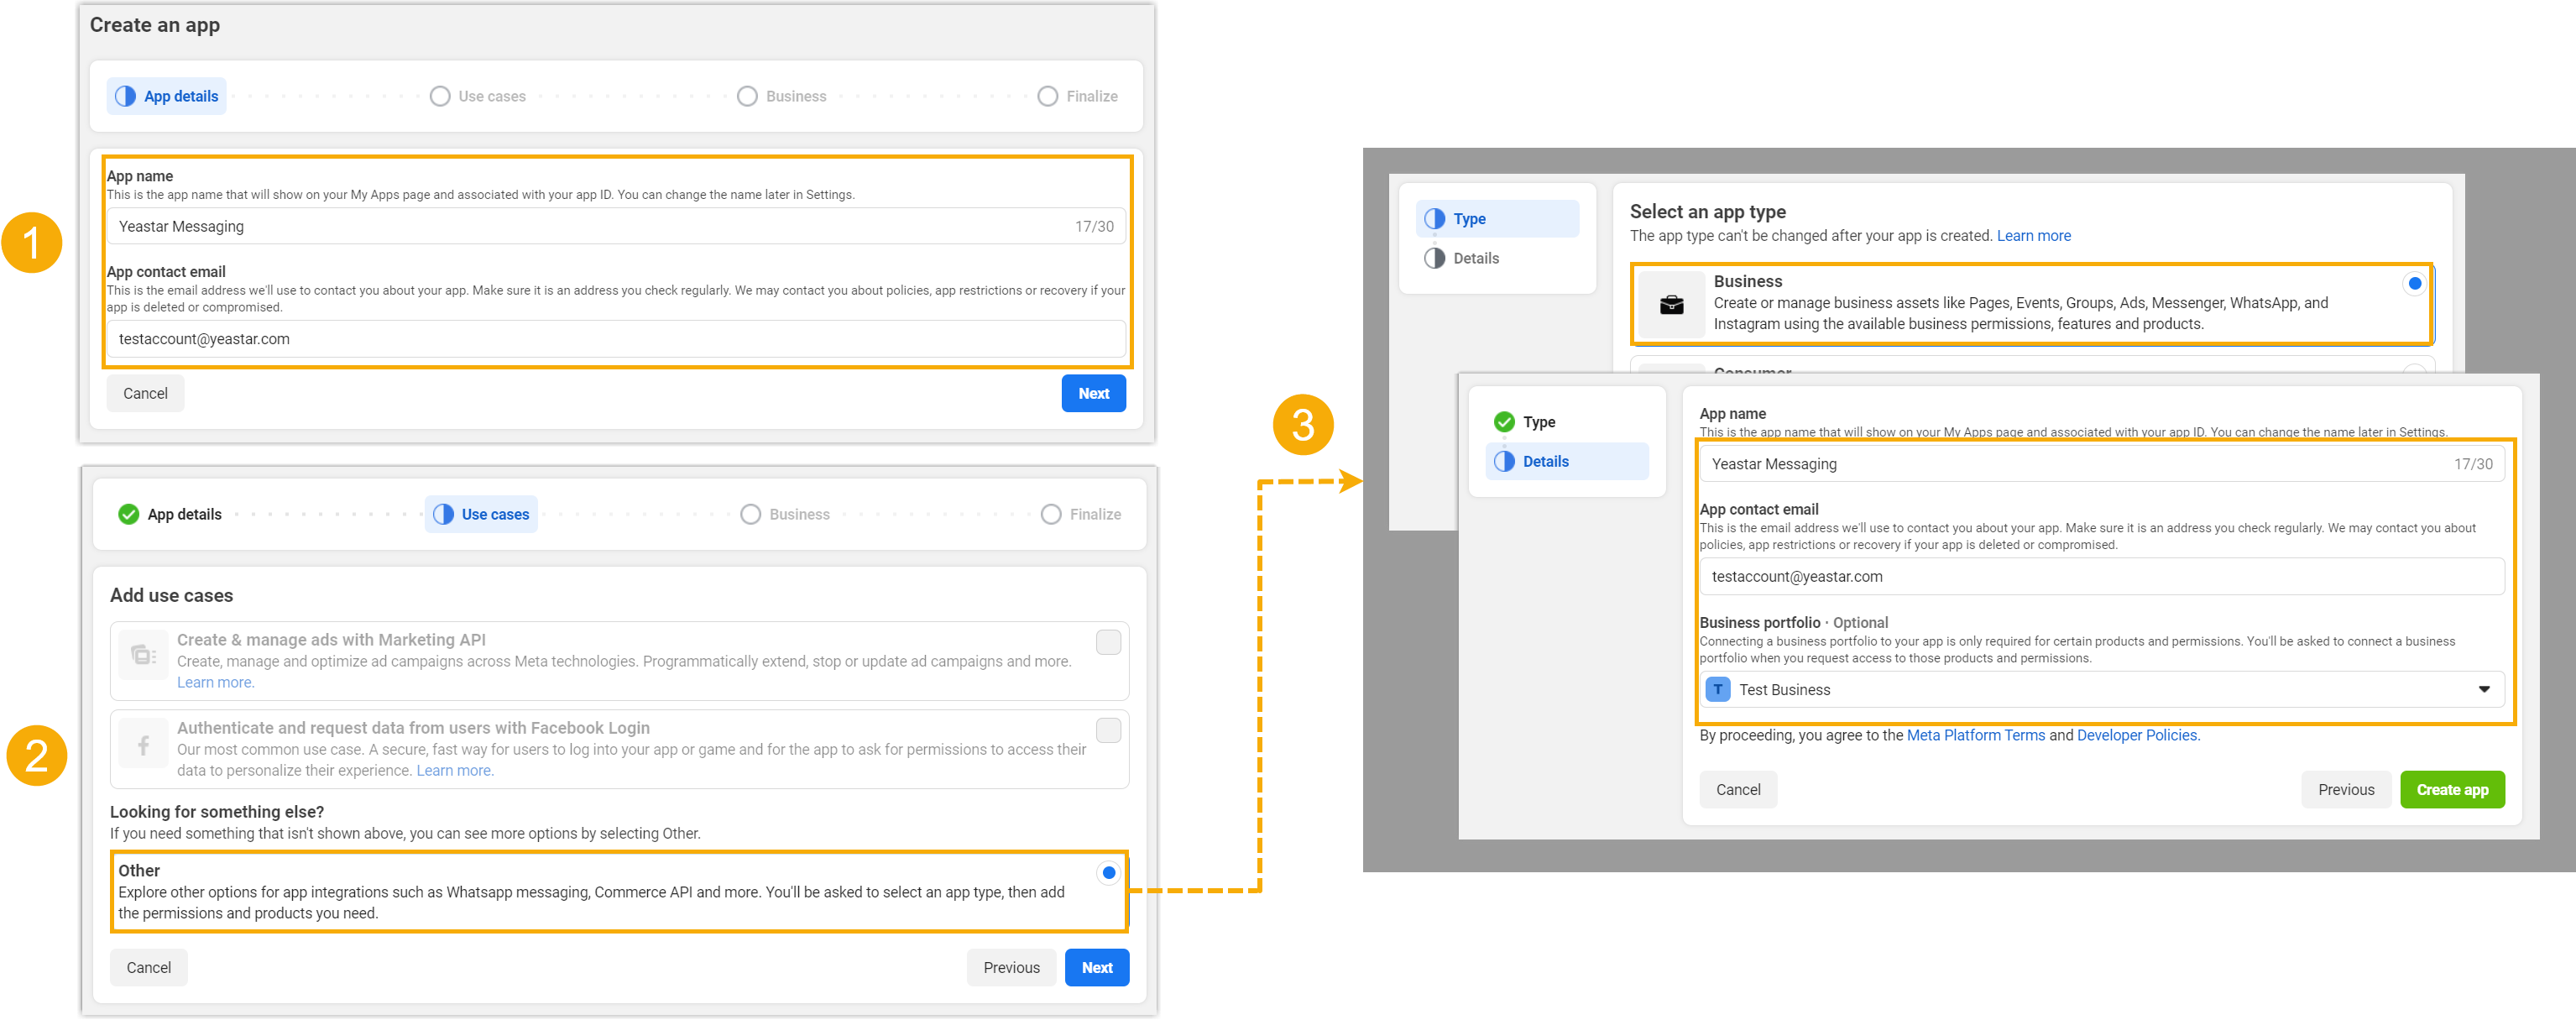
Create an app of the Business type.
-
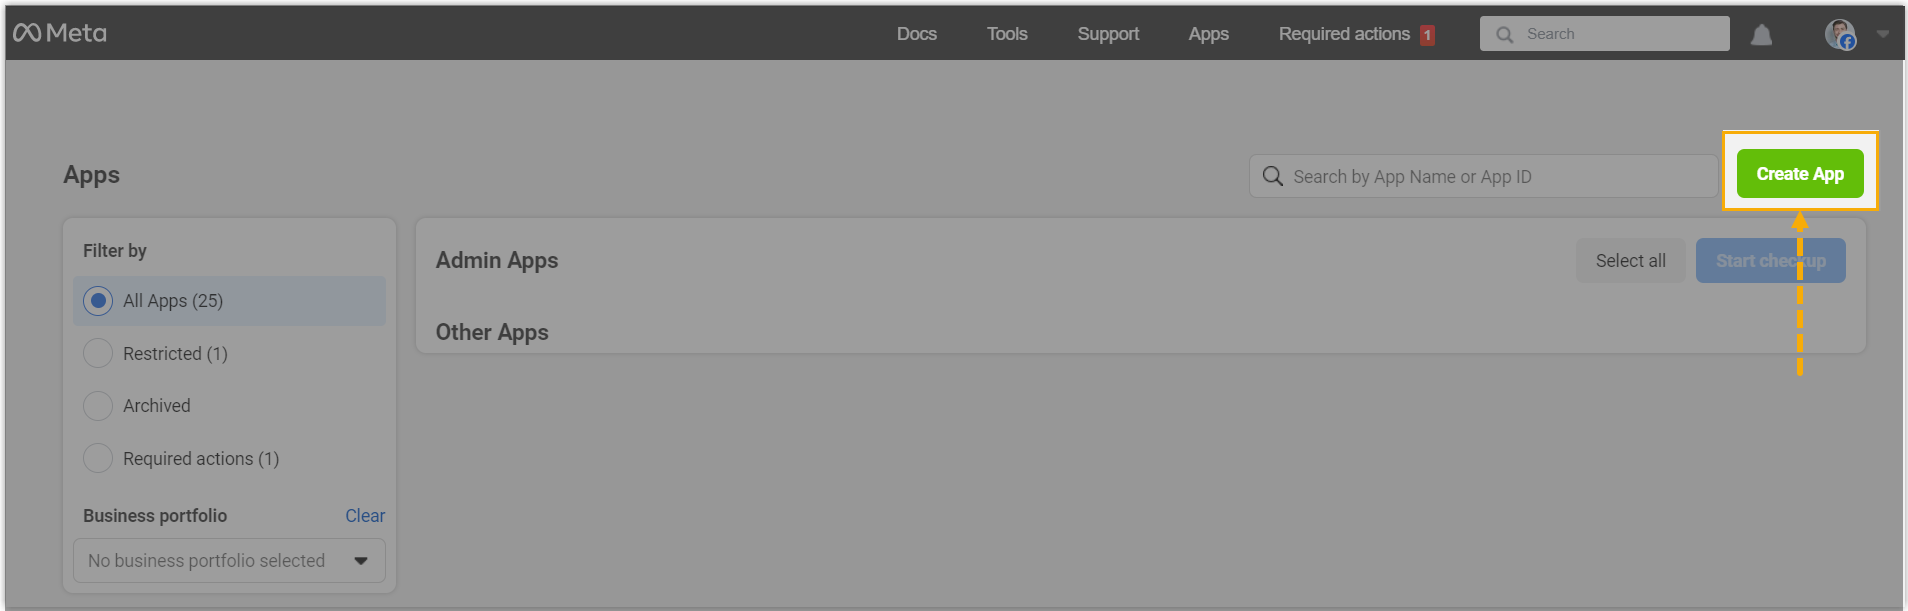
Click Create App.
-
Fill in the app settings. In the Business Portfolio field, choose your Business Account so the app is tied to your business, apps that require advanced access for permissions must be linked to a verified business entity.
-
-
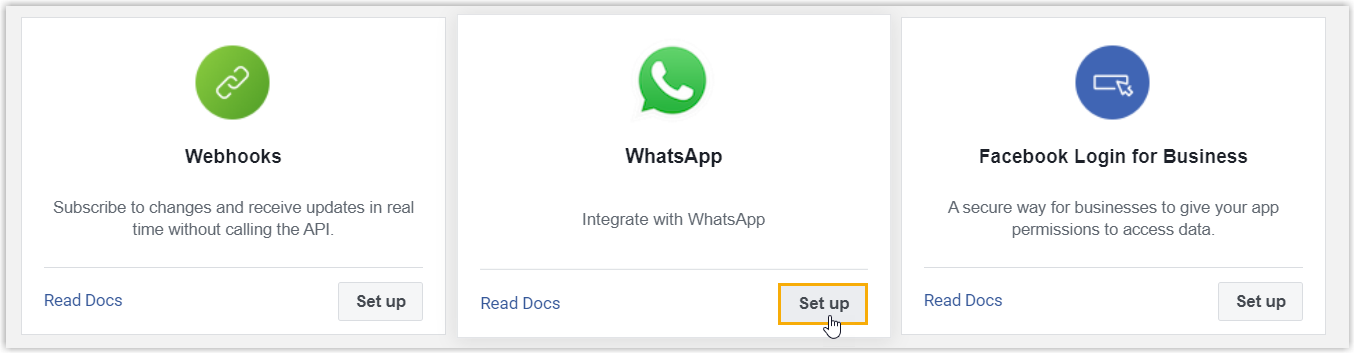
On the Add products to your app page, scroll to WhatsApp and click Set up. You are taken to the WhatsApp product’s Quickstart page.
-
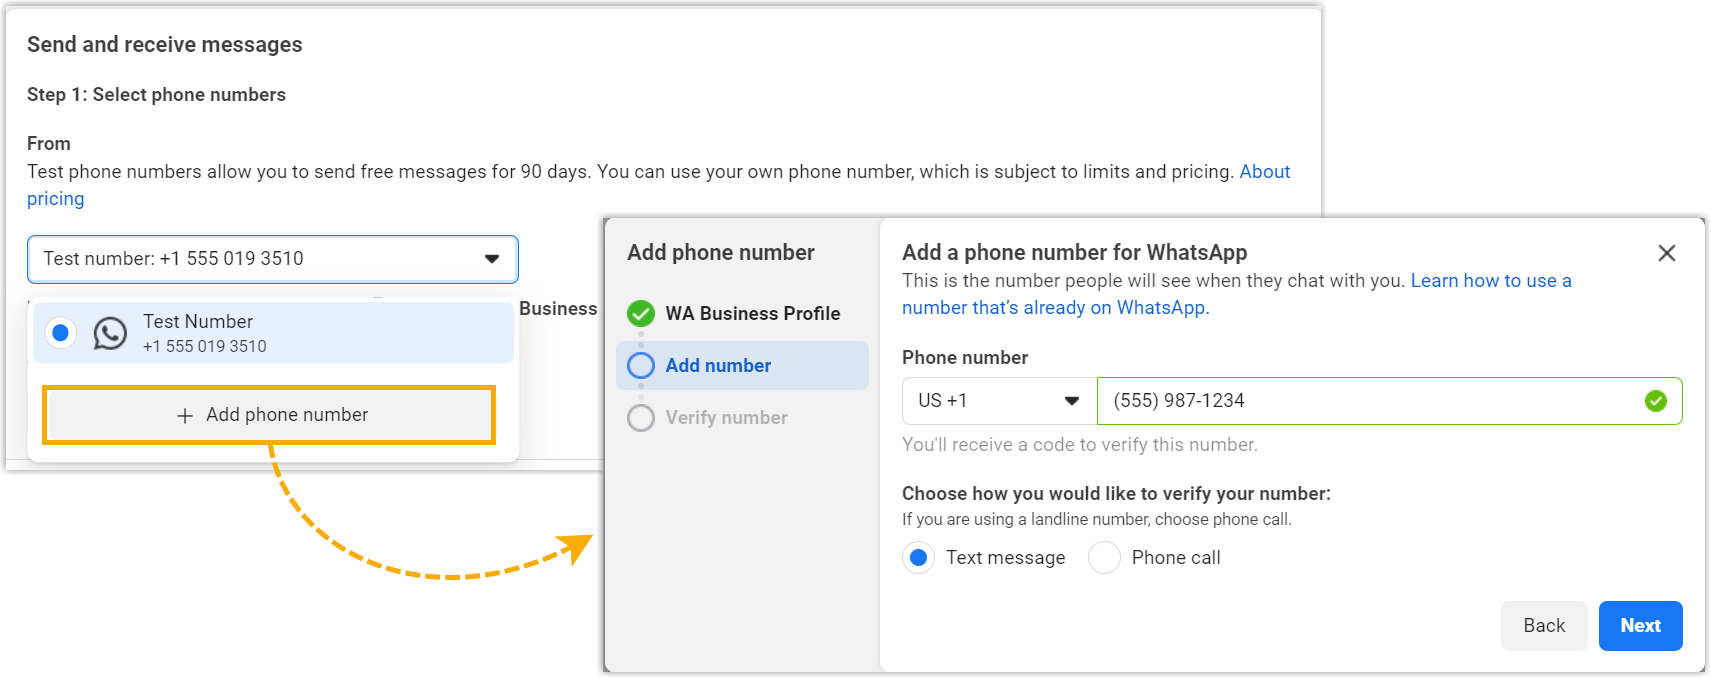
In the left navigation pane, go to WhatsApp > API Setup > Send and receive messages, then do the following:
-
From the From drop-down list, click Add phone number and add your WhatsApp phone number for messaging.
-
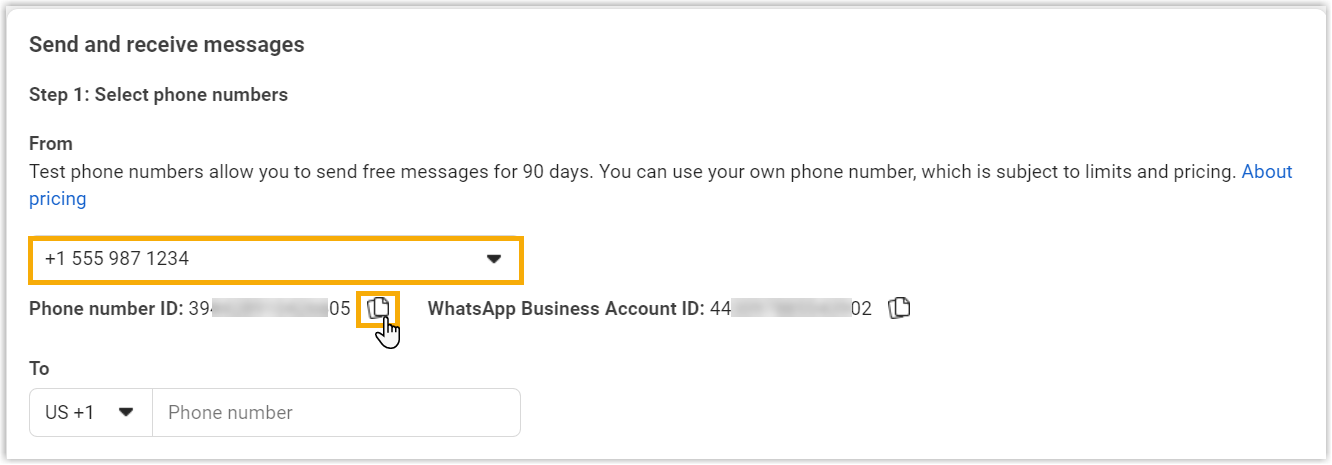
Select the added number in the list and note its Phone number ID: you will need it on the PBX.
-
-
In the left navigation pane, go to App settings > Basic and note the App secret. You will need it on the PBX later.

Step 2. Collect credentials on the Meta Business Suite portal
Section titled “Step 2. Collect credentials on the Meta Business Suite portal”On the Meta Business Suite portal, create a system user, grant it access to the Meta app from Step 1, and generate an access token for it. You also copy the WhatsApp Business Account ID, which Cloud Voice uses to pull in the account’s message templates.
-
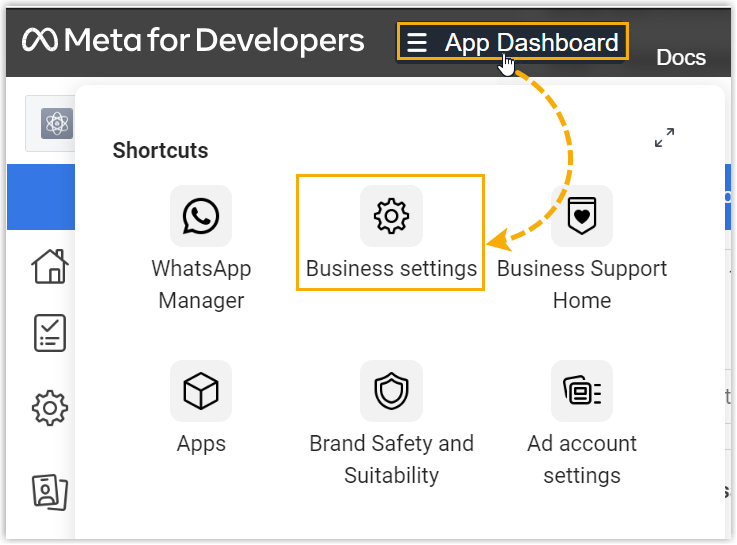
From the top-left corner of the Meta for Developers portal, go to App Dashboard > Business settings. You are redirected to the Business settings page of the Meta Business Suite portal.
-
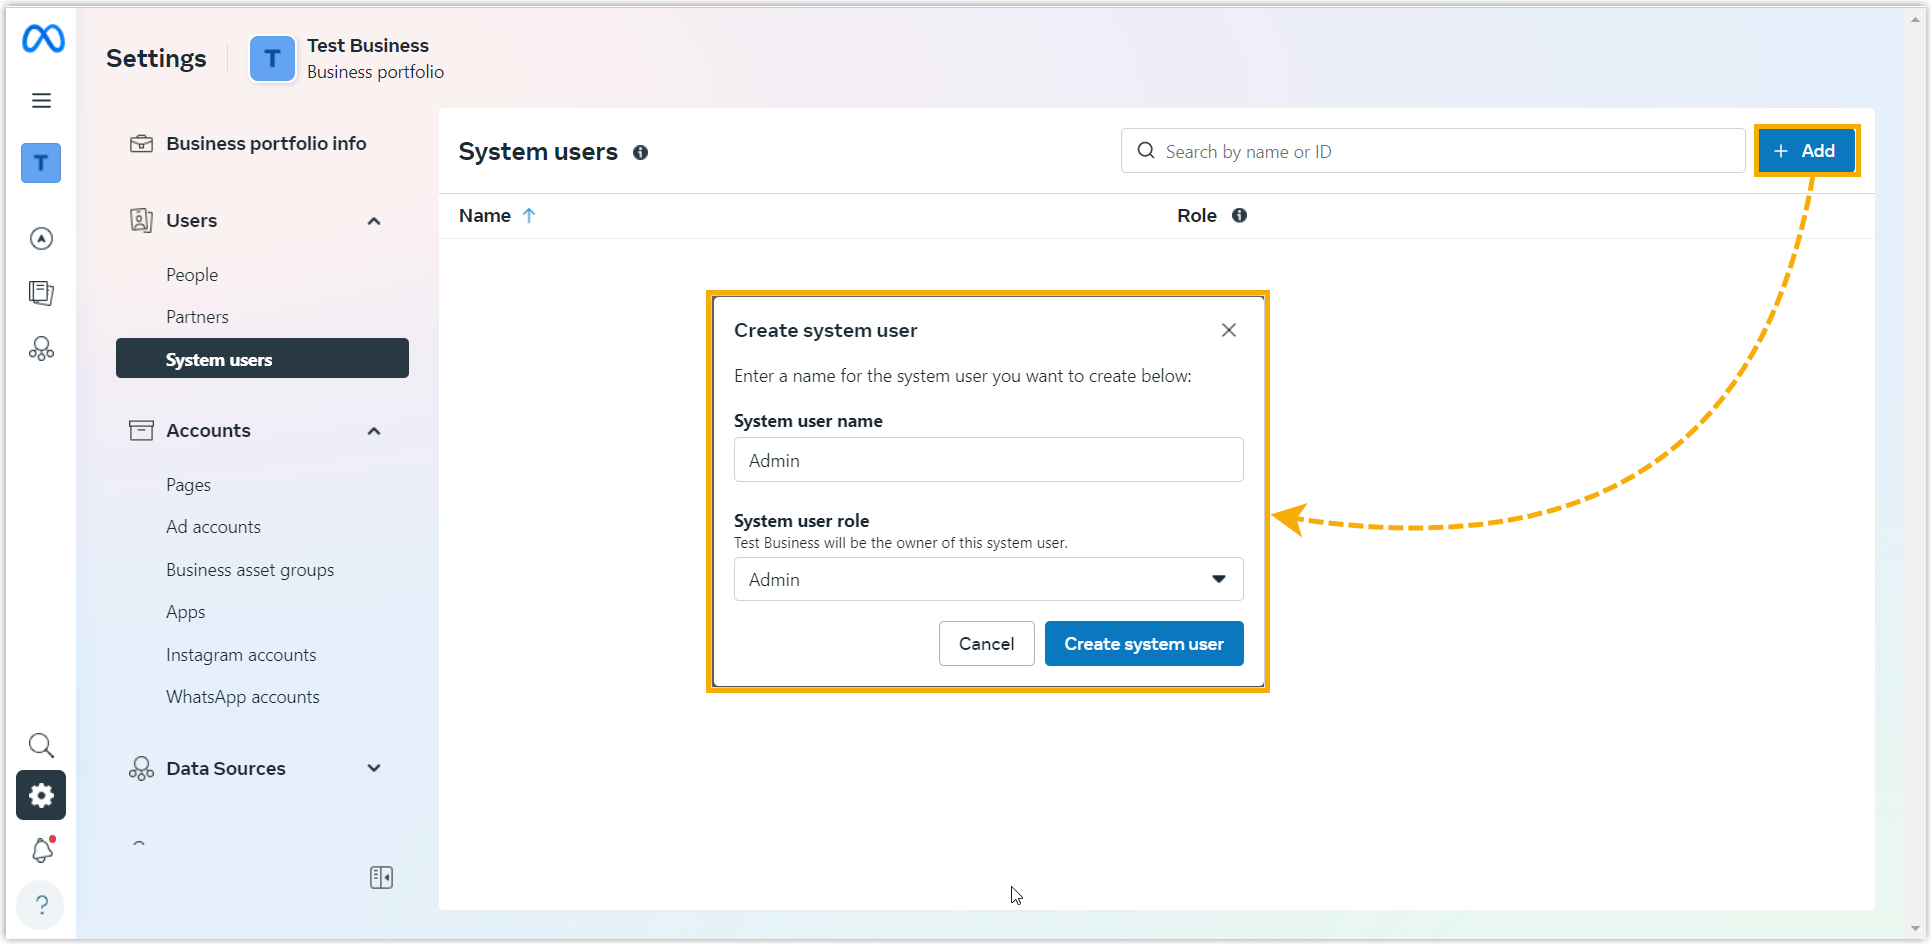
Go to Users > System users and create a system user with app permissions.
-
Click Add and create a system user with the Admin role.
-
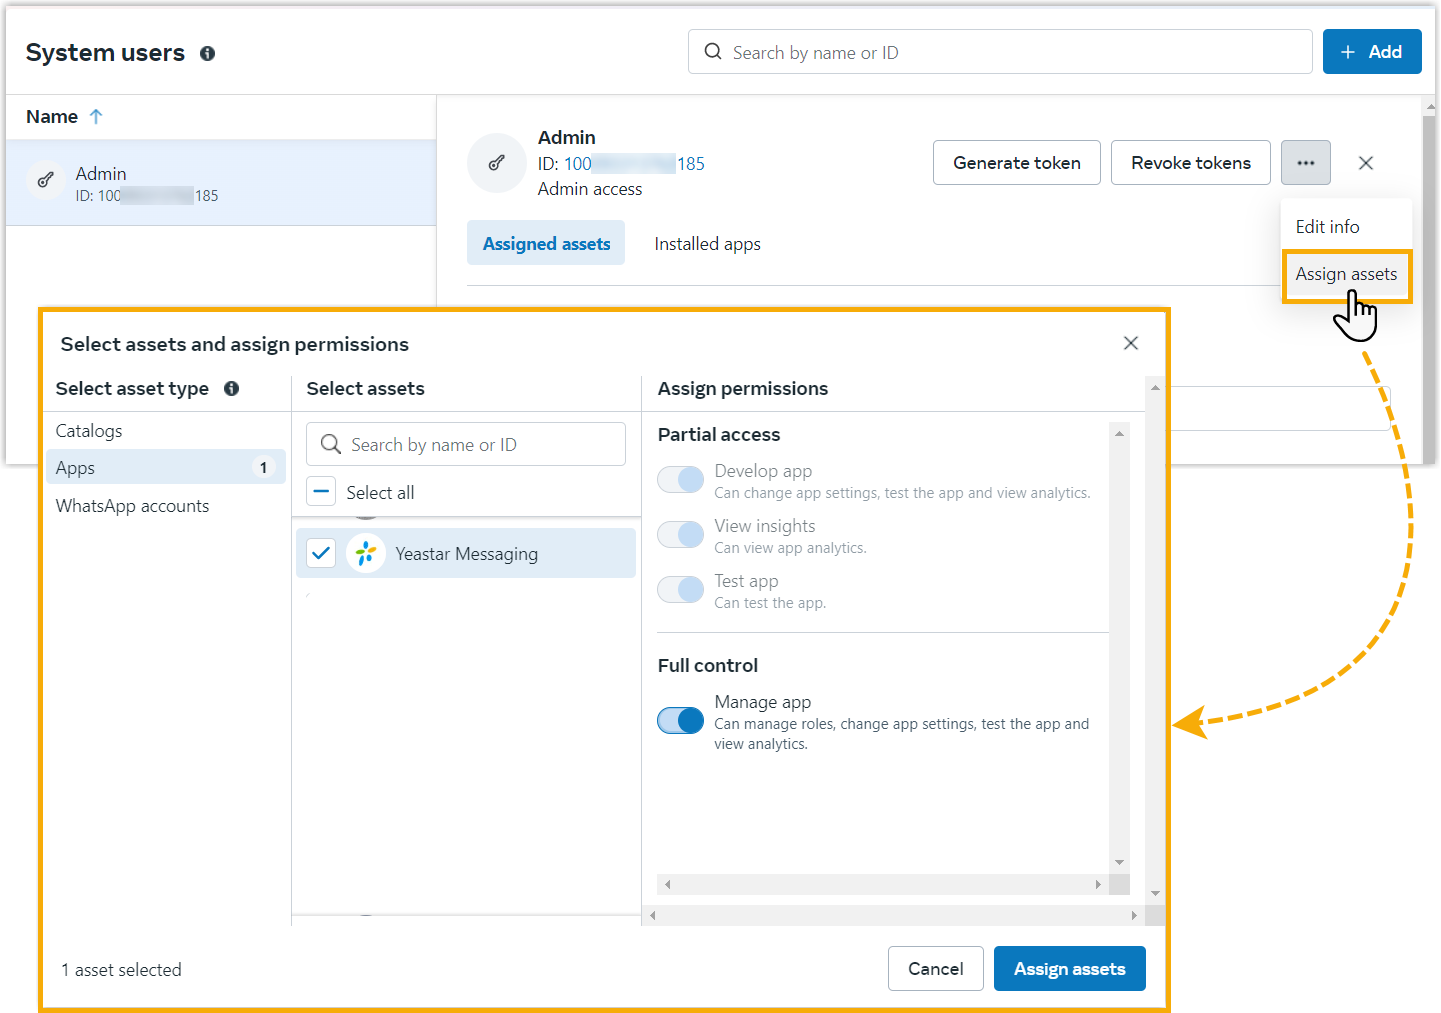
Select the new user, click Add assets, and grant the user full control of the app.
-
-
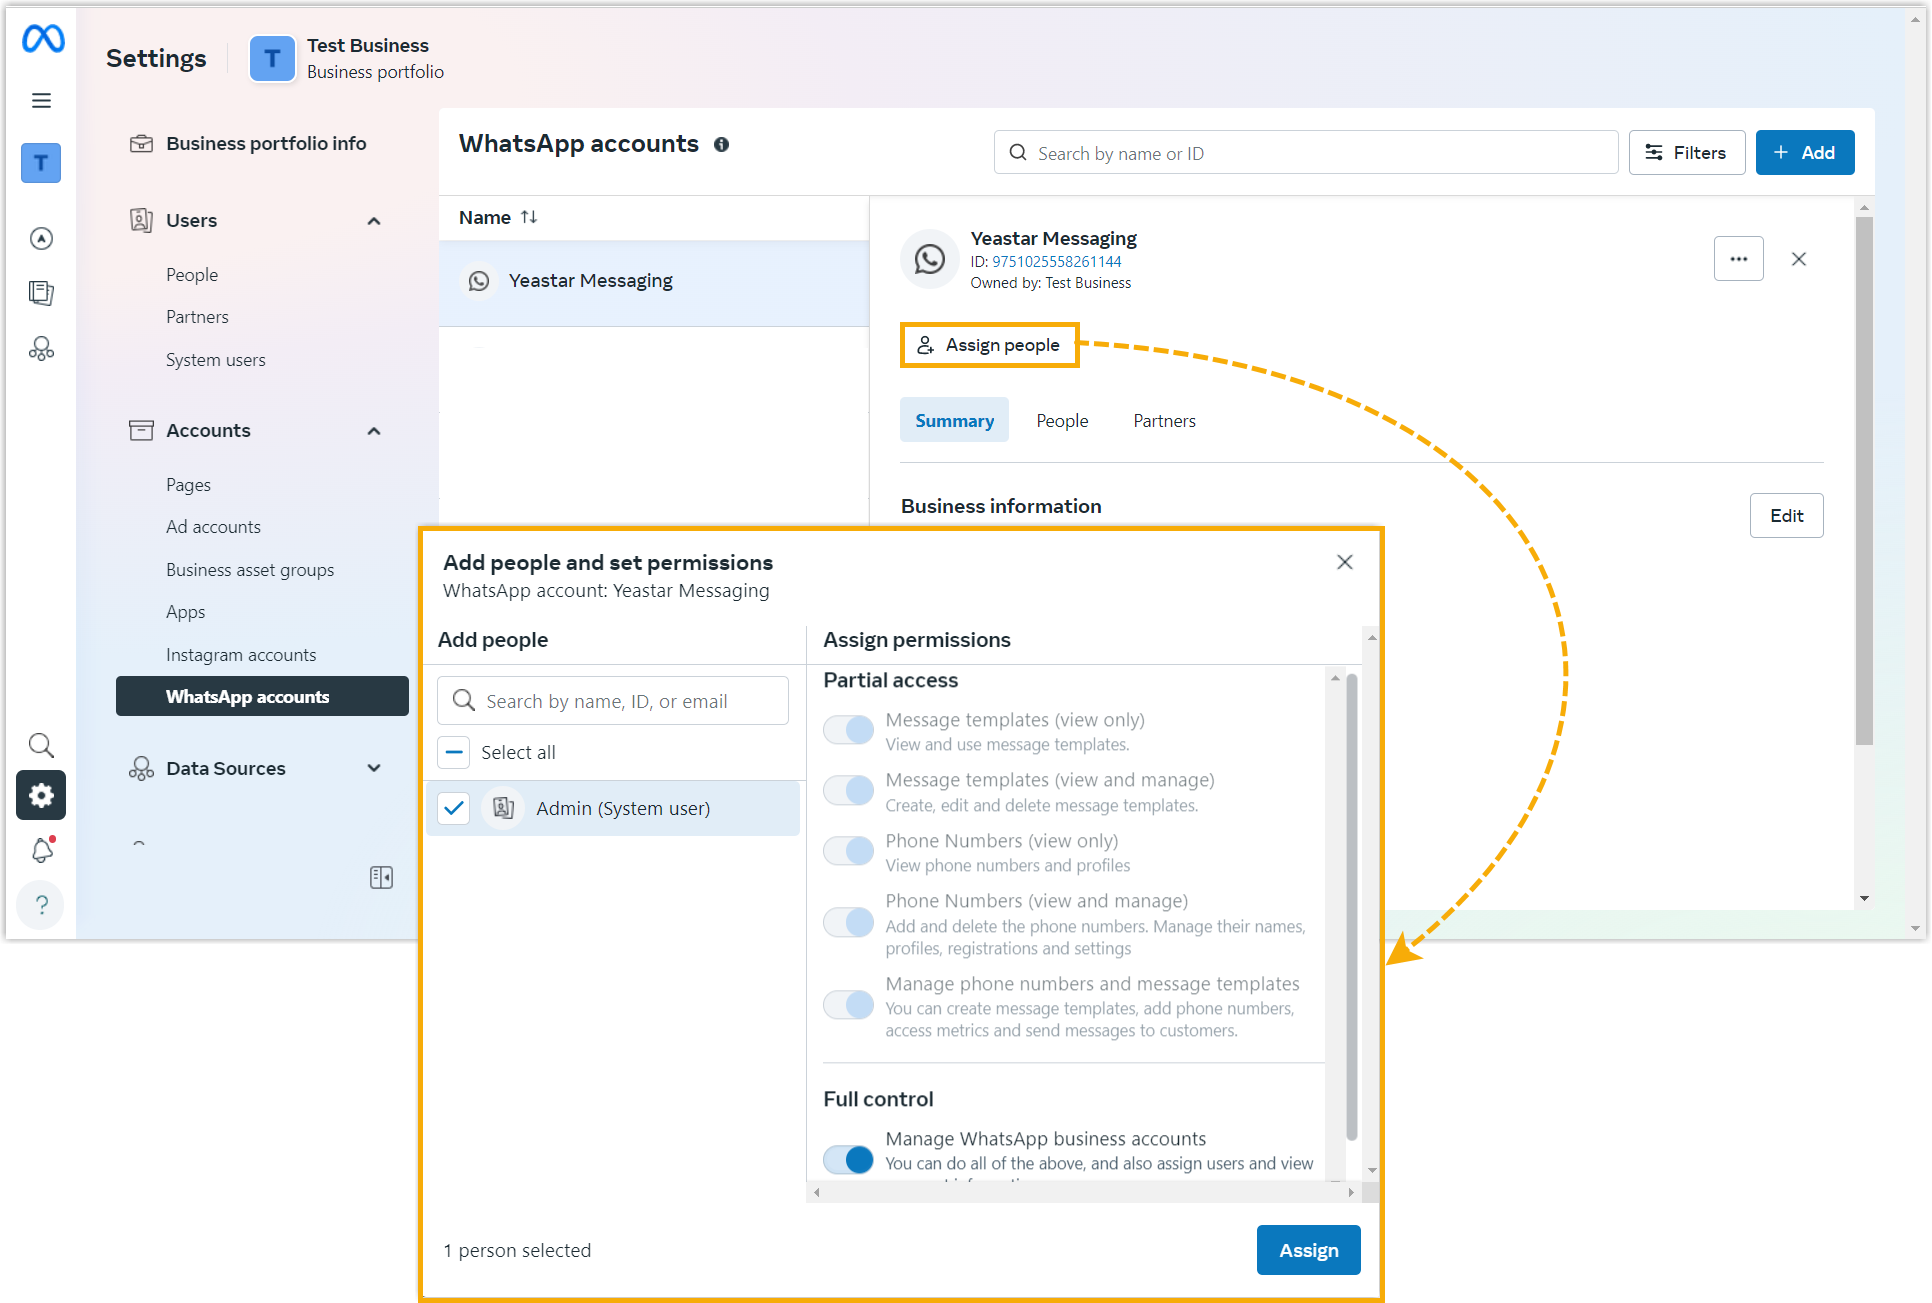
Go to Accounts > WhatsApp Accounts, add the system user to your WhatsApp Business account, and grant full control.
-
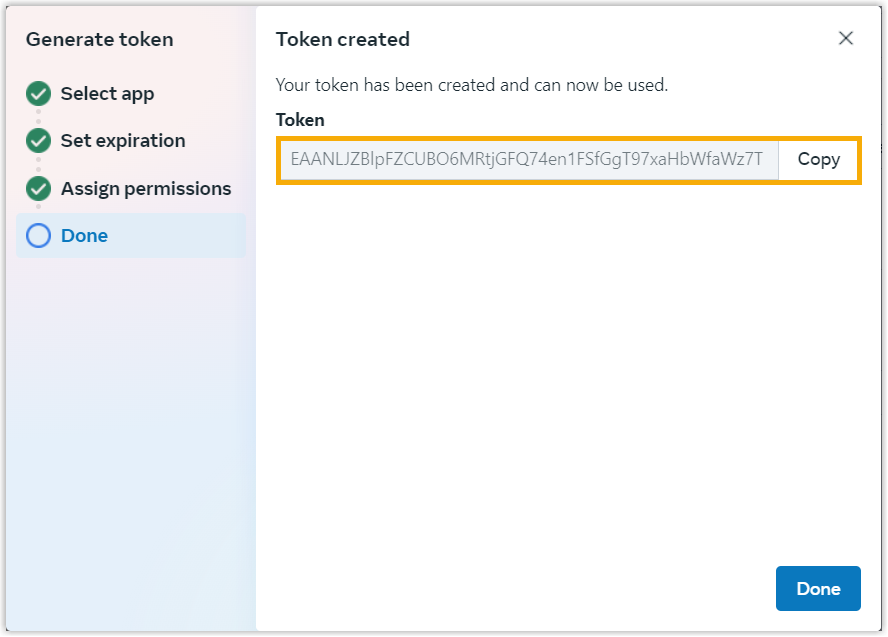
Return to Users > System users and generate an access token with the
whatsapp_business_messagingandwhatsapp_business_managementpermissions enabled.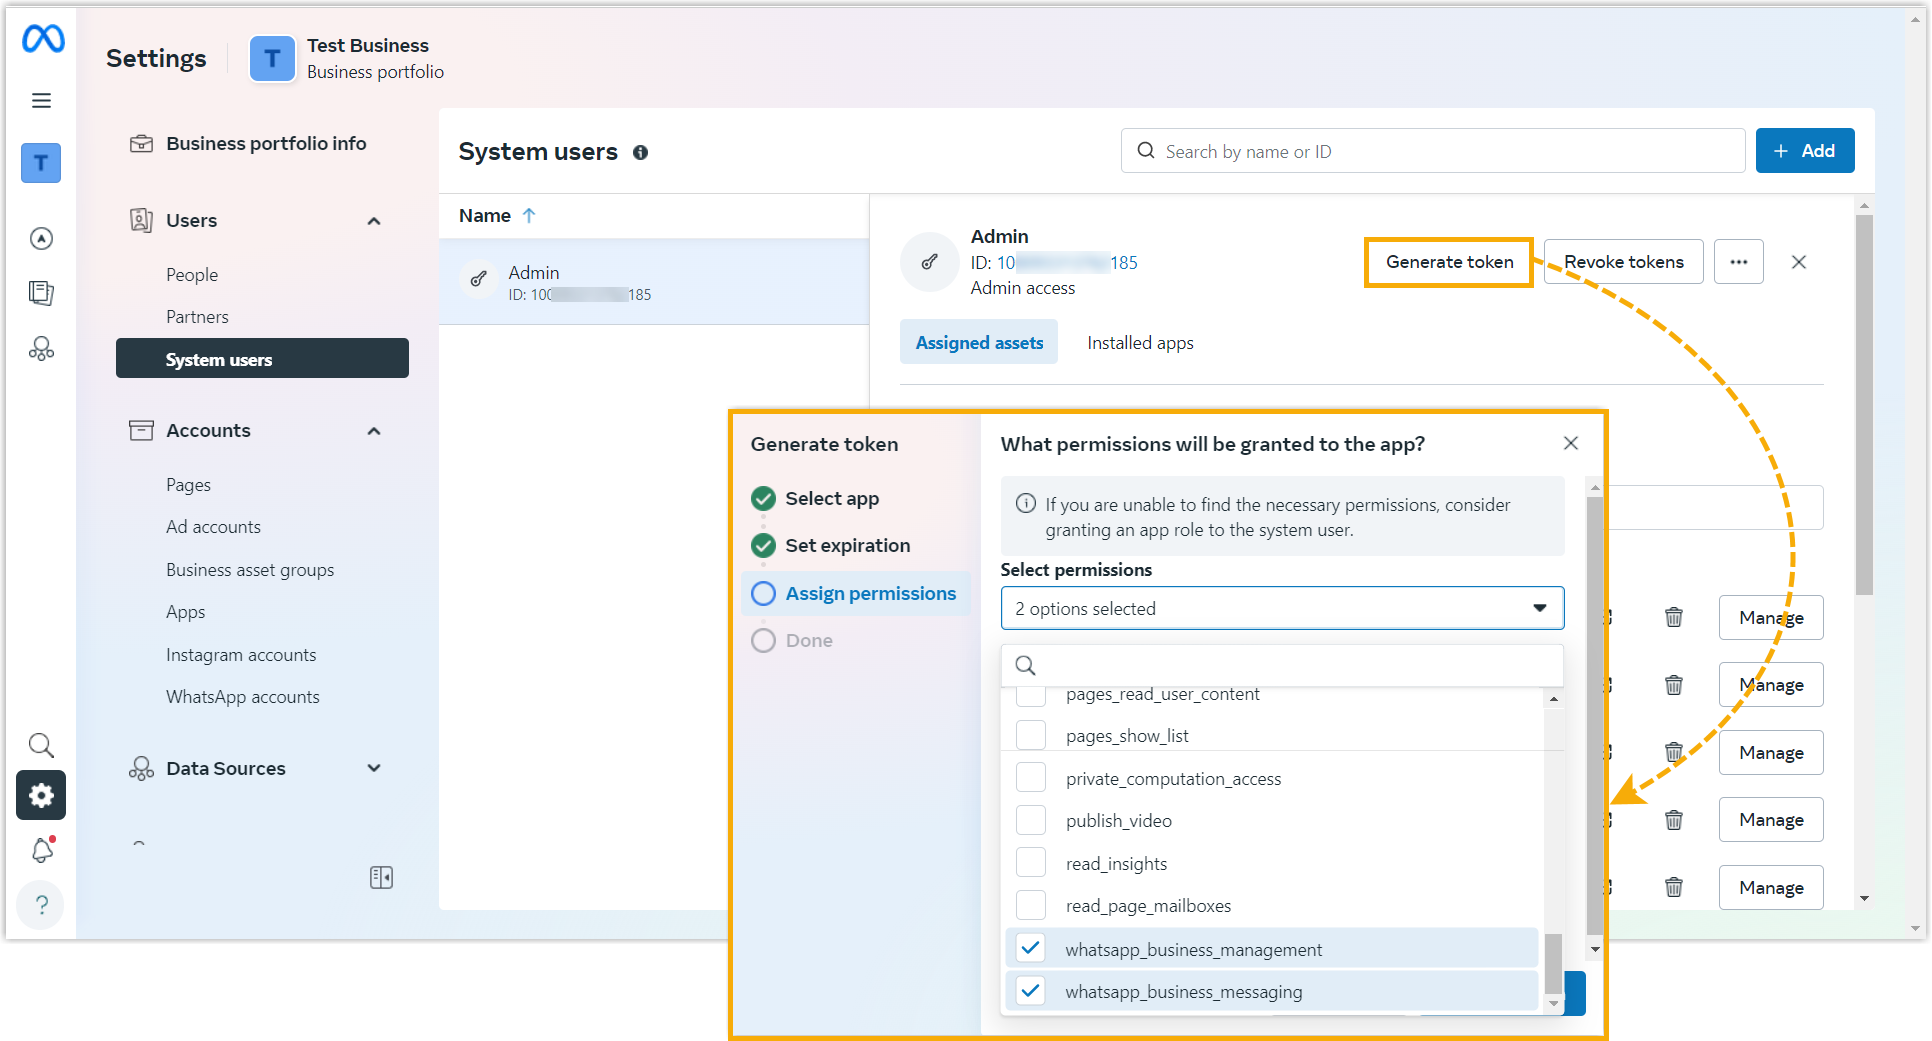
The generated token appears in a pop-up window.
-
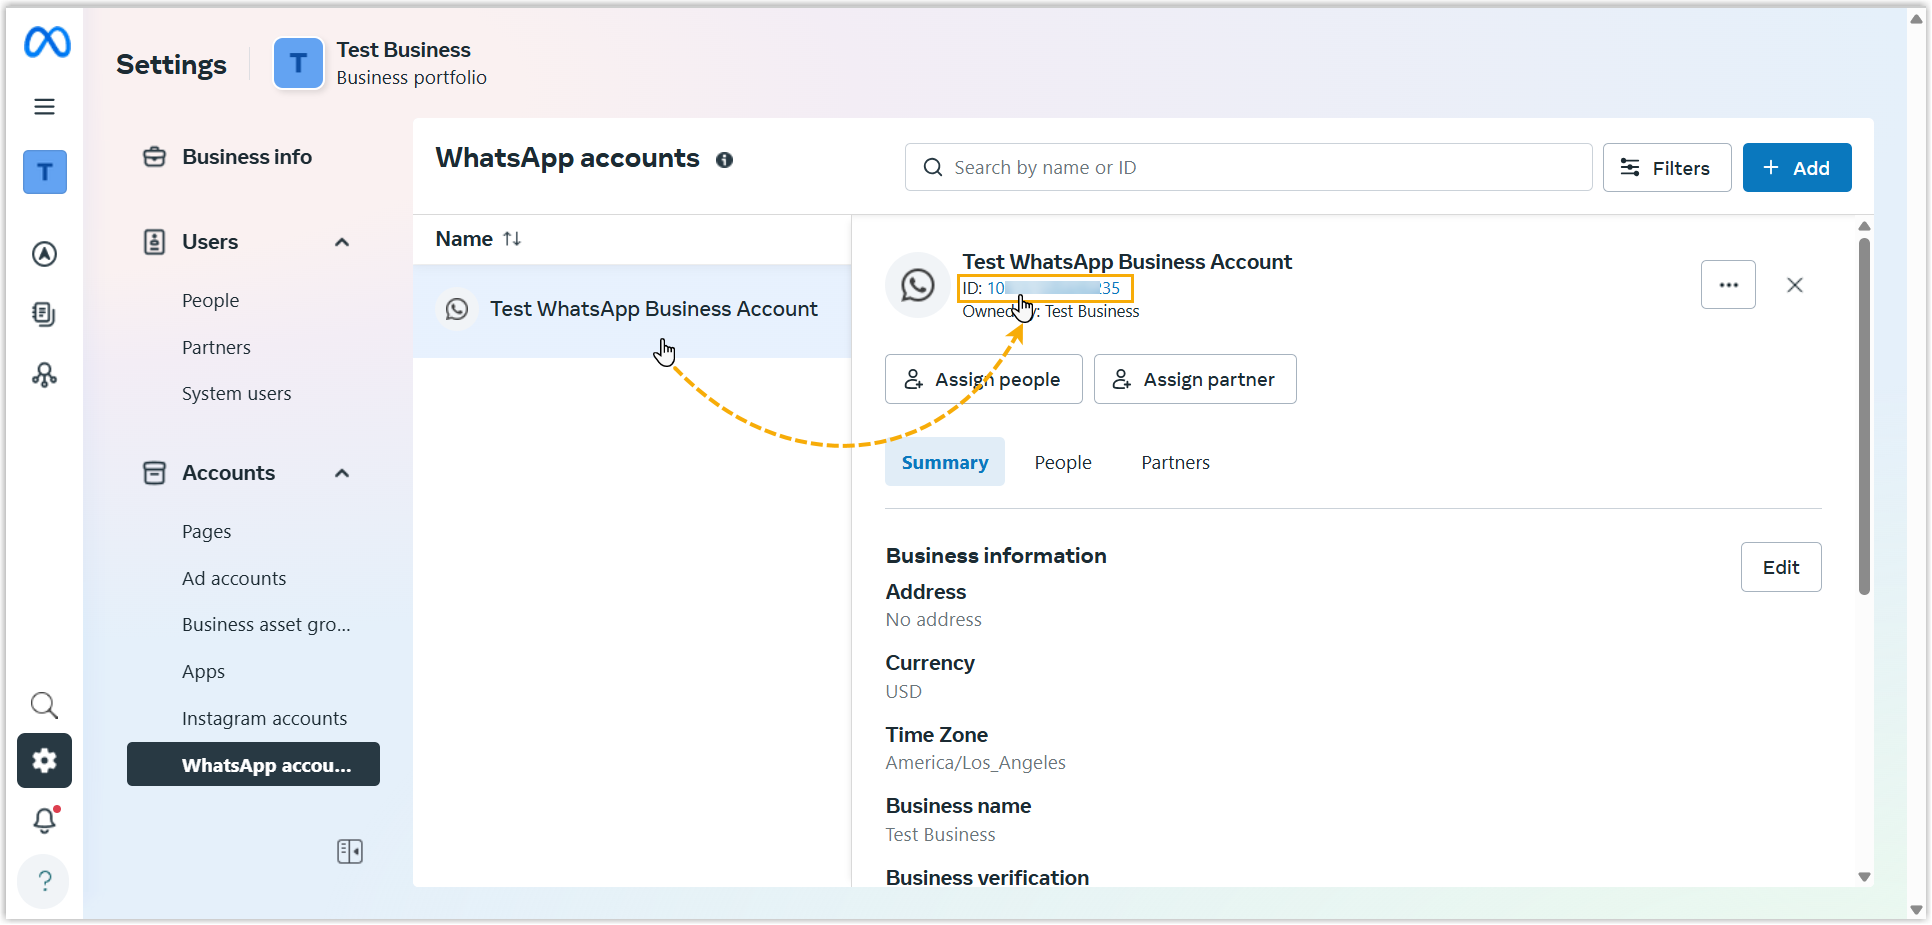
Go to Accounts > WhatsApp accounts, open your WhatsApp Business Account, and copy the account ID.
Step 3. Create and configure the channel on Cloud Voice
Section titled “Step 3. Create and configure the channel on Cloud Voice”Create a WhatsApp channel on the PBX and populate it with the values you gathered in the previous steps so Cloud Voice can connect to WhatsApp for messaging.
-
Sign in to the PBX web portal and go to Messaging > Message Channel.
-
Click Add and select WhatsApp.
-
On the Authentication tab, enter the WhatsApp authentication details.
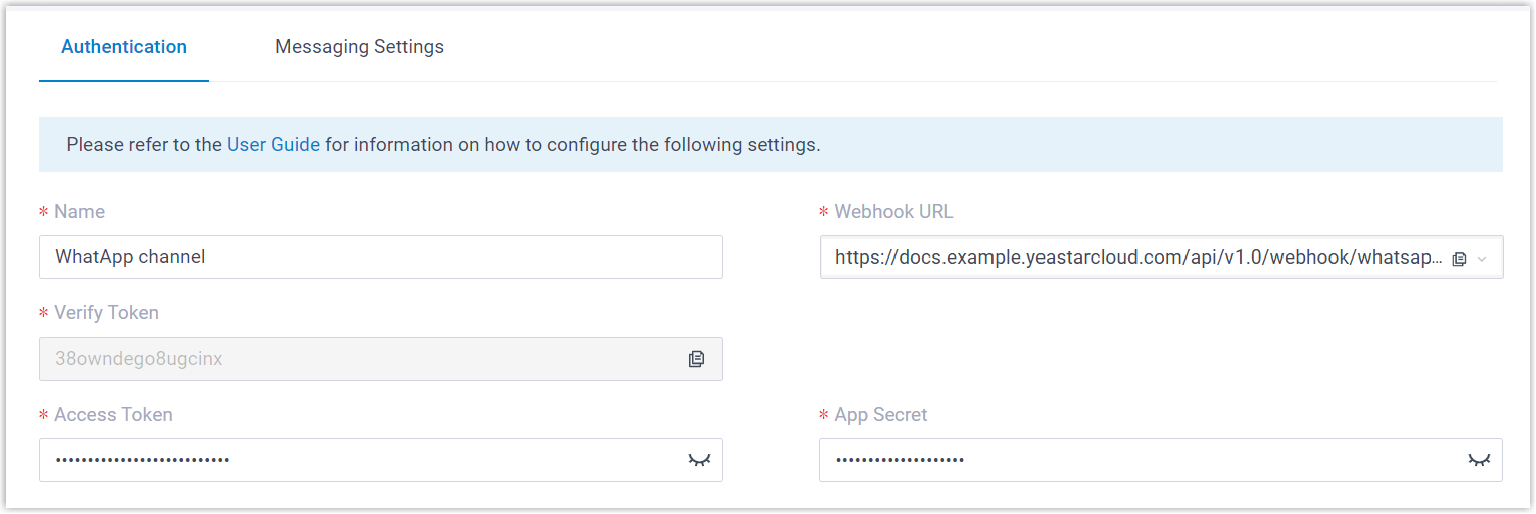
- Name: A name that helps you identify the channel.
- Webhook URL: Note this value down, you will paste it into WhatsApp in Step 4.
- Verify Token: Note this value down, you will paste it into WhatsApp in Step 4.
- Access Token: Paste the access token you generated in Meta Business Suite (Step 2).
- App Secret: Paste the app secret you copied from the Meta for Developers portal (Step 1).
-
On the Messaging Settings tab, configure the channel.
-
Enter the WhatsApp phone number details.

- Phone Number: The WhatsApp phone number in E.164 format (
[+][country code][phone number]), for example+15559871234. - Phone Number ID: The phone number ID you recorded in Step 1.
- Phone Number: The WhatsApp phone number in E.164 format (
-
In the WhatsApp Business Account ID field, paste the account ID you copied in Step 2. The PBX then automatically syncs the message templates tied to that WhatsApp account into the channel.

-
From the Destination for Inbound Messaging drop-down list, choose where inbound messages to this number are routed.

Option Description Extension Choose an extension from the Extension drop-down list. Only that extension user receives inbound messages from the number. Message Queue Choose a queue from the Message Queue drop-down list. Every agent in the queue is notified of new inbound sessions, but once an agent picks up a session, only that agent receives and replies to the follow-up messages in it. Third-Party Message Analytics Platform (Transmitted via API) Inbound messages are automatically forwarded to a third-party message analytics platform over the API (application programming interface, a way for two systems to exchange data automatically) for advanced processing. This requires that your PBX is already integrated with the analytics platform via the API. Once integrated, incoming messages are relayed automatically, you can watch for the New Message Notification API event, and the PBX’s Message API suite is available for deeper interaction. -
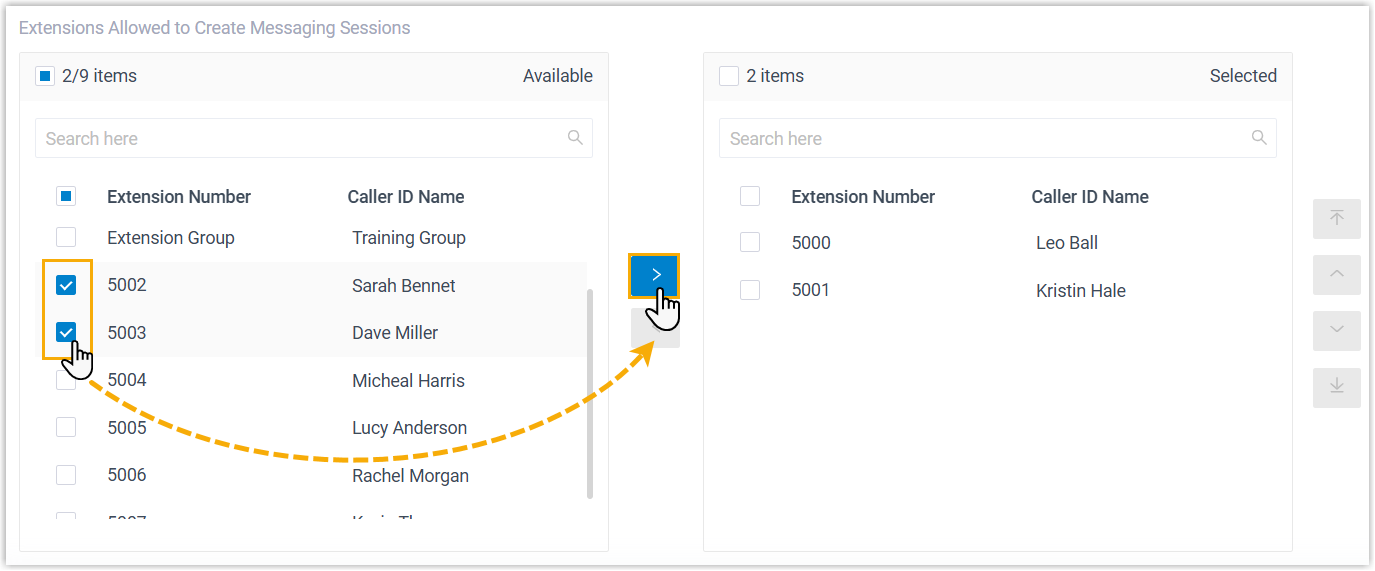
In the Extensions Allowed to Create Messaging Sessions section, select the extensions that may start a messaging session with customers.
-
Configure the session settings as needed.
Setting Description Close Session Automatically To have the system close sessions that have been idle for a set time, select the checkbox and enter the number of days in Session Timeout (Days). Allow the Creation of Duplicate Active Sessions Select the checkbox to permit a new session even when an active session already exists between the same sender and receiver. When an agent tries to create such a session in the Cloud Voice App, a prompt appears; if the agent continues, the existing session is removed from the previous handler’s list and taken over by the new agent, along with the full chat history. 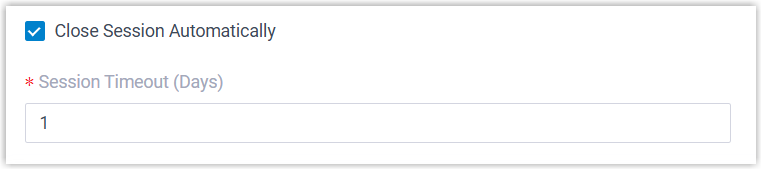
-
-
Click Save.
Step 4. Configure the webhook in the Meta app
Section titled “Step 4. Configure the webhook in the Meta app”Set up a webhook for your Meta app so it delivers real-time message events, allowing the PBX to process incoming WhatsApp messages.
-
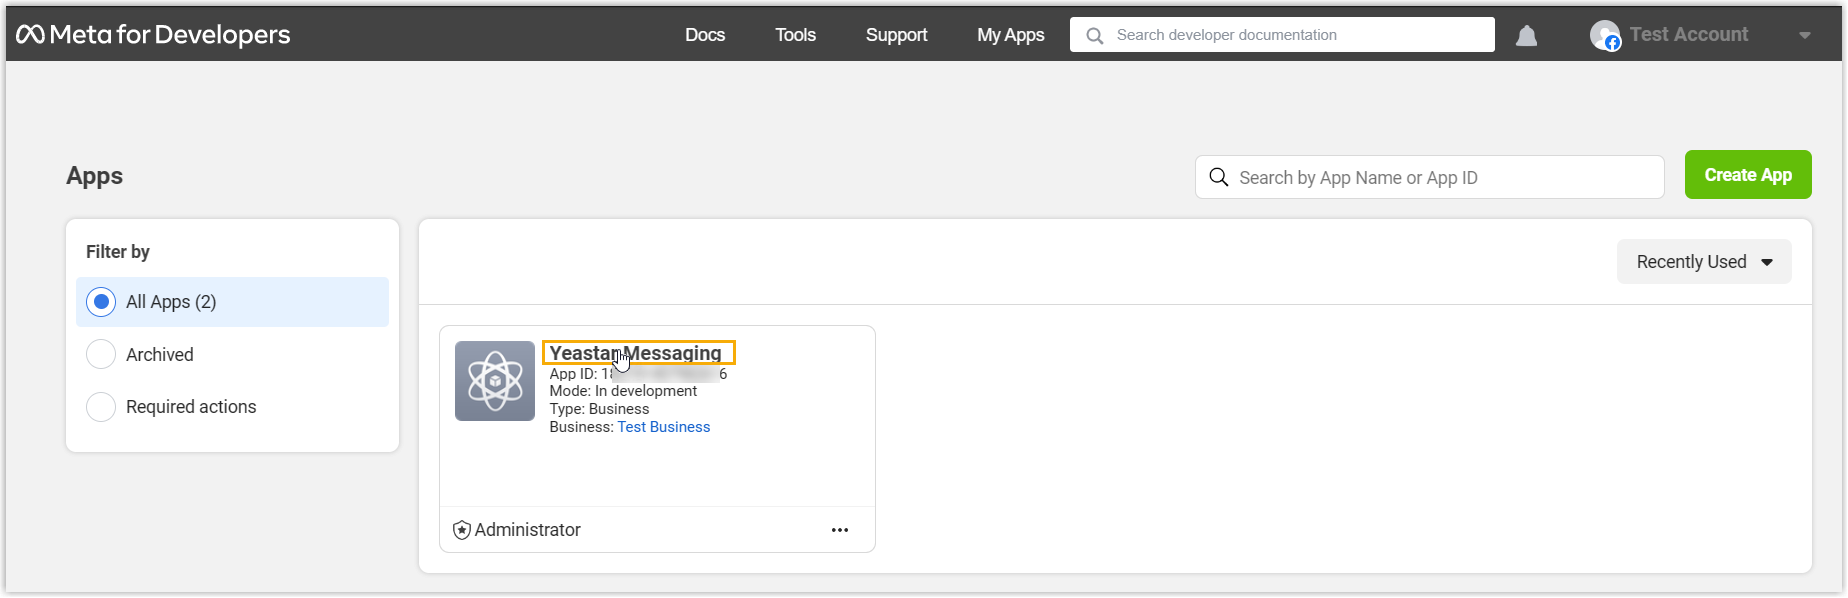
Sign in to the Meta for Developers portal with your Meta Developer account and open My Apps from the top menu.
-
Click your app to open its details page.
-
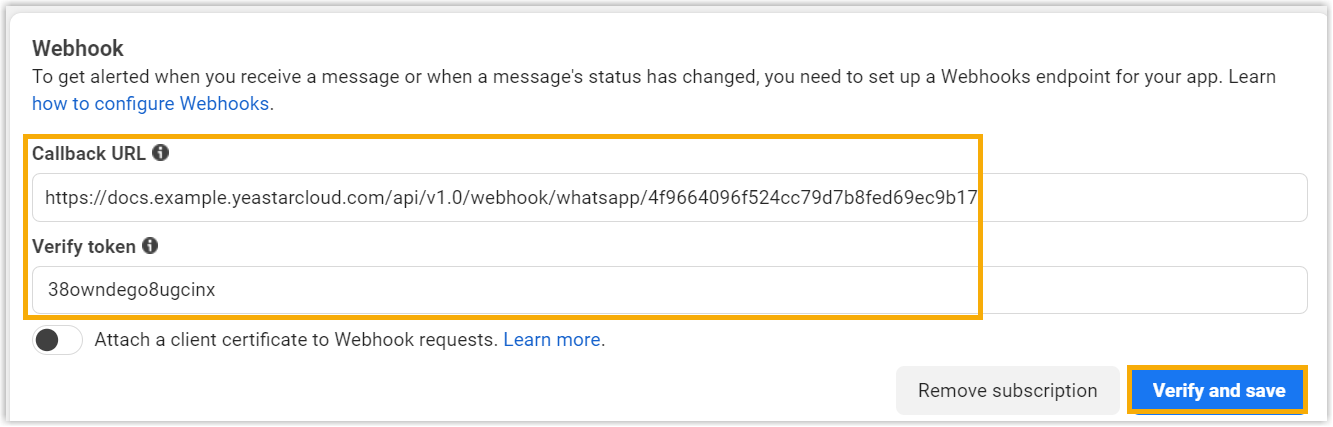
Go to WhatsApp > Configuration to set the messaging webhook and subscribe to the webhook field so the PBX is notified when WhatsApp messages arrive.
-
Paste the Webhook URL and Verify Token you noted from the PBX in Step 3.
-
In the Webhook fields section, subscribe to the messages field.

-
Result
Section titled “Result”-
The channel’s Status shows a green indicator, confirming that the WhatsApp channel was created successfully.

-
The PBX automatically counts the messages sent and received on the channel. The Total column shows all sent messages, including both successful and failed ones.

What to do next
Section titled “What to do next”Send a text message to the WhatsApp number and confirm that the assigned agent receives it in the Cloud Voice App.
Question about this page?
Ask the AI assistant. It starts from this page, then searches the rest of the docs.
Ask Cloud Voice AI
Answers are AI-generated from the docs and may contain mistakes. Verify with the linked pages.