🔧 Auto Provision Yealink Expansion Module with IZT Cloud Voice
This topic takes Yealink T53W as an example to describe how to provision Yealink expansion module with IZT Cloud Voice, so as to add extra programmable keys.
Requirements
Refer to the table below to learn about the supported Yealink IP phone models for different expansion modules, as well as the required phone provisioning templates.
| Expansion Module | Phone model | Phone provisioning template |
|---|---|---|
| EXP40 | T46S, T48S | YSDP_YealinkT4 (1.1.5 or later) |
| T46G, T48G | YSDP_YealinkT4xG (1.1.4 or later) | |
| EXP43 | T43U, T46U, T48U | YSDP_YealinkT4 (1.1.5 or later) |
| EXP50 | SIP-T53, SIP-T53W, SIP-T54W, SIP-T57W | YSDP_YealinkT5 (1.1.5 or later) |
| SIP-T56A | YSDP_YealinkT56 (1.1.5 or later) | |
| SIP-T58, SIP-T58W | YSDP_YealinkT58 (1.1.5 or later) |
Prerequisites
- The Yealink expansion module is connected to a Yealink IP phone.
- The Yealink IP phone is connected to IZT Cloud Voice via Auto Provisioning.
Supported methods
Provision function keys for Yealink expansion module via web interface
On PBX web portal, you can easily customize function keys by directly selecting key types from the menu and setting up specific operation for each function key.
📝 Note: IZT Cloud Voice supports to add up to 120 function keys on PBX web portal.
- Add and configure function keys.
- Log in to PBX web portal, go to Extension and Trunk > Extension, edit the desired extension.
- Click Function Keys tab.
- Click Add to add and configure function keys for the expansion module.
📝 Note: Function key settings that exceed the supported programmable keys of the IP phone will be automatically applied to the connected expansion module. For example, Yealink T53W supports 21 programmable keys, then the function key settings starting from the 22nd key will take effect on the expansion module.
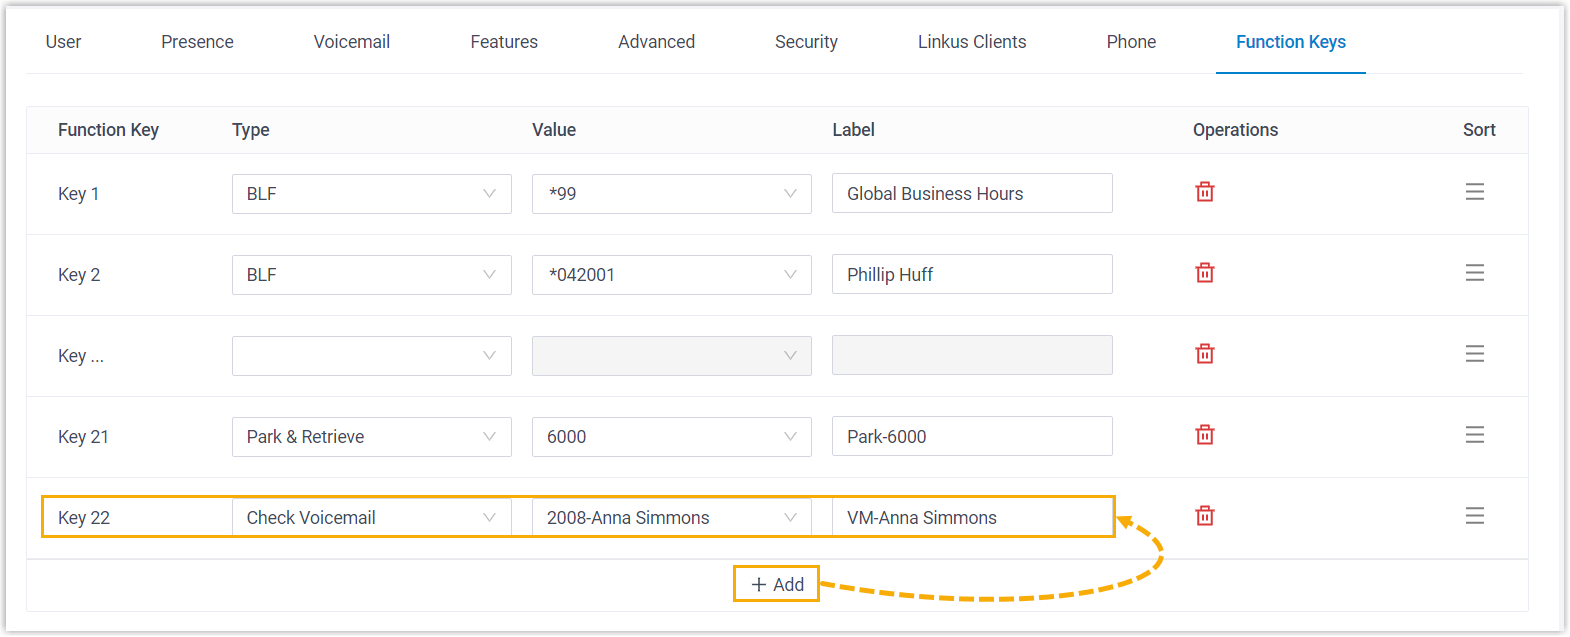
- Type: Select a key type.
- Value: Configure a desired value based on the key type.
- Label: Optional. Enter a label, which will be displayed on the LCD screen.
-
Click Save.
-
Reprovision the IP phone.
-
On PBX web portal, go to Auto Provisioning > Phones.
-
Click beside the phone.
-
In the pop-up window, click OK.

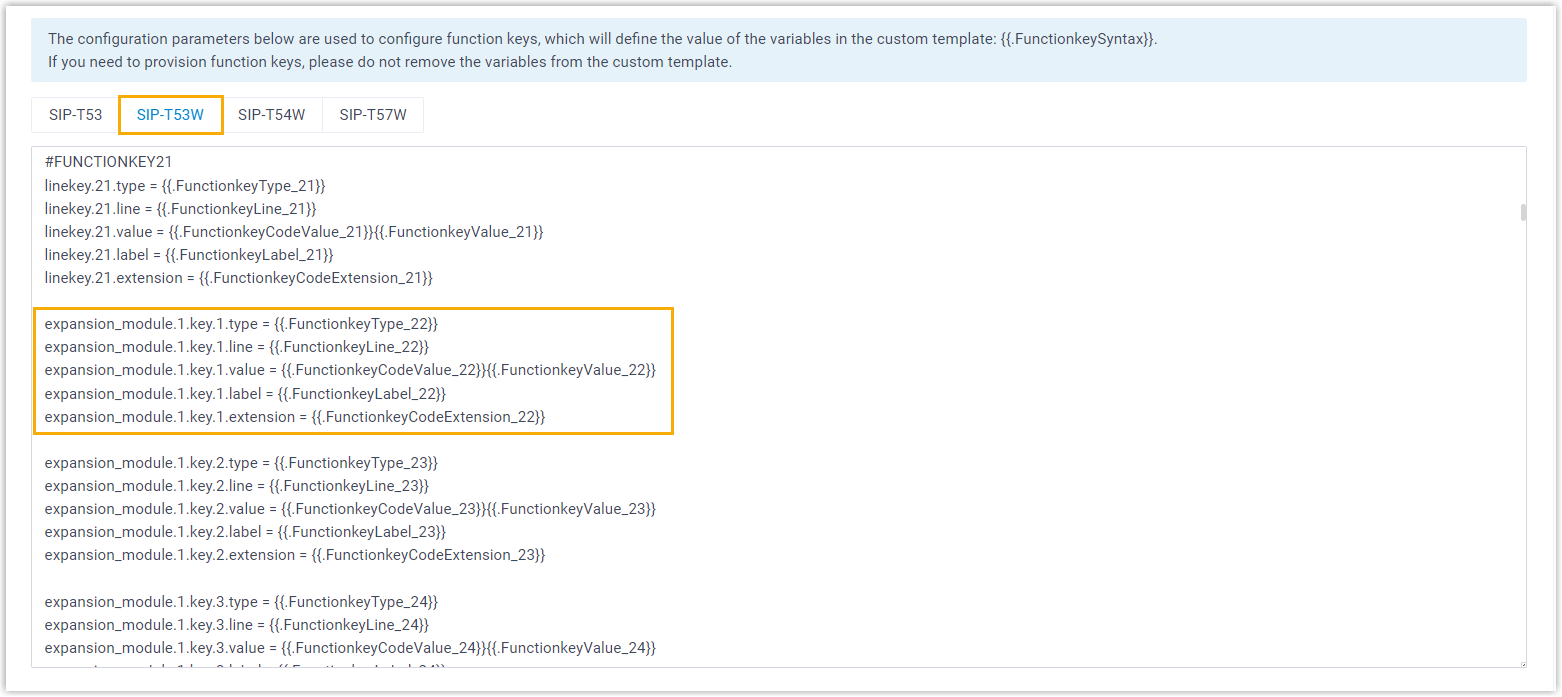
Provision function keys for Yealink expansion module using auto provisioning template
If you are familiar with the configuration parameters of IP phone, you can bulk configure function keys in a template file, via which the function key settings will be applied on the phone and expansion module automatically, thus saving time and effort.
⚠️ Important: As custom auto provisioning template is created based on the default phone provisioning template, make sure that you have updated the default template of the desired phone model to the required version on PBX (Path: Auto Provisioning > Resource Repository > Default Templates).
- Create a custom auto provisioning template.
- Log in to PBX web portal, go to Auto Provisioning > Resource Repository > Custom Templates.
- Click Add.
- In the Basic section, set the basic information.
- Template Name: Enter a name to help you identify the template.
- Source Default Template: Search and select the default template of the phone model. In this example, select YSDP_YealinkT5.
- Template Type: Select Advanced.
- Remark: Optional. Add a note for the template.
- Optional: In the Preference, Distinctive Ringtone, Codecs, and LDAP Directory sections, configure the settings according to your needs.
- In the second text box of the Customize Configuration Parameters in Text section, select the specific phone model, then refer to specific IP phone's configuration parameter explanations to add function key settings for the expansion module.
📝 Note: Function key settings that exceed the supported programmable keys of the IP phone will be automatically applied to the connected expansion module. For example, Yealink T53W supports 21 programmable keys, then the function key settings starting from the 22nd key will take effect on the expansion module.
-
Apply the template to the phone.
-
On PBX web portal, go to Auto Provisioning > Phones, edit the desired phone.
-
In the Options section, select the template from the Template drop-down list.
-
Click Save.
-
Reprovision the IP phone.
-
On PBX web portal, go to Auto Provisioning > Phones.
-
Click beside the phone.
-
In the pop-up window, click OK.